|
|
| Line 240: |
Line 240: |
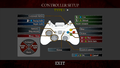
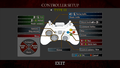
| | ===[https://community.pcgamingwiki.com/files/file/612-resident-evil-4-ultimate-hd-edition-playstation-buttons/ DualShock Button Prompts]=== | | ===[https://community.pcgamingwiki.com/files/file/612-resident-evil-4-ultimate-hd-edition-playstation-buttons/ DualShock Button Prompts]=== |
| | {{ii}} This mod adds PlayStation buttons. [http://residentevilmodding.boards.net/thread/978/darksamuss-ps-xbox-button-mods Original post here]. | | {{ii}} This mod adds PlayStation buttons. [http://residentevilmodding.boards.net/thread/978/darksamuss-ps-xbox-button-mods Original post here]. |
| | + | {{--}} Not compatible with [https://www.re4hd.com/ Resident Evil 4 HD Project] |
| | {{--}} Even though game does support DirectInput and button rebinding, game will show wrong buttons mixed with generic button prompts with [[Controller:DualShock 4|DualShock 4]]. Use of an XInput wrapper is required. | | {{--}} Even though game does support DirectInput and button rebinding, game will show wrong buttons mixed with generic button prompts with [[Controller:DualShock 4|DualShock 4]]. Use of an XInput wrapper is required. |
| | | | |
Revision as of 09:16, 3 February 2022
This page is for the remastered version. For the original 2007 PC port, see Resident Evil 4.
Resident Evil 4 Ultimate HD Edition is a third-person action horror shooter game developed by Capcom and ported by QLOC. It is an updated version of Resident Evil 4.
The Ultimate HD Edition of Resident Evil 4 was developed in response to the poor quality of the initial 2007 PC port from Sourcenext. This port was based off the 2011 HD version of the game on Xbox 360, which in turn was based off the 2007 Wii edition with the extra content from the PlayStation 2 port.[1] It also features alternative color filter options, some improved HD textures, keyboard and mouse support, and the ability to play the game at 60 or 30 FPS. The game, however, was originally designed around a 30 FPS cap, and various issues, both minor and major, can occur when playing at 60 FPS; see Issues unresolved for details. Mouse controls are also a hit-or-miss; some players reported the mouse aiming worked fine while others experience issues such as unresponsiveness, possibly to the extent of being unplayable.[2][3][4] A controller is recommended if you are experiencing such issues with mouse aiming. Unfortunately, the low-quality PlayStation 2 FMV sequences are also carried over in the Seperate Ways campaign and a few other scenarios in this port.[5] There were some other issues initially with this port, but some of them have been addressed with patches.[6][7]
There is a modding community for this version of Resident Evil 4 after moving from modding the previous 2007 PC port. One of the most ambitious projects available is the Resident Evil 4 HD Project, which completely revise the game's stock HD textures, models, UI, and FMVs.
General information
- Steam Community Discussions
- Modding forum
Availability
- All versions require Steam DRM.
Essential improvements
- Supports v1.0.6 and v1.1.0. A clean installation of Resident Evil 4 Ultimate HD Edition is recommended before installing this mod.
- Resident Evil 4 HD Project is a mod aiming to revise the textures of the game. It intends to be very faithful to the original look, as the creators even went to the real-life European locations to capture photos of the art and architecture. It also re-does effects such as lighting so that they make more logical sense, while fixing some of the environmental problems leftover in the game.
|
How to install HD Project mod[8]
|
- Download the HD Project here. The mod is available through a multi-part download of 18 2GB RAR files or a torrent.
- Extract the contents of the mod to a convenient location on the computer (RAR password: re4hdproject). There should be two folders from this mod:
Bin32 and BIO4. If the HD Project was downloaded via torrent, then this step is not required as the files are already unpacked.
- Go into the HD Project's
Bin32 folder and copy all of its contents into <path-to-game>\Bio32.
- Go back to
<path-to-game> and delete the original BIO4 folder, then move the HD project's BIO4 in its place.
- Launch the game and it will prompt a warning that the game's executable does not have the 4GB Patch applied. Click
Yes when prompted to apply the 4GB Patch and relaunch game (a backup of the original executable also will be created). The game should now play with the HD Project's new assets instead of the stock assets.
|
- Included with Resident Evil 4 HD Project.
- re4_tweaks is a project designed to fix and tweak small features of the game, as well as restoring/fixing some effects from the original GameCube version that were broken when ported over to the Xbox 360, which this port is based on. Features include restored depth of field in cutscenes and sniper scope, removal of a broken filter that gave some areas of the game a brown tint, restored sniper scope blur, option to skip intro videos, fix QTE speeds, and more.
Skip intro videos
|
Use re4_tweaks
|
- Install re4_tweaks.
- Open
dinput8.ini.
- Change
SkipIntroLogos = False to SkipIntroLogos = True.
|
Game data
Configuration file(s) location
- Some settings are tied to the game's save file.
Save game data location
- Save file is tied to the player's Steam account.
Video
- Vsync is forced on by default.
|
Use re4_tweaks to disable Vsync[10]
|
- Install re4_tweaks.
- Open
dinput8.ini.
- Change
DisableVsync = False to DisableVsync = True to disable Vsync.
|
Brightness
- It is recommended to set in-game brightness to the MAX level. Any value below the maximum will make the whites look like bright gray. Beyond that, lowering the brightness does not give you more detail (you’ll only get a duller image).[11]
Input
DirectInput controller remapping.
- This mod adds PlayStation buttons. Original post here.
- Not compatible with Resident Evil 4 HD Project
- Even though game does support DirectInput and button rebinding, game will show wrong buttons mixed with generic button prompts with DualShock 4. Use of an XInput wrapper is required.
Audio
| Audio feature |
State |
Notes |
| Separate volume controls |
|
|
| Surround sound |
|
Up to 7.0 output; Some SFX are positional, some are mono. Poor positional audio implementation.[14] |
| Subtitles |
|
Not for English. |
| Closed captions |
|
|
| Mute on focus lost |
|
See Mute on focus lost. |
Localizations
Mute on focus lost
|
Set mute in background[citation needed]
|
- Install Special K by following the Special K Unofficial Guide. Manual local installation may work better.
- Start the game once and close it to allow the configuration file of Special K to be created.
- Open
<path-to-game>\Bin32\d3d9.ini or %USERPROFILE%\Documents\My Mods\SpecialK\Profiles\bio4.exe\SpecialK.ini depending on the installation method you used.
- Change
MuteInBackground=false to MuteInBackground=true under [Window.System].
|
VR support
Issues unresolved
Issues when running the game at 60 FPS
- Various issues, both minor and major, can occur when playing at 60 FPS due to the game being originally designed to play at a 30 FPS cap. Issues when playing at 60 FPS includes the following:
- The game engine cannot skip frames, which means if it can't maintain a capped 60 (or 30) FPS, it will run in slow motion.[15]
- Some animations were not properly updated to 60 FPS, such as the rifle and bowgun reloading animations, and appear jarring in contrast to the rest of the game.[16]
- All effects generated by animated textures (flames, for example) are still running at 30 FPS.[11]
- Aiming may become accelerated and jittery, making it harder to properly aim with a drawn weapon.[17]
- The frequency of certain effects and events, such as the speed in which water moves, are at 2x speed.[18]
- Minor differences in the spawn behavior of some enemies/areas.[19]
- The Black Knights' death animation runs twice as fast at 60 FPS.[20]
- Leon's hitbox is bigger at 60 FPS and does not get reduced anymore by the Ditman glitch.[21]
Low frame rate
- If you are playing the game and it suddenly slows down, load the map and exit.[citation needed] Alternatively, lock the game's frame rate to 30 FPS if your system cannot maintain stable 60 FPS gameplay.[22]
Mouse aiming problems
- Some players have reported problems using the mouse to aim their weapon.[2][3][4] This can potentially be improved by changing the aim mode to "Modern" and adjusting the sensitivity level. Locking the game's frame rate to 30 FPS can help stabilize the player's aiming.[17]
Issues fixed
No video on monitors with high refresh rates / Game runs at incorrect refresh rate
- Fullscreen mode defaults to 60 Hz, even if the screen refresh rate is set higher than that.
|
Use re4_tweaks[10]
|
- Install re4_tweaks.
- Open
dinput8.ini.
- Make sure
FixDisplayMode is set to true.
|
Stutter Roughly Every 5 Seconds
- The game may have a 5 frame stutter every 5 seconds or so, no matter the video options, essentially making the game unplayable.
|
Uninstall Bluetooth drivers via device manager.
|
Can't pass QTEs that involve rapid button presses
- Some QTEs, such as the minecart and the statue bridge, were not re-timed for 60 FPS, so they require twice as many button presses in the same time frame.[23][24]
|
Use re4_tweaks[10]
|
- Install re4_tweaks.
- Open
dinput8.ini.
- Make sure
FixQTE is set to true.
|
Crashes after ~15 minutes of gameplay
|
Stop Touch Keyboard service[25]
|
- Open Task Manager.
- Go to Services.
- Identify "Touch Keyboard and Handwriting Panel Service" (TabletInputService).
- Stop the service.
- Launch the game.
|
|
Disable Bitdefender antivirus[26]
|
- Known affected areas are Chapters 1-3 "swamp area" and 3-1 "castle water room".
|
Button prompts not showing
- Game would not show you any prompts for context actions and in QTEs.
Other information
API
| Technical specs |
Supported |
Notes |
| Direct3D |
9 |
|
| Shader Model support |
3.0 |
|
| Executable |
32-bit |
64-bit |
Notes |
| Windows |
|
|
|
Middleware
|
Middleware |
Notes |
| Cutscenes |
Criware |
|
Natural Gradient mod
- This mod is for those who dislike the default color filters. The in-game brightness options can also be raised to give the desired effect.
- The Resident Evil 4 HD Project includes color gradients that differ from this mod, and its default gradient is designed to resemble the GameCube/Wii version.
|
How to install Natural Gradient Mod[27]
|
- Back up the original
gradients folder before using this mod.
- Download the modified gradients here.
- Extract the contents of the archive to
<path-to-game>\BIO4\Gradients\, replacing the original gradient files.
- Now run the game and change the color filters from the Video Settings menu as desired. You should now see the new gradients taking effect.
Notes
- Filters used in Natural Gradient mod.
- Contrast boost
- GameCube/Wii color temperature
- GameCube/Wii color temperature with subtle contrast boost
- Horror filter, uses warmer red colors for a foreboding atmosphere.
|
Shaders Fix and Film Grain Removal mod
- This mod removes the film grain effect present in the game while adjusting some of the shader effects.
- Alternatively, the film grain can be disabled in re4_tweaks.
- Now is compatible with the DualShock button mod, Just download this variant.
|
How to use Film Grain Removal mod[28]
|
- Back up the original
07000000.pack and 07000000.pack.lfs files from <path-to-game>\BIO4\ImagePack (original textures) and <path-to-game>\BIO4\ImagePackHD (HD textures).
- Download the Shaders Fix and Film Grain Removal mod here.
- Go into the
<path-to-game>\BIO4\ImagePack\ and <path-to-game>\BIO4\ImagePackHD\ folders and delete their respective 07000000.pack and 07000000.pack.lfs files.
- Extract the contents of the zip archive and copy the modified
07000000.pack file into the ImagePack and ImagePackHD folders.
- Now run the game. You should now be able to play the game without the film grain with some shader adjustments.
|
Manual film grain removal method
- Backing up the vanilla
07000000.pack and 07000000.pack.lfs files is recommended before removing the film grain effect manually. The procedure may differ if you are using mods.
|
How to remove film grain manually[29]
|
- Download the YZ2Tool here, and extract the contents of
YZ2tool.rar to its own folder in a convenient location on your computer (e.g. Documents). You will also need to install an image editing program that support *.dds texture files such as Paint.net.
- Go to
<path-to-game>\BIO4\ImagePack (original textures) and copy the 07000000.pack and 07000000.pack.lfs files into the folder where you have installed YZ2Tool along with its executable and *bat files.
- Drag and drop the
07000000.pack file onto the unpack-all.bat file and you should see a new 07000000 folder containing a number of *.dds files.
- Browse through the contents of the newly created
07000000 folder, then search for the file 0193.dds and open it with Paint.net.
- After opening the
0193.dds file in Paint.net, simply press Ctrl+A to select the entire image, then press Delete to erase the film grain effect on the texture file, and then save the changes on the file.
- Now take the
07000000 folder and drag and drop it onto the repack-all.bat file, and you should see the 07000000.pack file has been modified. Delete the 07000000 folder after the new 07000000.pack has been repacked.
- Cut the modified
07000000.pack and 07000000.pack.lfs files and paste them back into <path-to-game>\BIO4\ImagePack.
- Repeat Steps 2-7 for the
07000000.pack and 07000000.pack.lfs files from the <path-to-game>\BIO4\ImagePackHD (HD textures) files.
Notes:
- Mods may have a single
07000000.pack instead of a set of 07000000.pack and 07000000.pack.lfs files.
- YZ2Tool may generate
0216.bin and 0217.bin files from mods instead of 0216.dds and 0217.dds, which will crash the game if the *.bin files are repacked into 07000000.pack.[30]
|
Alternate Controller Layout mods
- These mods recreates the controller configuration of the GameCube and PlayStation 2 versions or a custom PlayStation 3 layout with relevant prompts when played with an XInput controller. See this forum post for more details of each alternative controller configuration.
- Not compatible with the Shaders Fix and Film Grain Removal mod above, however, the film grain can removed manually with these instructions.
- Currently not compatible with Resident Evil 4 HD Project.[31]
|
How to install GameCube/PlayStation 2 Controller Layout Mod[32]
|
- Download your desired controller layout and prompts from the following links:
- Extra the contents of the rar file into
<path-to-game>.
- Run the
Install Buttons.bat file and allow the mod to install the files. The original files are backed up in the respective <path-to-game>\RE4HDTEX\Backup* folders.
|
High Poly Weapons
- This mod replaces the stock in-game weapon models with their higher poly equivalents seen in the Examine screen. Backing up the game's original
Em and ImagePackHD folders found in <path-to-game>\BIO4 is recommended before installing this mod.
- This mod will crash the game when switching from the HD textures to the original textures after installation.
|
How to install High Poly Weapons mod[29]
|
- Download the mod here.
- Extract the contents of the zip archive. Password:
NEGAARMAX.
- Move or delete the original
wep##.lfs files from <path-to-game>\BIO4\Em and 020000##.pack files from <path-to-game>\BIO4\ImagePackHD that match with the ones from the High Poly Weapons folder.
- Copy the
Em and ImagePackHD folders from the High Poly Weapons folder into <path-to-game>\BIO4. You should be able to see the higher poly weapon models from the Examine screen during gameplay.
|
Customizing the laser sight color
- v1.0.6 added the ability to customize the laser sight color by editing the RGB values.
|
How to modify laser sight color[7]
|
- Go to
%USERPROFILE%\Documents\My Games\Capcom\RE4\.
- Open
config.ini with a text editor (e.g. Notepad++).
- Change
laserR (red), laserG (green), laserB (blue), and laserA (transparency level of the dot) to the desired values from 0 to 255.
- For example, people with color blindness may wish to change the laser sight to blue, which makes it easier to see:
laserR 0
laserG 0
laserB 255
laserA 255
Notes
- To return to factory settings (red laser sight), simply set
laserA -1 and save.
|
System requirements
| Windows |
|
Minimum |
Recommended |
| Operating system (OS) |
XP |
Vista, 7, 8 |
| Processor (CPU) |
Intel Core 2 Duo 2.4 GHz
AMD Athlon X2 2.8 GHz |
Intel Core 2 Quad 2.7 GHz
AMD Phenom II X4 3.0 GHz |
| System memory (RAM) |
2 GB |
4 GB |
| Hard disk drive (HDD) |
15 GB | |
| Video card (GPU) |
Nvidia GeForce 8800 GTS
ATI Radeon HD 4850
512 MB of VRAM
DirectX 9.0c compatible
| Nvidia GeForce GTX 560
1 GB of VRAM |
| Controller |
Xbox 360 Controller | |
Notes
References