
Difference between revisions of "Metal Gear Rising: Revengeance"
From PCGamingWiki, the wiki about fixing PC games
If and while (talk | contribs) |
If and while (talk | contribs) |
||
| (57 intermediate revisions by 15 users not shown) | |||
| Line 3: | Line 3: | ||
|developers = | |developers = | ||
{{Infobox game/row/developer|PlatinumGames}} | {{Infobox game/row/developer|PlatinumGames}} | ||
| − | {{Infobox game/row/porter|TransGaming | + | {{Infobox game/row/porter|TransGaming|OS X}} |
|publishers = | |publishers = | ||
{{Infobox game/row/publisher|Konami}} | {{Infobox game/row/publisher|Konami}} | ||
| Line 30: | Line 30: | ||
|steam appid = 235460 | |steam appid = 235460 | ||
|steam appid side = | |steam appid side = | ||
| − | |gogcom id = | + | |gogcom id = 1777132927 |
|gogcom id side = | |gogcom id side = | ||
|official site= https://www.konami.com/mg/archive/mgr/ | |official site= https://www.konami.com/mg/archive/mgr/ | ||
| Line 53: | Line 53: | ||
'''General information''' | '''General information''' | ||
{{ii}} [https://community.pcgamingwiki.com/page/blog/_/features/port-reports/pc-report-metal-gear-rising-revengeance-r129 PC Report] | {{ii}} [https://community.pcgamingwiki.com/page/blog/_/features/port-reports/pc-report-metal-gear-rising-revengeance-r129 PC Report] | ||
| + | {{GOG.com links|1777132927|metal_gear_rising_revengeance}} | ||
{{mm}} [https://steamcommunity.com/app/235460/discussions/ Steam Community Discussions] | {{mm}} [https://steamcommunity.com/app/235460/discussions/ Steam Community Discussions] | ||
| Line 59: | Line 60: | ||
{{Availability/row| GamersGate | metal-gear-rising-revengeance | Steam | | | Windows}} | {{Availability/row| GamersGate | metal-gear-rising-revengeance | Steam | | | Windows}} | ||
{{Availability/row| Gamesplanet | 1040-1 | Steam | | | Windows }} | {{Availability/row| Gamesplanet | 1040-1 | Steam | | | Windows }} | ||
| + | {{Availability/row| GOG | metal_gear_rising_revengeance | DRM-free | | | Windows }} | ||
{{Availability/row| GMG | metal-gear-rising-revengeance-pc | Steam | | | Windows}} | {{Availability/row| GMG | metal-gear-rising-revengeance-pc | Steam | | | Windows}} | ||
{{Availability/row| Humble | metal-gear-rising-revengeance | Steam | | | Windows}} | {{Availability/row| Humble | metal-gear-rising-revengeance | Steam | | | Windows}} | ||
{{Availability/row| Steam | 235460 | Steam | | | Windows}} | {{Availability/row| Steam | 235460 | Steam | | | Windows}} | ||
| − | |||
}} | }} | ||
| − | + | ||
{{--}} The Mac OS X version is no longer available and unplayable as the server for the DRM has been shut down.<ref name="macOS DRM">{{Refurl|url=https://www.reddit.com/r/Games/comments/8thog5/drm_takes_out_metal_gear_rising_revengeance/|title=DRM Takes Out Metal Gear Rising: Revengeance : Games |date=2020-12-07|snippet=Transgaming, the company who created the port included some DRM that has to "phone home" as part of its install process.}}</ref> | {{--}} The Mac OS X version is no longer available and unplayable as the server for the DRM has been shut down.<ref name="macOS DRM">{{Refurl|url=https://www.reddit.com/r/Games/comments/8thog5/drm_takes_out_metal_gear_rising_revengeance/|title=DRM Takes Out Metal Gear Rising: Revengeance : Games |date=2020-12-07|snippet=Transgaming, the company who created the port included some DRM that has to "phone home" as part of its install process.}}</ref> | ||
| − | |||
==Monetization== | ==Monetization== | ||
| Line 101: | Line 101: | ||
==Essential improvements== | ==Essential improvements== | ||
| + | ===Fix for the 59 FPS cap=== | ||
| + | {{Fixbox|description=Use [https://cookieplmonster.github.io/mods/w101/ SilentPatch for The Wonderful 101: Remastered]|fix= | ||
| + | '''Notes''' | ||
| + | {{++}} Despite being a patch made for "''The Wonderful 101''", it is also applied to MGR as both games are similar internally. | ||
| + | }} | ||
| + | |||
| + | ===[https://www.nexusmods.com/metalgearrisingrevengeance/mods/224 Silent's patch for Metal Gear Rising]=== | ||
| + | {{++}}Allows to skip logo sequences. | ||
| + | {{++}}Fixes the save path. | ||
| + | {{++}}Fixes Infinite Wig B, allows using Blade Mode while in Ripper Mode.<ref>{{Refurl|url=https://github.com/CookiePLMonster/SilentPatchMGR/pull/5#issuecomment-1445458902|title=SilentPatchMGR - Fix Infinite Wig B - GitHub|date=2024-08-31}}</ref> | ||
| + | {{++}}Patches mouse side buttons not bindable. | ||
| + | |||
===Skip intro videos=== | ===Skip intro videos=== | ||
| − | {{Fixbox|description=Modify | + | {{Fixbox|description=Modify game EXE file|ref=<ref>[https://github.com/CookiePLMonster/SilentPatchMGR/blob/7d043cafab206e21ceb9192c61a876ca46b7d0c8/SilentPatchMGR/SilentPatchMGR.cpp#L556 CookiePLMonster/SilentPatchMGR | Skip intro splashes]</ref>|fix= |
# Make a backup of {{file|{{P|game}}\METAL GEAR RISING REVENGEANCE.exe}}. | # Make a backup of {{file|{{P|game}}\METAL GEAR RISING REVENGEANCE.exe}}. | ||
| − | # Open {{file|{{P|game}}\METAL GEAR RISING REVENGEANCE.exe}} | + | # Open {{file|{{P|game}}\METAL GEAR RISING REVENGEANCE.exe}} with a hex editor such as [https://mh-nexus.de/en/hxd/ HxD]. |
# Press {{key|CTRL|R}} to open the '''Replace''' window. | # Press {{key|CTRL|R}} to open the '''Replace''' window. | ||
# On the '''Hex-values''' tab of the '''Replace''' window, enter the following values and select '''OK''': | # On the '''Hex-values''' tab of the '''Replace''' window, enter the following values and select '''OK''': | ||
| Line 112: | Line 124: | ||
}} | }} | ||
| − | {{Fixbox|description=Use the mod Skip credits and more|ref=<ref>{{Refurl|url=https://www.nexusmods.com/metalgearrisingrevengeance/mods/66/|title=Skip credits and more at Metal Gear Rising: Revengeance Nexus - Mods and community|date=2022-09-11}}</ref>|collapsed=no|fix= | + | {{Fixbox|description=Use the mod "''Skip credits and more''"|ref=<ref>{{Refurl|url=https://www.nexusmods.com/metalgearrisingrevengeance/mods/66/|title=Skip credits and more at Metal Gear Rising: Revengeance Nexus - Mods and community|date=2022-09-11}}</ref>|collapsed=no|fix= |
| − | # Download the mod [https://www.nexusmods.com/metalgearrisingrevengeance/mods/66/ | + | # Download the mod from [https://www.nexusmods.com/metalgearrisingrevengeance/mods/66/ here]. |
| − | # | + | # Copy {{file|d3d9.dll}} to {{folder|{{P|game}}}}. |
'''Notes''' | '''Notes''' | ||
| − | {{ii}} | + | {{ii}} You can press {{key|Enter}} on keyboard or the "''A''" button on gamepad to skip the intro logos and credits.<br> It is also possible to use the Konami code in the “''PRESS ANY KEY''” screen by pressing {{key|F11}}. |
}} | }} | ||
| Line 122: | Line 134: | ||
===Configuration file(s) location=== | ===Configuration file(s) location=== | ||
{{Game data| | {{Game data| | ||
| − | {{Game data/config|Windows| | + | {{Game data/config|Windows|C:\Users\{{p|username}}\Documents\MGR\SaveData\{{Note|DO NOT CHANGE, the game really uses fixed path like this}}}} |
{{Game data/config|OS X|}} | {{Game data/config|OS X|}} | ||
}} | }} | ||
| Line 128: | Line 140: | ||
===Save game data location=== | ===Save game data location=== | ||
{{Game data| | {{Game data| | ||
| − | {{Game data/saves|Windows| | + | {{Game data/saves|Windows|C:\Users\{{p|username}}\Documents\MGR\SaveData\MGR.sav{{Note|DO NOT CHANGE, the game really uses fixed path like this}}}} |
{{Game data/saves|OS X|{{p|osxhome}}/Library/Application Support/Metal Gear Rising - Revengeance Steam/p_drive/User/Application Data/MGR/SaveData/MGR.sav}} | {{Game data/saves|OS X|{{p|osxhome}}/Library/Application Support/Metal Gear Rising - Revengeance Steam/p_drive/User/Application Data/MGR/SaveData/MGR.sav}} | ||
}} | }} | ||
| − | {{--}} The game uses a fixed path for its data instead of using the standard Windows variables, if the {{code|C:}} drive is missing or there isn't a {{folder|Documents}} folder | + | {{--}} The game uses a fixed path for its data instead of using the standard Windows variables, if the {{code|C:}} drive is missing or there isn't a {{folder|Documents}} folder inside the user folder, the game will not be able to save and will crash.<ref>{{Refcheck|user=Marioysikax|date=June 20, 2016}}</ref> This also means that Steam Cloud won't work correctly if the {{folder|Documents}} folder is in a drive other than {{code|C:}} (Steam Cloud will sync the save in the correct drive, but the game will ignore this save and create a new one in the {{code|C:}} drive instead).<ref>{{Refcheck|user=Reonu|date=June 12, 2022}}</ref> Possible workarounds include manually creating an empty {{folder|Documents}} folder or using symbolic link. The latter allows to keep Steam Cloud working while also having the user folder in a drive other than {{code|C:}}. |
===[[Glossary:Save game cloud syncing|Save game cloud syncing]]=== | ===[[Glossary:Save game cloud syncing|Save game cloud syncing]]=== | ||
| Line 139: | Line 151: | ||
|epic games launcher = | |epic games launcher = | ||
|epic games launcher notes = | |epic games launcher notes = | ||
| − | |gog galaxy = | + | |gog galaxy = true |
|gog galaxy notes = | |gog galaxy notes = | ||
| − | |origin = | + | |origin = |
|origin notes = | |origin notes = | ||
|steam cloud = true | |steam cloud = true | ||
| − | |steam cloud notes = Approx. 954 MB available.<br/>Settings will sync too, except graphics settings.<br/>Steam Cloud will not sync any files if the system doesn't have a <code>C:</code> drive.<ref>{{Refurl|url=https://steamcommunity.com/games/235460/announcements/detail/1387412155878494752|title=Steam Community :: Group Announcements :: METAL GEAR RISING: REVENGEANCE|date=17 May 2023}}</ref><br/>Also, if | + | |steam cloud notes = Approx. 954 MB available.<br/>Settings will sync too, except graphics settings.<br/>Steam Cloud will not sync any files if the system doesn't have a <code>C:</code> drive.<ref>{{Refurl|url=https://steamcommunity.com/games/235460/announcements/detail/1387412155878494752|title=Steam Community :: Group Announcements :: METAL GEAR RISING: REVENGEANCE|date=17 May 2023}}</ref><br/>Also, if a C: drive exists but your Documents folder has been moved to a different drive (e.g., D:), Steam Cloud will sync the folder in the correct drive, but the game will insist on saving and loading from the C: drive, meaning that Steam Cloud will still not work. Your Documents folder needs to be in the C: drive in order for Steam Cloud to work. |
|ubisoft connect = | |ubisoft connect = | ||
|ubisoft connect notes = | |ubisoft connect notes = | ||
| Line 164: | Line 176: | ||
|multimonitor notes = Use [https://www.flawlesswidescreen.org Flawless Widescreen]. | |multimonitor notes = Use [https://www.flawlesswidescreen.org Flawless Widescreen]. | ||
|ultrawidescreen = hackable | |ultrawidescreen = hackable | ||
| − | |ultrawidescreen notes = Use [https://www.flawlesswidescreen.org Flawless Widescreen]. If the HUD is broken on Ultrawide/Superwide resolutions, | + | |ultrawidescreen notes = Use [https://www.flawlesswidescreen.org Flawless Widescreen]. If the HUD is broken on Ultrawide/Superwide resolutions, Make sure to use [[#Widescreen resolution|MGROverride]] first (modify the EXE to the monitor's resolution), set the game resolution to 800x600 and follow the instructions in the Flawless Widescreen window. Make sure {{key|Don't Stretch HUD}} is checked. |
|4k ultra hd = hackable | |4k ultra hd = hackable | ||
|4k ultra hd notes = See [[#Widescreen resolution|Widescreen resolution]]. | |4k ultra hd notes = See [[#Widescreen resolution|Widescreen resolution]]. | ||
| − | |fov = | + | |fov = hackable |
| − | |fov notes = | + | |fov notes = Use [https://framedsc.com/GameGuides/metalgearrising.htm Cheat Table by IPG Xapek].{{cn}} |
|windowed = true | |windowed = true | ||
|windowed notes = | |windowed notes = | ||
| Line 183: | Line 195: | ||
|vsync notes = | |vsync notes = | ||
|60 fps = limited | |60 fps = limited | ||
| − | |60 fps notes = Main menu and cutscenes are capped at 30 FPS. Gameplay is capped at 59 FPS. Frame limiter is unstable and may jump further up and down the longer the game is left on. This is a long-standing issue with PlatinumGames PC ports.<ref>[https://cookieplmonster.github.io/2020/05/16/silentpatch-wonderful-101/ SilentPatch for The Wonderful 101: Remastered, fixing frame pacing issues | Silent's Blog]</ref> | + | |60 fps notes = Main menu and cutscenes are capped at 30 FPS. Gameplay is capped at 59 FPS.<br> Frame limiter is unstable and may jump further up and down the longer the game is left on. This is a long-standing issue with PlatinumGames PC ports.<ref>[https://cookieplmonster.github.io/2020/05/16/silentpatch-wonderful-101/ SilentPatch for The Wonderful 101: Remastered, fixing frame pacing issues | Silent's Blog]</ref> <br>See [[#Fix_for_the_59_FPS_cap| SilentPatch for The Wonderful 101]] to fix the frame limiter. |
|120 fps = false | |120 fps = false | ||
|120 fps notes = | |120 fps notes = | ||
| Line 195: | Line 207: | ||
===[[Glossary:Widescreen resolution|Widescreen resolution]]=== | ===[[Glossary:Widescreen resolution|Widescreen resolution]]=== | ||
| − | {{ii}} | + | {{ii}} The only resolutions available are 800x600, 1280x720, 1366x768, 1680x1050, and 1920x1080. Aspect ratios other than 16:9 are {{W|Anamorphic format|anamorphic}}. |
{{Fixbox|description=Set custom resolution|ref=<ref>{{Refurl|url=https://www.neogaf.com/forum/showpost.php?p=99628721&postcount=7487|title=NeoGAF - View Single Post - Metal Gear Rising: Revengeance PC Version |OT| Violence Breeds Violence|date=2017-03-03}}</ref>|fix= | {{Fixbox|description=Set custom resolution|ref=<ref>{{Refurl|url=https://www.neogaf.com/forum/showpost.php?p=99628721&postcount=7487|title=NeoGAF - View Single Post - Metal Gear Rising: Revengeance PC Version |OT| Violence Breeds Violence|date=2017-03-03}}</ref>|fix= | ||
# Download [https://community.pcgamingwiki.com/files/file/722-mgroverride MGROverride]. | # Download [https://community.pcgamingwiki.com/files/file/722-mgroverride MGROverride]. | ||
| − | # | + | # Type the desired resolution and click '''Patch'''. |
| − | # Close the tool | + | # Close the tool. |
| − | # | + | # Set the resolution to 800x600 in the game options to enable custom resolution. |
'''Notes''' | '''Notes''' | ||
| − | {{ii}} | + | {{ii}} It is not necessary to run the tool again, unless you want to remove the patch or change to another resolution. |
| − | {{ii}} You must manually | + | {{ii}} May cause minor graphical glitches, especially with the HUD. |
| − | + | {{ii}} May be impossible to use the left stick for QTEs. | |
| + | {{ii}} You must manually set the resolution to 800x600 each time you run the game.<br> This is because the game tries to detect the correct resolution for the monitor at startup. | ||
}} | }} | ||
===Remove noise filter=== | ===Remove noise filter=== | ||
{{Fixbox|description=Remove noise filter|ref=<ref>{{Refurl|url=https://www.neogaf.com/forum/showpost.php?p=97260557&postcount=6133|title=NeoGAF - View Single Post - Metal Gear Rising: Revengeance PC Version |OT| Violence Breeds Violence|date=2017-03-03}}</ref>|fix= | {{Fixbox|description=Remove noise filter|ref=<ref>{{Refurl|url=https://www.neogaf.com/forum/showpost.php?p=97260557&postcount=6133|title=NeoGAF - View Single Post - Metal Gear Rising: Revengeance PC Version |OT| Violence Breeds Violence|date=2017-03-03}}</ref>|fix= | ||
| − | # Download the | + | # Download the mod from [https://community.pcgamingwiki.com/files/file/2093-nonoisefilter/ here] or [https://www.mediafire.com/download/zpu11ns33nrk795/NoNoiseFilter.7z here]. |
| − | # | + | # Copy {{folder|GameData}} to {{folder|{{p|game}}}} and overwrite when prompted. |
}} | }} | ||
| Line 218: | Line 231: | ||
{{ii}} These mods disable some camera restrictions and leave the camera a little more calm and fixed.<br> They also make the player character centered on the screen, rather than aligned to the left. | {{ii}} These mods disable some camera restrictions and leave the camera a little more calm and fixed.<br> They also make the player character centered on the screen, rather than aligned to the left. | ||
| − | {{Fixbox|description=Use camera mods|ref=<ref>[ | + | {{Fixbox|description=Use camera mods|ref=<ref>[https://web.archive.org/web/20150101173218/http://z13.invisionfree.com/MetalGearRising_Mods/index.php?showtopic=3 Metal Gear Rising PC Modding → Simple Camera Mod]</ref>|fix= |
| − | # Download the | + | # Download the mods from [https://community.pcgamingwiki.com/files/file/2091-dmc-camera-simple-camera-mod/ here] or [https://steamcommunity.com/app/235460/discussions/0/521643320350104394/#c521643320350211529 here]. |
| − | # | + | # Copy the desired mod to {{folder|{{p|game}}\GameData}}. |
}} | }} | ||
| Line 237: | Line 250: | ||
|mouse sensitivity notes = Separate values for the Y-axis and the X-axis. | |mouse sensitivity notes = Separate values for the Y-axis and the X-axis. | ||
|invert mouse y-axis = true | |invert mouse y-axis = true | ||
| − | |invert mouse y-axis notes = Also has X-axis inversion. General camera settings also affect sub-weapon aiming and blade mode cameras. | + | |invert mouse y-axis notes = Also has X-axis inversion.<br> General camera settings also affect sub-weapon aiming and blade mode cameras. |
|touchscreen = false | |touchscreen = false | ||
|touchscreen notes = | |touchscreen notes = | ||
| Line 249: | Line 262: | ||
|controller sensitivity notes= Separate values for the Y-axis and the X-axis. | |controller sensitivity notes= Separate values for the Y-axis and the X-axis. | ||
|invert controller y-axis = true | |invert controller y-axis = true | ||
| − | |invert controller y-axis notes= Also has X-axis inversion. General camera settings also affect sub-weapon aiming and blade mode cameras. | + | |invert controller y-axis notes= Also has X-axis inversion.<br> General camera settings also affect sub-weapon aiming and blade mode cameras. |
|xinput controllers = true | |xinput controllers = true | ||
|xinput controllers notes = | |xinput controllers notes = | ||
| Line 291: | Line 304: | ||
===DualShock Button Prompts=== | ===DualShock Button Prompts=== | ||
| − | {{Fixbox|description=Instructions | + | {{Fixbox|description=Instructions|fix= |
| − | # Download and open the | + | # Download and open the [https://community.pcgamingwiki.com/files/file/638-metal-gear-solid-rising-revengeance-dualshock-3-buttons/ archive]. |
# Open the appropiate language folder. | # Open the appropiate language folder. | ||
| − | # | + | # Copy the {{folder|ui}} folder for the correct language to {{folder|{{p|game}}\gamedata}}. |
| − | |||
'''Notes''' | '''Notes''' | ||
| − | {{ii}} | + | {{ii}} Delete the {{folder|ui}} folder to restore standard button prompts. |
}} | }} | ||
<gallery> | <gallery> | ||
| Line 310: | Line 322: | ||
{{Audio | {{Audio | ||
|separate volume = true | |separate volume = true | ||
| − | |separate volume notes = Music, sound effects and voices. | + | |separate volume notes = Music, sound effects, and voices. |
|surround sound = true | |surround sound = true | ||
|surround sound notes = Up to 5.0 output.<ref>{{Refurl|url=https://satsun.org/audio/|title=PC Gaming Surround Sound Round-up|date=17 May 2023}}</ref> | |surround sound notes = Up to 5.0 output.<ref>{{Refurl|url=https://satsun.org/audio/|title=PC Gaming Surround Sound Round-up|date=17 May 2023}}</ref> | ||
| Line 365: | Line 377: | ||
|language = Japanese | |language = Japanese | ||
|interface = true | |interface = true | ||
| − | |audio = | + | |audio = hackable |
|subtitles = true | |subtitles = true | ||
| − | |notes = | + | |notes = Use [https://www.nexusmods.com/metalgearrisingrevengeance/mods/579 this mod] to restore the Japanese dub for cutscenes. In-game dialogues and voice lines will remain in English because of modding limitations. Ported from the Japanese PlayStation 3 version.<br>Japanese audio for the DLC campaigns is currently not supported and thus remain in English. |
|fan = | |fan = | ||
}} | }} | ||
| Line 398: | Line 410: | ||
==Issues fixed== | ==Issues fixed== | ||
===Crash on launch (Windows)=== | ===Crash on launch (Windows)=== | ||
| − | {{ii}} Even when the correct drive is present, the game might still crash | + | {{ii}} Even when the correct drive is present, the game might still crash due to {{file|ntdll.dll}} as a faulty module. |
| − | {{--}} The game uses a fixed path for its data instead of using | + | {{--}} The game uses a fixed path for its data instead of using standard Windows variables. If the {{code|C:}} drive is missing, the game will not be able to save and will crash. |
| − | {{Fixbox|description= | + | {{Fixbox|description=Use [[#Silent.27s_patch_for_Metal_Gear_Rising| SilentPatch for MGR]] to fix the save path|fix= |
| − | |||
| − | |||
| − | |||
}} | }} | ||
| − | === | + | ===Game runs at incorrect refresh rate=== |
| − | {{--}} | + | {{--}} The game doesn't follow the refresh rate set in Windows and defaults to a slower one.<ref>{{Refurl|url=https://steamcommunity.com/app/235460/discussions/0/630802344132561194/|title=Fix the 24 fps fullscreen lock ASAP :: METAL GEAR RISING: REVENGEANCE General Discussions|date=17 May 2023}}</ref> |
{{Fixbox|description=Override refresh rate with D3Dx|ref=<ref>{{Refcheck|user=Keith|date=2021-07-12|comment=}}</ref>|fix= | {{Fixbox|description=Override refresh rate with D3Dx|ref=<ref>{{Refcheck|user=Keith|date=2021-07-12|comment=}}</ref>|fix= | ||
| Line 419: | Line 428: | ||
{{Fixbox|description=Set screen refresh rate with Special K|ref=<ref>{{Refcheck|user=Keith|date=2017-09-28}}</ref>|fix= | {{Fixbox|description=Set screen refresh rate with Special K|ref=<ref>{{Refcheck|user=Keith|date=2017-09-28}}</ref>|fix= | ||
# Install Special K by following the [https://steamcommunity.com/sharedfiles/filedetails/?id=933337066 Special K Unofficial Guide]. | # Install Special K by following the [https://steamcommunity.com/sharedfiles/filedetails/?id=933337066 Special K Unofficial Guide]. | ||
| − | # | + | # Run the game once and close it to allow the configuration file of Special K to be created. |
| − | # Open {{file|{{p|game}}\d3d9.ini}} or {{file|{{p|userprofile\Documents}}\My Mods\SpecialK\Profiles\METAL GEAR RISING REVENGEANCE.exe\SpecialK.ini}} depending on the installation method | + | # Open {{file|{{p|game}}\d3d9.ini}} or {{file|{{p|userprofile\Documents}}\My Mods\SpecialK\Profiles\METAL GEAR RISING REVENGEANCE.exe\SpecialK.ini}} depending on the installation method used. |
| − | # Change <code>RefreshRate=-1</code> to the proper value | + | # Change <code>RefreshRate=-1</code> to the proper value; e.g. <code>RefreshRate=60</code> or use <code>RefreshRate=0</code> for automatic detection. |
# Change <code>EnableTextureMods=true</code> to <code>EnableTextureMods=false</code>. | # Change <code>EnableTextureMods=true</code> to <code>EnableTextureMods=false</code>. | ||
}} | }} | ||
| Line 429: | Line 438: | ||
# Download version of ForceFix for your operating system from [https://steamcommunity.com/app/235460/discussions/0/630802344702757872 Steam Guide]. | # Download version of ForceFix for your operating system from [https://steamcommunity.com/app/235460/discussions/0/630802344702757872 Steam Guide]. | ||
# Unpack the archive and launch ForceFix. | # Unpack the archive and launch ForceFix. | ||
| − | # For refresh rates above 60 Hz, set frequency under Custom tab and Apply. | + | # For refresh rates above 60 Hz, set frequency under '''Custom''' tab and '''Apply'''. |
| − | |||
'''Notes''' | '''Notes''' | ||
| − | {{ii}} By default, the refresh rate | + | {{ii}} By default, the refresh rate will go back to normal once the program is closed.<br> You can change it by unchecking {{key|Restore on Close}}. |
}} | }} | ||
{{Fixbox|description=Disable fullscreen optimizations in Windows 10 and 11|fix= | {{Fixbox|description=Disable fullscreen optimizations in Windows 10 and 11|fix= | ||
| − | # Right click the EXE file | + | # Right-click the game EXE file and click '''Properties'''. |
| − | # Click on the | + | # Click on the '''Compatibility''' tab. |
| − | # | + | # Tick {{key|Disable fullscreen optimizations}}. |
| − | # Click | + | # Click '''Apply''' and '''OK'''. |
| + | }} | ||
| + | |||
| + | {{Fixbox|description=Use Custom Resolution Utility|fix= | ||
| + | # Download the latest version of CRU from [https://www.monitortests.com/forum/Thread-Custom-Resolution-Utility-CRU here]. | ||
| + | # Follow the instructions on the website on to disable unwanted display modes. | ||
}} | }} | ||
===Crashes when changing display mode to fullscreen (Linux)=== | ===Crashes when changing display mode to fullscreen (Linux)=== | ||
| − | {{ii}} On some Proton / Linux configurations, changing | + | {{ii}} On some Proton/Linux configurations, changing from windowed mode to fullscreen mode may crash.<br> This issue can be solved by editing the graphics settings file directly. |
| − | {{Fixbox|description= | + | {{Fixbox|description=Edit graphics settings file|fix= |
# Locate the {{file|GraphicOption}} file in game's configuration path. | # Locate the {{file|GraphicOption}} file in game's configuration path. | ||
# Open the file with a hex editor. | # Open the file with a hex editor. | ||
| − | # Each configuration option | + | # Each configuration option requires 4 bytes. The first byte of each 4 contains a configuration value.<br> Fullscreen/Windowed option is <b>seventh</b>, so you want to edit the byte at address {{code|0x18}} in hex (the twenty-fifth byte). |
| − | # Set the byte at address 0x18 to 1 for windowed mode | + | # Set the byte at address {{code|0x18}} to {{code|1}} for windowed mode or {{code|0}} for fullscreen mode. |
}} | }} | ||
Latest revision as of 15:27, 12 September 2024
 |
|
| Developers | |
|---|---|
| PlatinumGames | |
| macOS (OS X) | TransGaming |
| Publishers | |
| Konami | |
| Engines | |
| Platinum Engine | |
| Release dates | |
| Windows | January 9, 2014 |
| macOS (OS X) | September 25, 2014 |
| Reception | |
| Metacritic | 83 |
| OpenCritic | 84 |
| IGDB | 85 |
| Taxonomy | |
| Monetization | One-time game purchase |
| Microtransactions | None |
| Modes | Singleplayer |
| Pacing | Real-time |
| Perspectives | Third-person |
| Controls | Direct control |
| Genres | Action, Hack and slash, Quick time events |
| Art styles | Realistic |
| Themes | Africa, Asia, Middle East, North America, Sci-fi, South America |
| Series | Metal Gear |
Warnings
- The macOS (OS X) version of this game does not work on macOS Catalina (version 10.15) or later due to the removal of support for 32-bit-only apps.
Metal Gear Rising: Revengeance is a singleplayer third-person action, hack and slash and quick time events game in the Metal Gear series.
The Mac OS X port was deactivated in 2017.[1]
General information
Availability
| Source | DRM | Notes | Keys | OS |
|---|---|---|---|---|
| GamersGate | ||||
| GOG.com | ||||
| Green Man Gaming | ||||
| Humble Store | ||||
| Steam |
- The Mac OS X version is no longer available and unplayable as the server for the DRM has been shut down.[1]
Monetization
| Type | Notes |
|---|---|
| One-time game purchase | The game requires an upfront purchase to access. |
Microtransactions
| Type | Notes |
|---|---|
| No microtransactions | The game does not contain microtransactions. |
DLC and expansion packs
- All DLC from the console versions, apart from the Japan exclusive Hebidamashii sword, is included.
Essential improvements
Fix for the 59 FPS cap
| Use SilentPatch for The Wonderful 101: Remastered |
|---|
|
Notes
|
Silent's patch for Metal Gear Rising
- Allows to skip logo sequences.
- Fixes the save path.
- Fixes Infinite Wig B, allows using Blade Mode while in Ripper Mode.[2]
- Patches mouse side buttons not bindable.
Skip intro videos
| Modify game EXE file[3] |
|---|
|
| Use the mod "Skip credits and more"[4] |
|---|
Notes
|
Game data
Configuration file(s) location
| System | Location |
|---|---|
| Windows | C:\Users\%USERNAME%\Documents\MGR\SaveData\[Note 1] |
| macOS (OS X) | |
| Steam Play (Linux) | <SteamLibrary-folder>/steamapps/compatdata/235460/pfx/[Note 2] |
Save game data location
| System | Location |
|---|---|
| Windows | C:\Users\%USERNAME%\Documents\MGR\SaveData\MGR.sav[Note 3] |
| macOS (OS X) | $HOME/Library/Application Support/Metal Gear Rising - Revengeance Steam/p_drive/User/Application Data/MGR/SaveData/MGR.sav |
| Steam Play (Linux) | <SteamLibrary-folder>/steamapps/compatdata/235460/pfx/[Note 2] |
- The game uses a fixed path for its data instead of using the standard Windows variables, if the
C:drive is missing or there isn't aDocumentsfolder inside the user folder, the game will not be able to save and will crash.[5] This also means that Steam Cloud won't work correctly if theDocumentsfolder is in a drive other thanC:(Steam Cloud will sync the save in the correct drive, but the game will ignore this save and create a new one in theC:drive instead).[6] Possible workarounds include manually creating an emptyDocumentsfolder or using symbolic link. The latter allows to keep Steam Cloud working while also having the user folder in a drive other thanC:.
Save game cloud syncing
| System | Native | Notes |
|---|---|---|
| GOG Galaxy | ||
| Steam Cloud | Approx. 954 MB available. Settings will sync too, except graphics settings. Steam Cloud will not sync any files if the system doesn't have a C: drive.[7]Also, if a C: drive exists but your Documents folder has been moved to a different drive (e.g., D:), Steam Cloud will sync the folder in the correct drive, but the game will insist on saving and loading from the C: drive, meaning that Steam Cloud will still not work. Your Documents folder needs to be in the C: drive in order for Steam Cloud to work. |
Video

Video settings
| Graphics feature | State | Notes | |
|---|---|---|---|
| Widescreen resolution | See Widescreen resolution. | ||
| Multi-monitor | Use Flawless Widescreen. | ||
| Ultra-widescreen | Use Flawless Widescreen. If the HUD is broken on Ultrawide/Superwide resolutions, Make sure to use MGROverride first (modify the EXE to the monitor's resolution), set the game resolution to 800x600 and follow the instructions in the Flawless Widescreen window. Make sure Don't Stretch HUD is checked. | ||
| 4K Ultra HD | See Widescreen resolution. | ||
| Field of view (FOV) | Use Cheat Table by IPG Xapek.[citation needed] | ||
| Windowed | |||
| Borderless fullscreen windowed | See the glossary page for potential workarounds. | ||
| Anisotropic filtering (AF) | Up to 16x. | ||
| Anti-aliasing (AA) | Up to 8x MSAA. | ||
| High-fidelity upscaling | See the glossary page for potential workarounds. | ||
| Vertical sync (Vsync) | See the glossary page for potential workarounds. | ||
| 60 FPS | Main menu and cutscenes are capped at 30 FPS. Gameplay is capped at 59 FPS. Frame limiter is unstable and may jump further up and down the longer the game is left on. This is a long-standing issue with PlatinumGames PC ports.[8] See SilentPatch for The Wonderful 101 to fix the frame limiter. |
||
| 120+ FPS | |||
| High dynamic range display (HDR) | See the glossary page for potential alternatives. | ||
| Ray tracing (RT) | |||
Widescreen resolution
- The only resolutions available are 800x600, 1280x720, 1366x768, 1680x1050, and 1920x1080. Aspect ratios other than 16:9 are anamorphic.
| Set custom resolution[9] |
|---|
Notes
|
Remove noise filter
| Remove noise filter[10] |
|---|
|
Modified camera settings
- These mods disable some camera restrictions and leave the camera a little more calm and fixed.
They also make the player character centered on the screen, rather than aligned to the left.
| Use camera mods[11] |
|---|
|
Input

Input settings.

Keyboard settings.
- The Konami Code can only be input with a controller.
| Keyboard and mouse | State | Notes |
|---|---|---|
| Remapping | Certain keys such as A and D cannot be changed. No extra mouse buttons. | |
| Mouse acceleration | Negative mouse acceleration present by default. | |
| Mouse sensitivity | Separate values for the Y-axis and the X-axis. | |
| Mouse input in menus | ||
| Mouse Y-axis inversion | Also has X-axis inversion. General camera settings also affect sub-weapon aiming and blade mode cameras. |
|
| Controller | ||
| Controller support | ||
| Full controller support | ||
| Controller remapping | Four presets available. | |
| Controller sensitivity | Separate values for the Y-axis and the X-axis. | |
| Controller Y-axis inversion | Also has X-axis inversion. General camera settings also affect sub-weapon aiming and blade mode cameras. |
| Controller types |
|---|
| XInput-compatible controllers | ||
|---|---|---|
| Xbox button prompts | ||
| Impulse Trigger vibration |
| PlayStation controllers | See DualShock 4. | |
|---|---|---|
| PlayStation button prompts | See DualShock Button Prompts. | |
| Light bar support | ||
| Adaptive trigger support | ||
| DualSense haptic feedback support | ||
| Connection modes | ||
| Generic/other controllers | See the glossary page for potential workarounds. |
|---|
| Additional information | ||
|---|---|---|
| Controller hotplugging | ||
| Haptic feedback | ||
| Digital movement supported | ||
| Simultaneous controller+KB/M | Switches rapidly between controller and KB/M prompts. Prioritizes KB/M prompts. |
DualShock Button Prompts
| Instructions |
|---|
Notes
|
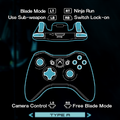
Controller Layout A.
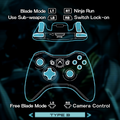
Controller Layout B.
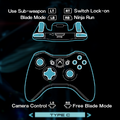
Controller Layout C.
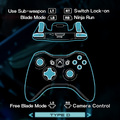
Controller Layout D.


Audio

Audio settings.
| Audio feature | State | Notes |
|---|---|---|
| Separate volume controls | Music, sound effects, and voices. | |
| Surround sound | Up to 5.0 output.[12] | |
| Subtitles | ||
| Closed captions | ||
| Mute on focus lost | ||
| Royalty free audio |
Localizations
| Language | UI | Audio | Sub | Notes |
|---|---|---|---|---|
| English | ||||
| French | ||||
| German | ||||
| Italian | ||||
| Japanese | Use this mod to restore the Japanese dub for cutscenes. In-game dialogues and voice lines will remain in English because of modding limitations. Ported from the Japanese PlayStation 3 version. Japanese audio for the DLC campaigns is currently not supported and thus remain in English. |
|||
| Brazilian Portuguese | ||||
| Russian | Fan translation by «ZoG Forum Team». | |||
| Spanish |
Issues fixed
Crash on launch (Windows)
- Even when the correct drive is present, the game might still crash due to
ntdll.dllas a faulty module. - The game uses a fixed path for its data instead of using standard Windows variables. If the
C:drive is missing, the game will not be able to save and will crash.
| Use SilentPatch for MGR to fix the save path |
|---|
Game runs at incorrect refresh rate
- The game doesn't follow the refresh rate set in Windows and defaults to a slower one.[13]
| Override refresh rate with D3Dx[14] |
|---|
|
| Set screen refresh rate with Special K[15] |
|---|
|
| Use ForceFix |
|---|
Notes
|
| Disable fullscreen optimizations in Windows 10 and 11 |
|---|
|
| Use Custom Resolution Utility |
|---|
|
Crashes when changing display mode to fullscreen (Linux)
- On some Proton/Linux configurations, changing from windowed mode to fullscreen mode may crash.
This issue can be solved by editing the graphics settings file directly.
| Edit graphics settings file |
|---|
|
QTEs with Left Stick impossible to complete on controller
| Use D-pad ← and D-pad → buttons[16] |
|---|
Other information
API
| Technical specs | Supported | Notes |
|---|---|---|
| Direct3D | 9.0c |
| Executable | 32-bit | 64-bit | Notes |
|---|---|---|---|
| Windows | |||
| macOS (OS X) | Unplayable as of 2017. |
Middleware
System requirements
| Windows | ||
|---|---|---|
| Minimum | Recommended | |
| Operating system (OS) | XP, Vista, 7, 8 | |
| Processor (CPU) | Intel Core i5-2400 | Intel Core i7-3770 |
| System memory (RAM) | 2 GB | 4 GB |
| Hard disk drive (HDD) | 25 GB | |
| Video card (GPU) | Nvidia GeForce GTS 450 DirectX 9.0c compatible | Nvidia GeForce GTX 650 |
| Sound (audio device) | DirectX compatible | |
| macOS (OS X) | ||
|---|---|---|
| Minimum | Recommended | |
| Operating system (OS) | 10.9.2 | 10.9.4 |
| Processor (CPU) | Intel Core i Series | |
| System memory (RAM) | 4 GB | 8 GB |
| Hard disk drive (HDD) | 27 GB | |
| Video card (GPU) | Nvidia GeForce GT 650M ATI Radeon HD 4870 Intel Iris | Nvidia GeForce GT 750M |
Notes
- ↑ DO NOT CHANGE, the game really uses fixed path like this
- ↑ 2.0 2.1 Notes regarding Steam Play (Linux) data:
- File/folder structure within this directory reflects the path(s) listed for Windows and/or Steam game data.
- Games with Steam Cloud support may also store data in
~/.steam/steam/userdata/<user-id>/235460/. - Use Wine's registry editor to access any Windows registry paths.
- The app ID (235460) may differ in some cases.
- Treat backslashes as forward slashes.
- See the glossary page for details on Windows data paths.
- ↑ DO NOT CHANGE, the game really uses fixed path like this
References
- ↑ 1.0 1.1 DRM Takes Out Metal Gear Rising: Revengeance : Games - last accessed on 2020-12-07
- "Transgaming, the company who created the port included some DRM that has to "phone home" as part of its install process."
- ↑ SilentPatchMGR - Fix Infinite Wig B - GitHub - last accessed on 2024-08-31
- ↑ CookiePLMonster/SilentPatchMGR | Skip intro splashes
- ↑ Skip credits and more at Metal Gear Rising: Revengeance Nexus - Mods and community - last accessed on 2022-09-11
- ↑ Verified by User:Marioysikax on June 20, 2016
- ↑ Verified by User:Reonu on June 12, 2022
- ↑ Steam Community :: Group Announcements :: METAL GEAR RISING: REVENGEANCE - last accessed on 17 May 2023
- ↑ SilentPatch for The Wonderful 101: Remastered, fixing frame pacing issues | Silent's Blog
- ↑ NeoGAF - View Single Post - Metal Gear Rising: Revengeance PC Version - last accessed on 2017-03-03
- ↑ NeoGAF - View Single Post - Metal Gear Rising: Revengeance PC Version - last accessed on 2017-03-03
- ↑ Metal Gear Rising PC Modding → Simple Camera Mod
- ↑ PC Gaming Surround Sound Round-up - last accessed on 17 May 2023
- ↑ Fix the 24 fps fullscreen lock ASAP :: METAL GEAR RISING: REVENGEANCE General Discussions - last accessed on 17 May 2023
- ↑ Verified by User:Keith on 2021-07-12
- ↑ Verified by User:Keith on 2017-09-28
- ↑ Left Stick Waggle Dont Works But On Keyboard It works :: METAL GEAR RISING: REVENGEANCE General Discussion - last accessed on 17 May 2023
- ↑ Audiokinetic | METAL GEAR RISING: REVENGEANCE