Difference between revisions of "E.Y.E: Divine Cybermancy"
From PCGamingWiki, the wiki about fixing PC games
m (Fixing link) |
m (Fixed Uninstallation of Translation Patch) |
||
| Line 78: | Line 78: | ||
'''Patch Uninstallation''' | '''Patch Uninstallation''' | ||
#Simply copy back the original {{code|{{p|game}}\EYE\EYE\resource}} folder back. | #Simply copy back the original {{code|{{p|game}}\EYE\EYE\resource}} folder back. | ||
| − | #Otherwise, in {{code|{{p|game}}\EYE\EYE}} delete | + | #Otherwise, in {{code|{{p|game}}\EYE\EYE}} delete the {{code|{{p|game}}\EYE\EYE\resource}} folder. |
#In Steam's '''Library''' page, Right-Click on the game's title. Choose '''Properties'''. Head to '''Local Files''' tab, and click on '''VERIFY INTEGRITY OF GAME FILES'''. | #In Steam's '''Library''' page, Right-Click on the game's title. Choose '''Properties'''. Head to '''Local Files''' tab, and click on '''VERIFY INTEGRITY OF GAME FILES'''. | ||
}} | }} | ||
Revision as of 17:18, 9 December 2020
 |
|
| Developers | |
|---|---|
| Streum On Studio | |
| Engines | |
| Source | |
| Release dates | |
| Windows | July 29, 2011 |
| Reception | |
| Metacritic | 61 |
| Taxonomy | |
| Modes | Singleplayer, Multiplayer |
General information
Availability
| Source | DRM | Notes | Keys | OS |
|---|---|---|---|---|
| Steam |
Essential improvements
Skip intro videos
Use -novid command line argument[1]
|
|---|
Patches
EYE Text Revamp Mod v1.3[2]
- Updated version v1.4 available here
- Improves the English translation and the text U.I.
- Causes an error in the Stats tab
| Installation of Translation Patch with Stats tab fix |
|---|
Patch Installation
Fixing Stats tab
Patch Uninstallation
|
Game data
Configuration file(s) location
| System | Location |
|---|---|
| Windows | <path-to-game>\EYE\cfg\[Note 1] |
| Steam Play (Linux) | <SteamLibrary-folder>/steamapps/compatdata/91700/pfx/[Note 2] |
-
config.cfgcontains general settings. - Video settings are stored in
HKEY_CURRENT_USER\Software\Valve\Source\EYE\Settings
Save game data location
| System | Location |
|---|---|
| Windows | %USERPROFILE%\Documents\streumon\eye\Save |
| Steam Play (Linux) | <SteamLibrary-folder>/steamapps/compatdata/91700/pfx/[Note 2] |
Save game cloud syncing
| System | Native | Notes |
|---|---|---|
| OneDrive | Requires enabling backup of the Documents folder in OneDrive on all computers. | |
| Steam Cloud |
Video
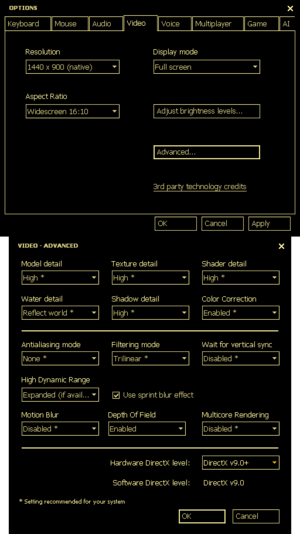
| Graphics feature | State | WSGF | Notes |
|---|---|---|---|
| Widescreen resolution | |||
| Multi-monitor | HUD displays on the far left. | ||
| Ultra-widescreen | HUD may display on the left of the screen. Subtitles may be cut off. | ||
| 4K Ultra HD | 4k resolution may result in the exp, health, stamina, and mental energy bars not displaying correctly. Game lacks HUD scaling for ultra-high resolutions. | ||
| Field of view (FOV) | Default is 90°;[3] see Field of view (FOV). | ||
| Windowed | |||
| Borderless fullscreen windowed | See Borderless fullscreen windowed. | ||
| Anisotropic filtering (AF) | |||
| Anti-aliasing (AA) | |||
| Vertical sync (Vsync) | |||
| 60 FPS and 120+ FPS | No frame rate or refresh rate cap.[4] | ||
| High dynamic range display (HDR) | Rendered image uses SDR color space. In-game HDR option refers only to HDR Rendering. | ||
Field of view (FOV)
| Set FOV in console[citation needed] |
|---|
|
Borderless fullscreen windowed
| -window -noborder[5] |
|---|
|
Input
| Keyboard and mouse | State | Notes |
|---|---|---|
| Remapping | ||
| Mouse acceleration | Disabled by default. | |
| Mouse sensitivity | ||
| Mouse input in menus | ||
| Mouse Y-axis inversion | ||
| Controller | ||
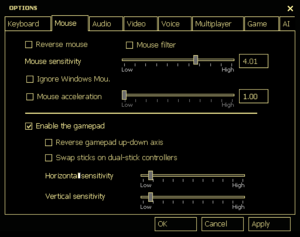
| Controller support | Disabled by default. Set in Options, Mouse. | |
| Full controller support | ||
| Controller remapping | ||
| Controller sensitivity | ||
| Controller Y-axis inversion | Set in Options, Mouse. |
| Additional information | ||
|---|---|---|
| Controller hotplugging | ||
| Haptic feedback | ||
| Digital movement supported | ||
| Simultaneous controller+KB/M |
Audio
| Audio feature | State | Notes |
|---|---|---|
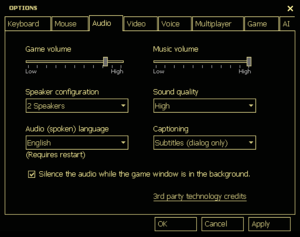
| Separate volume controls | Game and Music. | |
| Surround sound | ||
| Subtitles | Enabled by default. Conversations are text-only. | |
| Closed captions | Option is listed but does nothing. | |
| Mute on focus lost | Enabled by default. Set in Options, Audio. |
Localizations
- All voice acting is in a fictional language.
| Language | UI | Audio | Sub | Notes |
|---|---|---|---|---|
| English | Fan translation patch, download. See here for details. | |||
| French | ||||
| German | Fan translation, Download link 1. Download link 2. | |||
| Japanese | Fan translation, Tutorial on how to download and configure | |||
| Spanish | Fan translation, download. | |||
| Russian | Fan translation, download. |
Network
Multiplayer types
| Type | Native | Notes | |
|---|---|---|---|
| Local play | Not present; category is listed incorrectly on the Steam store page.[6] | ||
| LAN play | |||
| Online play | |||
Connection types
| Type | Native | Notes |
|---|---|---|
| Matchmaking | ||
| Peer-to-peer | ||
| Dedicated | Windows dedicated server available under Tools in the Steam client. | |
| Self-hosting | ||
| Direct IP | Entering the "connect" command followed by the IP address in the Source console (opened via ` key). |
VR support
| 3D modes | State | Notes | |
|---|---|---|---|
| vorpX | G3D User created game profile, see vorpx forum profile introduction. |
||
Issues unresolved
Save system is broken on Windows 10
- On Windows 10 systems the game's save system does not work properly; character or mission progress autosaving is inconsistent, and the game may skip large sections of the mission when loading a level.[7]
- Game can still be completed, though achieving 100% completion may be extremely difficult, as the bug interferes with the event flag required to spawn the werewolf and obtain the "Hypnotic Gate" artifact required for the "true ending".
Issues fixed
Possible Fixes for the Save system on Windows 10
- Below are possible methods that fixes the game's save system to avoid repeating missions and skipping sections of missions.[8]
| Fixing Save System |
|---|
|
Exclude save folder from File Indexing
Exclude save folder from Windows Defender
Turn off Read Only attribute of the Save folder
Rename temp save files
|
Other information
API
| Technical specs | Supported | Notes |
|---|---|---|
| Direct3D | 9 | |
| Shader Model support | 3 |
| Executable | 32-bit | 64-bit | Notes |
|---|---|---|---|
| Windows | [9] |
System requirements
| Windows | ||
|---|---|---|
| Minimum | Recommended | |
| Operating system (OS) | XP | Vista, 7 |
| Processor (CPU) | Intel Pentium 4 3.0 GHz AMD Athlon 64 3000+ |
Intel Core 2 Duo 2.4 GHz AMD Athlon 64 X2 4600+ |
| System memory (RAM) | 1 GB (XP), 2 GB (Vista) | |
| Hard disk drive (HDD) | 6 GB | |
| Video card (GPU) | ATI Radeon X800 Nvidia GeForce 6600 DirectX 9.0c compatible Shader model 2.0 support |
Nvidia GeForce 7600 ATI Radeon X1600 Shader model 3.0 support |
Notes
- ↑ When running this game without elevated privileges (Run as administrator option), write operations against a location below
%PROGRAMFILES%,%PROGRAMDATA%, or%WINDIR%might be redirected to%LOCALAPPDATA%\VirtualStoreon Windows Vista and later (more details). - ↑ 2.0 2.1 Notes regarding Steam Play (Linux) data:
- File/folder structure within this directory reflects the path(s) listed for Windows and/or Steam game data.
- Use Wine's registry editor to access any Windows registry paths.
- The app ID (91700) may differ in some cases.
- Treat backslashes as forward slashes.
- See the glossary page for details on Windows data paths.
References
- ↑ Verified by User:Expack3 on 2017-11-5
- ↑ Moddb E.Y.E English Fan Translation Patch - last accessed on 2020-12-09
- ↑ https://steamcommunity.com/app/91700/discussions/0/864950841089197155/
- ↑ New 120Hz Games Report
- ↑ Verified by User:Expack3 on 2020-05-12
- ↑ It says Local multiplayer in the description, is it on the same machine? :: E.Y.E: Divine Cybermancy General Discussions
- ↑ Steam Discussions - Saving broken? - last accessed on 2020-10-19
- ↑ Steam Community Guide - Fix Save Bug - last accessed on 2020-12-08
- ↑ Verified by User:Expack3 on 2020-05-12
- Tested using win32 port of Linux
filecommand.
- Tested using win32 port of Linux


