|
|
| Line 224: |
Line 224: |
| | {{ii}} Some of the post-processing effects can only be disabled in the game's XEngine.ini file. These effects include depth of field, light bloom, and color correction. | | {{ii}} Some of the post-processing effects can only be disabled in the game's XEngine.ini file. These effects include depth of field, light bloom, and color correction. |
| | | | |
| − | {{Fixbox|description=Disabling post-processing|ref={{cn|date=July 2016}}|fix=
| |
| | # Go to the [[#Game data|configuration files location]]. | | # Go to the [[#Game data|configuration files location]]. |
| | # Open {{File|XEngine.ini}}. | | # Open {{File|XEngine.ini}}. |
| Line 234: |
Line 233: |
| | </gallery> | | </gallery> |
| | }} | | }} |
| | + | |
| | + | ===Disable Lens Flare and Dirt Effect=== |
| | + | {{ii}} Both effects are controlled by a single setting |
| | + | |
| | + | {{Fixbox|description=Disabling lens flare|ref={{cn|date=July 2016}}|fix= |
| | + | # Go to the [[#Game data|configuration files location]]. |
| | + | # Open {{File|XEngine.ini}}. |
| | + | # Change <code>LensFlares=True</code> to <code>LensFlares=False</code>. |
| | | | |
| | ==Input settings== | | ==Input settings== |
Revision as of 07:48, 2 December 2017
Template:Infobox game/row/osxporterTemplate:Infobox game/row/linporterWarnings
- The macOS (OS X) version of this game does not work on macOS Catalina (version 10.15) or later due to the removal of support for 32-bit-only apps.
Key points
- Quality PC port, including graphics and control options.[1][2]
- Aim assist is on by default even when not using a controller, but can be fixed.
General information
- Port Report: BioShock Infinite.
- Official game site
- 2K Games Forums
- Steam Community Discussions
- BioShock Wiki - A huge wiki for all the BioShock games
Availability
- All Windows and Linux versions require Steam DRM.
DLC and expansion packs
| Name |
Notes |
|
| Season Pass |
|
|
| Early Bird Special Pack |
Exclusive to the Season Pass |
|
| Columbia's Finest |
|
|
| Clash in the Clouds |
Part of the Season Pass |
|
| Burial At Sea: Episode One |
Part of the Season Pass |
|
| Burial At Sea: Episode Two |
Part of the Season Pass |
|
Essential improvements
Skip intro videos
|
Replace files[citation needed]
|
- Download this archive.
- Extract to the installation folder and replace all files.
|
|
Edit Configuration File[citation needed]
|
- Go to the configuration files location.
- Open
XEngine.ini.
- Locate section
[FullScreenMovie] and comment out these lines by putting a semicolon (;) at the beginning of each:
StartupMovies=2KLogoSweep720p2997
StartupMovies=IrrationalLogoTest
StartupMovies=UE3AnimatedLogo_ProRes
StartupMovies=AMDLogo720p
- Save the file as read-only to prevent the tweak from randomly reverting.
- Do not touch this line or you won't be able to reach the main menu:
StartupMovies=LoopingMovieUntilStartupFinishes
|
Turn Off Texture Streaming
|
Edit Configuration File[citation needed]
|
- Go to the configuration files location.
- Open
XEngine.ini.
- Change these lines and save as read-only:
UseBackgroundLevelStreaming=False
MipFadeInSpeed0=0
MipFadeOutSpeed0=0
MipFadeInSpeed1=0
MipFadeOutSpeed1=0
OnlyStreamInTextures=True
PoolSize=0
LoadMapTimeLimit=999
LightmapStreamingFactor=0
ShadowmapStreamingFactor=0
bAllowSwitchingStreamingSystem=False
UseDynamicStreaming=False
- May cause game to enter an infinite loading loop. If it does, turn texture streaming back on, leave that area of the game, and turn it off again once you leave the area.
|
Game data
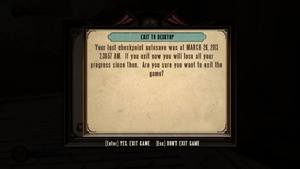
Exiting to desktop or main menu reveals the local date of the last checkpoint.
Configuration files location
- This game follows the XDG Base Directory Specification on Linux.
- Key mappings are encrypted which prevents sharing key bind files or creating custom commands.[3]
Save game data location
- Game creates an automatic permanent save at the beginning of each chapter. These saves are automatically overwritten if replaying from a previous chapter.
- Only one save game is able to played at any one time.[4]
Video settings
In-game graphics settings.
Template:Video settings
- The HUD may not be centred automatically for multi-monitor setups.[citation needed]
|
Centering HUD on multi-monitor setups[citation needed]
|
- Go to the configuration files location.
- Open
XGame.ini.
- Change
bUseDefaultSafeRect=true to bUseDefaultSafeRect=False.
- Change
SafeRectX0 and SafeRectX1 to area you want to HUD to be within.
- Change
SafeRectY1 to the height of your monitors.
- For example, on a 5760x1080 resolution it would be as
SafeRectX0=1920, SafeRectX1=3840, SafeRectY0=0, SafeRectY1=1080
|
- There is a FOV slider in the game options, however it only increases/decreases FOV by 15% from the default value of 70º (59.5º - 80.5º).
|
FOV slider expansion[citation needed]
|
- Go to the configuration files location.
- Open
XUserOptions.ini.
- Locate line
MaxUserFOVOffsetPercent=15.000000 and change its value to 100 for maximum variability. This value is in percent and not degrees. See table below for precise field of view values.
- Start the game and set your field of view via slider in menu.
Default FOV slider to the max.
Slider offset set to 100 and slider set to the max.
|
| Maximum FoV by slider |
MaxUserFOVOffsetPercent value
|
| 85 |
21.43
|
| 90 |
28.57
|
| 95 |
35.71
|
| 100 |
42.86
|
| 105 |
50.00
|
| 110 |
57.14
|
| 120 |
60.00
|
Disable Post-Processing Effects
- Some of the post-processing effects can only be disabled in the game's XEngine.ini file. These effects include depth of field, light bloom, and color correction.
- Go to the configuration files location.
- Open
XEngine.ini.
- Change
DepthOfField=True to DepthOfField=False.
}}
Disable Lens Flare and Dirt Effect
- Both effects are controlled by a single setting
{{Fixbox|description=Disabling lens flare|ref=[citation needed]|fix=
- Go to the configuration files location.
- Open
XEngine.ini.
- Change
LensFlares=True to LensFlares=False.
Input settings
Template:Input settings
Mouse speed slider tweak
- Slider for mouse speed is set to very wide range, which can be unsuitable for high precision mice.
|
Mouse slider tweak[citation needed]
|
- Go to the configuration files location.
- Open
XUserOptions.ini.
- Locate lines
MinMouseLookSensitivity=0.010000 and MaxMouseLookSensitivity=1.500000 and change values to your taste. Values 0.05 for MinMouse and 0.5 for MaxMouse works OK
- Start the game and set your desired sensitivity via slider.
Notes
- This fix will modify the in-game slider and give better control.
|
Audio settings
Template:Audio settings
Localizations
| Language |
UI |
Audio |
Sub |
Notes |
| English |
|
|
|
|
| French |
|
|
|
|
| German |
|
|
|
|
| Italian |
|
|
|
|
| Japanese |
|
|
|
|
| Korean |
|
|
|
|
| Polish |
|
|
|
|
| Brazilian Portuguese |
|
|
|
|
| Russian |
|
|
|
|
| Spanish |
|
|
|
|
VR support
Issues unresolved
Windows
Freezing and crashing
- There have been reports of crashing and freezing, possibly related to i7 processors.[5][6] 2K is aware of this issue and there should be patch soon.[citation needed]
|
Possible fixes[citation needed]
|
- If the game crashes on start-up, disable any on-screen display applications like MSI Afterburner.
- Disable overclocking or underclock your graphics card.
- Disable Killer e2200 PCI-E Gigabit Ethernet Controller or any other virtual/VPN network adapters like Hamachi.[7]
|
Issues fixed
Texture streaming quality problems
- When the game can't detect or detects wrong video memory size, it automatically enables only Very Low and Low options for texture quality.
- There is also an issue on some systems that selection Very High or Ultra for texture quality will cause to textures never load properly and game tries to load them over and over.[8]
|
Low texture quality and streaming fix[9]
|
- Go to the configuration files location.
- Open
XEngine.ini.
- Locate section
[TextureStreaming] and change appropriate lines as shown:
[TextureStreaming]
UseTextureFileCache=False
TexturePoolSizeReductionMB=1500
PoolSize=3000
LowPCTexturePoolSizeMB=3000
|
FPS dropping
- Nvidia cards experience FPS drops in certain areas when
Dynamic Shadows is set to Very High or Ultra.
Make the Game Hor+
|
Edit Configuration File[citation needed]
|
- Go to the configuration files location.
- Open
XEngine.ini.
- add this line:
AspectRatioAxisConstraint=AspectRatio_MaintainYFOV
|
Disable aim assist
- Aim assist is on by default even when using keyboard and mouse.[12]
- There are some auto aim variables in the .ini files but these variables are reverted to True every time you start the game.[13] There is no permanent fix yet.
|
Permanent Partial Solution[14]
|
- This fix affects user options configurations, if you need to make a config in game do it before try this.
- Go to the configuration files location.
- Open
XUserOptions.ini.
- Change
bAimAssist and DefaultbAimAssist to false
- Save your changes and make
XUserOptions.ini read only.
|
|
Temporary auto aim fix[15]
|
- This fix needs to be applied every time the game is started.
- Start the game with a controller plugged in.
- Go to controller options and turn off Aim Assist.
- Unplug controller and play the game.
|
GUI scaling on high resolution displays
- GUI elements are not scaling with resolution which makes these elements rather small on high resolution displays.
|
GUI scaling tweak[16]
|
- Go to the configuration files location.
- Open
XUI.ini.
- Locate lines
MaxResolutionUpScale=0.0 and change value to something between 0.0 and 1.0. See screenshots for examples.
|
Windows
Crash on start for some Windows 7 and 8 users
|
Force start in Windowed Mode[citation needed]
|
- Run the game with the
-windowed command line argument.
- Open the graphics options and set the game to run full screen.
- Close the game, remove the launch option, then restart the game.
|
|
Run Steam as an administrator and the game itself NOT as an administrator[citation needed]
|
|
Change the "Documents" folder back to default if it has been moved[citation needed]
|
Cannot restore game after Alt-Tab
Change from toggle to hold aim down sights
|
AutoHotkey script for hold to aim[citation needed]
|
- Download and install AutoHotkey.
- Let application create sample script. This script file should open after installation.
- Delete everything and insert the lines below.
- Open AutoHotkey window (green H icon in tray area), navigate to
File and hit Reload Script.
#IfWinActive BioShock Infinite
$mbutton::
  Send {mbutton}
  KeyWait, mbutton
Return
mbutton Up::Send {mbutton}
Notes
- This is script for default bindings where aiming is bind to middle mouse button. For aiming by right mouse button replace
MButton for RButton.
- For bindings to other keys, see Hotkeys and KeyList sections of AutoHotkey documentation for button syntaxes.
- If your zoom gets stuck, you can reset with the run key.
|
Stuttering during gameplay
|
Enable fullscreen mode[citation needed]
|
|
Run game in compatibility mode[citation needed]
|
- Go to
<path-to-game>\Binaries\Win32\.
- Right-click on
BioShockInfinite.exe, go to the compatibility tab, tick the box and select Windows Vista Service Pack 2.
|
|
Texture Pool Size Fix[18][19]
|
- Set the PoolSize variable in
XEngine.ini to about 400 less than the total number of Megabytes RAM your video card has (e.g if you have 2048 MB of video RAM set this to 1600).
- Add this launch option in Steam:
-ReadTexturePoolFromIni.
|
Xbox controls even with no controller attached
- Bioshock Infinite auto-detects any controllers/joysticks attached to the system including virtual ones. This could make the game uncontrollable, cause the camera to spin, and label the menu with Xbox prompts.
|
Remove all controllers[citation needed]
|
- Remove all physical controllers and joysticks.
- Disable all virtual controllers
- These can be included in software for gaming mice and keyboards
- Disable Unified Remote.
- Disable virtual adapter for 3DConnexion devices.
- To disable controller support, edit
%USERPROFILE%\Documents\My Games\BioShock Infinite\XGame\Config\XEngine.ini and change AllowJoystickInput=1 to AllowJoystickInput=0. Save your changes.
|
Microstuttering
|
Adaptive and dynamic V-Sync[citation needed]
|
- These forms of V-Sync significantly reduce micro-stuttering.[20][21]
- For Nvidia cards, Adaptive V-Sync can be enabled through the driver control panel. Set
Vertical sync to Adaptive.
- For AMD cards, Dynamic V-Sync can be enabled using the third-party program RadeonPro. Click the
Add new profile icon and find the BioShock Infinite executable (BioShockInfinite.exe in <path-to-game>\Binaries\Win32\BioShockInfinite.exe). Click the newly created profile and click the Tweaks tab. Set VSync Control to Always on. Enable Dynamic Framerate Control and set Keep up to to 60.
|
- Mice with high polling rates can sometimes cause microstuttering.
|
Fix for Razer mice[22]
|
- Open Razer Synapse.
- Click on the "Performance" tab.
- Change the "Polling Rate" to 125 Hz.
|
Audio crackling
|
Update GPU drivers[23][citation needed]
|
|
Run the game in compatibility mode[24]
|
|
Audio stutter may also be fixed by enabling compatibility mode for Windows Vista SP2
- Go to
<path-to-game>\Binaries\Win32\
- Right-click on
BioShockInfinite.exe, go to the compatibility tab, tick the box and select Windows Vista Service Pack 2.
|
Linux
Game starts on the wrong screen
|
Start with a a command line option[citation needed]
|
- Launch the game with
--eon_force_display=#, replacing # with the index of the monitor you want the game to launch on.
|
Game starts on the wrong screen, wrong aspect ratio
- In a multi-monitor configuration where 1 monitor is portrait and 1 monitor landscape and where game starts on portrait monitor and is forced to run on the landscape monitor using
--eon_force_display, game does not recognize landscape monitor's aspect ratio and will only allow portrait aspect ratios/resolutions.
- No real fix is available at this time.
|
Pending fix[citation needed]
|
- De-rotating the portrait screen will allow selection of landscape aspect ratios, but it is not persistent. The portrait monitor must be de-rotated before playing as a workaround.
- In
XUserOptions.ini setting ResolutionX=<DesiredWidth>, ResolutionY=<DesiredHeight>, and DisplayMode=0 (fullscreen) will allow the game to run in widescreen, but you are restricted to fullscreen play.
|
Game uses system mouse acceleration
- The game uses mouse acceleration, even if mouse acceleration is turned off in-game.
|
Disable mouse acceleration in the system before game launches[citation needed]
|
- Open the terminal and type
xinput list to look up your mouse name (the Virtual core pointer section)
- In Steam, go to the Bioshock Infinite launch options (Properties -> SET LAUNCH OPTIONS...)
- Copy the following into the text-field (replace 'MOUSENAME' with the name you got in step 1, include the quotation marks):
xinput --set-prop 'MOUSENAME' 'Device Accel Profile' -1 ; %command% ; xinput --set-prop 'MOUSENAME' 'Device Accel Profile' 0
Notes
- This will disable mouse acceleration in your system before launching the game and enable it again when the game closes (which might take a couple of seconds).
- Graphical user interfaces for mouse settings (e.g. mate-mouse-properties) might not be aware of the changes. It's best not to touch them while the game is running.
|
Other information
API
| Technical specs |
Supported |
Notes |
| Direct3D |
10, 11 |
|
| OpenGL |
3.3, 4.1, 4.2 |
3.3 on OS X, 4.1/4.2 on Linux. |
| Shader Model support |
4, 5 |
|
| Executable |
32-bit |
64-bit |
Notes |
| Windows |
|
|
|
| macOS (OS X) | |
|
|
| Linux | |
|
|
Middleware
System requirements
| Windows |
|
Minimum |
Recommended |
| Operating system (OS) |
Vista SP2 |
7 SP1 64-bit |
| Processor (CPU) |
2.4 GHz Intel Core 2 Duo
2.7 GHz AMD Athlon X2 |
Quad core |
| System memory (RAM) |
2 GB |
4 GB |
| Hard disk drive (HDD) |
20 GB |
30 GB |
| Video card (GPU) |
ATI Radeon 3870
Intel HD 3000
Nvidia GeForce 8800 GT
512 MB of VRAM
DirectX 10 compatible
| ATI Radeon 6950
Nvidia GeForce GTX 560
1 GB of VRAM
DirectX 11 compatible |
| macOS (OS X) |
|
Minimum |
| Operating system (OS) |
10.8.4 |
| Processor (CPU) |
2.2 GHz Intel Core 2 Duo |
| System memory (RAM) |
4 GB |
| Hard disk drive (HDD) |
30 GB |
| Video card (GPU) |
ATI Radeon HD 3870
Nvidia GeForce 640M
512 MB of VRAM |
| Linux |
|
Minimum |
Recommended |
| Operating system (OS) |
Ubuntu 14.10, Mint 17.1 | |
| Processor (CPU) |
2.4 GHz Intel Core 2 Duo
2.7 GHz AMD Athlon X2 |
3 GHz Intel Core i5 |
| System memory (RAM) |
4 GB |
8 GB |
| Hard disk drive (HDD) |
20 GB | |
| Video card (GPU) |
Nvidia/AMD
OpenGL 4.1 compatible
| OpenGL 4.2 compatible |
References