Warnings
- GameSpy online services have been shut down (see Network for solutions).
Key points
- Crysis Wars is the multiplayer section of the game, Crysis: Warhead is the single player campaign.
- Comes bundled with modding tools
- Very taxing even on some modern computers
- GameSpy online server browser stopped working on May 31, 2014 due to GameSpy services being shut down.[1] Unofficial Crysis Wars Multiplayer Mod is available.[2]
General information
- Crysis Website
- MyCrysis Forums
- Crysis Wiki - A wiki for everything Crysis related
- GOG.com Community Discussions for game series
- GOG.com Support Page
- Steam Community Discussions
Availability
Essential improvements
Patches
Latest version for Warhead is 1.1. Latest versions for Wars is 1.5. Patch can be found here.
Crysis Wars Multiplayer Mod
This mod updates the game to use new multiplayer master servers, re-enabling online support lost by the GameSpy service shutdown.
Full details and download links can be found on the German Crysis Forums.
Skip intro videos
|
Skip company logos[citation needed]
|
- Go to
<path-to-game>\Game\Localized\Video\
- Delete or move these files:
CryTek.sfd
Trailer_Crytek.sfd
Trailer_CrytekC.sfd
Trailer_DemoLegal.sfd
Trailer_EA.sfd
Trailer_Intel.sfd
Trailer_NVidia.sfd
Trailer_PEGI.sfd
Trailer_Rating_Full.sfd
Trailer_Rating_Logo.sfd
|
Game data
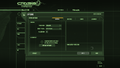
In-game general settings.
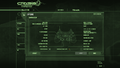
In-game general settings (Crysis Wars).
Configuration file(s) location
Save game data location
Video settings
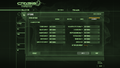
In-game general video settings.
In-game advanced video settings.
Template:Video settings
In-game general video settings (Crysis Wars).
In-game advanced video settings (Crysis Wars).
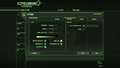
In-game graphics settings (Crysis Wars).
- This game uses vertical FOV. See FOV Calculator for help.
|
Edit game.cfg[citation needed]
|
- Go to
%USERPROFILE%\Documents\My Games\Crysis_WARHEAD\
- Open
game.cfg with a text editor.
- Enter the following line with the desired value:
cl_fov=<value>
- Right-click
game.cfg -> Properties -> Set the file's attribute to Read-only as this keeps the desired value from changing to it's default value every time you exit the game.
|
- Crysis: Warhead by default disables AF because the engine as-is does not support using AF with parallax occlusion mapping (POM). This mod allows the engine to use AF and POM at the same time.
|
Install the POM+AF mod to allow anisotropic filtering[citation needed]
|
- Download the POM+AF mod from here.
- Copy
zz_GlobalAmbientLighting_pom_Af.pak to <path-to-game>\Game
- Force anisotropic filtering in your graphics card control panel.
|
Input settings
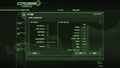
In-game keyboard/mouse settings.
In-game gamepad settings.
Template:Input settings
In-game keyboard/mouse settings (Crysis Wars).
In-game gamepad settings (Crysis Wars).
|
Mouse acceleration[citation needed]
|
- Open the console (~).
- Enter
con_restricted=0 to enable all console commands.
- Enter
i_mouse_accel X where X is 1 or 0. Default 0 disables acceleration.
|
Audio settings
In-game audio settings (Crysis Wars).
Template:Audio settings
Localizations
| Language |
UI |
Audio |
Sub |
Notes |
| English |
|
|
|
|
| Czech |
|
|
|
|
| French |
|
|
|
|
| German |
|
|
|
|
| Hungarian |
|
|
|
|
| Italian |
|
|
|
|
| Polish |
|
|
|
|
| Russian |
|
|
|
|
| Spanish |
|
|
|
|
Network
Multiplayer types
Connection types
Ports
| Protocol |
Port(s) and/or port range(s) |
| TCP |
80, 443, 6667, 28910, 29900-29901 |
| UDP |
27900-27901, 29910, 64087 |
- Universal Plug and Play (UPnP) support status is unknown.
VR support
Issues fixed
- TweakGuides has created a comprehensive guide for fixing issues in this game. It can be found here.
Hangs on startup
|
Run the 64-bit version of the game[citation needed]
|
- Go to
<path-to-game>\Bin64.
- Launch the
crysis64.exe file to play the 64-bit version of the game.
|
|
Stop your antivirus or add the game to its exceptions[7]
|
Remapping dual wielding secondary fire to other keys
By default, mouse2 (mouse right click) is permanently mapped to the dual wielding secondary fire command, regardless of what mouse2 is actually mapped to in-game. The only way to remap the command is to manually edit the profile key map file.
|
Remapping the dual wielding secondary fire command[citation needed]
|
- Go to
%USERPROFILE%\Documents\My Games\Crysis_WARHEAD\Profiles\<user-id>
- Open
actionmaps.xml with Notepad.
- Go to the lines with
<action name="attack2" onPress="1" onRelease="1"> <key name="mouse2" />
- Set the
key name variable to another key.
Ex. <key name="mouse3" />
- Save the file and launch the game.
|
Run the game at screen refresh rate
- The game may set your monitor's refresh rate to 24/59/60 Hz, resulting in a lowered FPS when Vsync is on, and heavy screen stuttering even if FPS is high.
|
Set screen refresh rate[8]
|
- Install Special K by following the Unofficial Special K Guide. Manual local installation may work better.
- Start the game with the
-dx9 command line argument once and close it to allow the configuration file of Special K to be created.
- Open
<path-to-game>\Bin64\d3d9.ini or %USERPROFILE%\Documents\My Mods\SpecialK\Profiles\Crysis.exe\SpecialK.ini depending on the installation method you used.
- Change
RefreshRate=-1 to RefreshRate=0 under [Render.FrameRate].
- Play the game with the
-dx9 command line argument.
|
Game is shifted to the right on the screen/runs in 59Hz mode/wrong refresh rate
|
Change refresh rate - automate with QRes[citation needed]
|
|
You can change your refresh rate manually each time you open and close the game.
OR
You can automate this with QRes:
- Download QRes from Softpedia or Software.Informer
- Extract QRes.exe into the Crysis Warhead Bin64 or Bin32 folder depending on whether you're using the 64-bit or 32-bit executable
- Open Notepad
- Copy and paste:
@echo off
qres.exe /r:59
timeout /t 10 > NUL
start crysis64.exe
timeout /t 60 > NUL
:_loop
tasklist /FI "IMAGENAME eq crysis64.exe" | findstr = > NUL || goto _cleanup
timeout /t 5 > NUL
goto _loop
:_cleanup
qres.exe /r:60
- Go to File and then Save As...
- Name it Crysis Warhead.bat, and then change Save as type from .txt to All Files
- Save into the same Bin64 or Bin32 folder
- Right-click Crysis Warhead.bat and click Create shortcut
- Move this shortcut to wherever is easiest, say the desktop, replacing the original shortcut
- Right-click the shortcut, click Properties, click Change icon, click Browse, navigate to the same Bin64 or Bin32 folder, select Crysis64.exe, and click OK twice
- When you run this using the new shortcut, your screen will flash off and on again, shifted to one side. Press the Auto button or equivalent on your monitor to realign the screen before the game starts
- When you exit the game, wait a few seconds, the screen will flash again, the command window will close, and you can press the Auto again
|
Other information
API
| Technical specs |
Supported |
Notes |
| Direct3D |
9, 10 |
DX10 by default. Use -dx9 parameter to change API. |
| Shader Model support |
3, 4 |
|
| Executable |
32-bit |
64-bit |
Notes |
| Windows |
|
|
|
Middleware
|
Middleware |
Notes |
| Audio |
FMOD |
|
| Multiplayer |
GameSpy, PunkBuster |
|
Console commands
The console can be opened with ~, but the available commands are limited. This limitation can be bypassed by the con_restricted=0 command or by adding -devmode to the game's shortcut. A thorough list of console commands can be found here.
Instead of re-entering console commands every time the game starts, the file <path-to-game>\system.cfg can be created to apply console commands automatically. The commands need to be formatted differently in the file, using an equal sign instead of a space. For example, to change the FOV to 80 you would use cl_fov=80 rather than "cl_fov 80" like in the console.
System requirements
| Windows |
|
Minimum |
Recommended |
| Operating system (OS) |
XP SP2, Vista | |
| Processor (CPU) |
2.8 GHz (XP)
3.2 GHz (Vista) | |
| System memory (RAM) |
1.0 GB (XP)
1.5 GB (Vista) | |
| Hard disk drive (HDD) |
15 GB | |
| Video card (GPU) |
256 MB of VRAM
| Nvidia GeForce 8800 GTS/640 |
- Supported Processors: Intel Pentium 4 2.8 GHz (3.2 GHz for Vista) or faster, Intel Core 2.0 GHz (2.2 GHz for Vista) or faster, AMD Athlon 2800+ (3200+ for Vista) or faster.
- Supported chipsets: Nvidia GeForce 6800 GT or greater; ATI Radeon 9800 Pro (Radeon X800 Pro for Vista) or greater. Laptop versions of these chipsets may work but are not supported. Integrated chipsets are not supported. Updates to your video and sound card drivers may be required.
Notes
- ↑ 1.0 1.1 Notes regarding Steam Play (Linux) data:
References


