
Difference between revisions of "XIII"
From PCGamingWiki, the wiki about fixing PC games
I Drink Lava (talk | contribs) |
|||
| Line 334: | Line 334: | ||
|notes = Select when installing [[#Patches|unofficial patch 1.4.2.1 / XIII+]]. | |notes = Select when installing [[#Patches|unofficial patch 1.4.2.1 / XIII+]]. | ||
|fan = true | |fan = true | ||
| + | }} | ||
| + | {{L10n/switch | ||
| + | |language = Hungarian | ||
| + | |interface = true | ||
| + | |audio = false | ||
| + | |subtitles = true | ||
| + | |notes = Local retial only. [https://magyaritasok.hu/magyaritasok/xiii/1650 Also fan translations are available.] | ||
| + | |fan = | ||
}} | }} | ||
{{L10n/switch | {{L10n/switch | ||
Revision as of 01:53, 1 March 2020
This page is for the original game. For the 2020 remake, see XIII (2020).
 |
|
| Developers | |
|---|---|
| Ubisoft Paris | |
| macOS (OS X) | Zonic Limited |
| Publishers | |
| Ubisoft | |
| OS X | Feral Interactive |
| Engines | |
| Unreal Engine 2 | |
| Release dates | |
| Windows | November 18, 2003 |
| macOS (OS X) | June 5, 2004 |
Warnings
- The macOS (OS X) version of this game does not work on macOS Catalina (version 10.15) or later due to the removal of support for 32-bit-only apps.
| XIII | |
|---|---|
| XIII | 2003 |
| XIII: Lost Identity | 2011 |
| XIII (2020) | 2020 |
Key points
- Official master server for online multiplayer has been shut down in 2012[1][2] (see Network for solutions).
General information
- InsideXIII - fan site
- Opaquit's XIII Files - fan site
- GOG.com Community Discussions
- GOG.com Support Page
Availability
| Source | DRM | Notes | Keys | OS |
|---|---|---|---|---|
| Retail | TAGES DRM Released on multiple CDs, later editions on 1 DVD. Patch 1.3 removes the copy protection. |
|||
| GOG.com |
- A demo is available.
Essential improvements
Patches
- Official patches
- Unofficial patches
- Patch 1.4 by Opaquit
- Patch 1.4.2.1 / XIII+ by Arthur (recommended)
- All patches include previous patch updates.
Skip intro videos
| Download and install unofficial patch 1.4.2.1 / XIII+[3] |
|---|
| Replace video files[4] |
|---|
|
Game data
Configuration file(s) location
| System | Location |
|---|---|
| Windows | <path-to-game>\system\[Note 1] |
| macOS (OS X) |
Save game data location
| System | Location |
|---|---|
| Windows | <path-to-game>\save\[Note 1] |
| macOS (OS X) |
- 1 quicksave slot + 9 autosave slots available. Addition save slots can be made by creating an additional profile. Game does not autosave progress.
Save game cloud syncing
| System | Native | Notes |
|---|---|---|
| GOG Galaxy |
Video settings

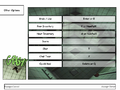
In-game video settings.
Widescreen resolution
| Download and install unofficial patch 1.4.2.1 / XIII+[3] |
|---|
Modify XIII.ini[4][5]
|
|---|
|
Field of view (FOV)
Modify DefUser.ini[5]
|
|---|
Notes
|
Windowed
| Use unofficial patch 1.4.2.1 / XIII+[3] |
|---|
|
| Use DxWnd[citation needed] |
|---|
|
High frame rate
- Fullscreen mode defaults to 60 Hz, even if the screen refresh rate is set higher than that.
| Use dgVoodoo 2[6] |
|---|
|
Input settings
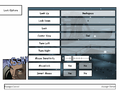
In-game control settings (1/6).
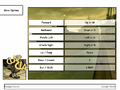
In-game control settings (2/6).
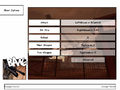
In-game control settings (3/6).

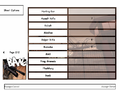
In-game control settings (4/6).
In-game control settings (5/6).
In-game control settings (6/6).


Mouse smoothing
Modify DefUser.ini[7]
|
|---|
|
Mouse sensitivity
Modify DefUser.ini[7]
|
|---|
|
Audio settings

In-game audio settings.
Localizations
| Language | UI | Audio | Sub | Notes |
|---|---|---|---|---|
| English | Select when installing unofficial patch 1.4.2.1 / XIII+. | |||
| Czech | Select when installing unofficial patch 1.4.2.1 / XIII+. | |||
| French | Select when installing unofficial patch 1.4.2.1 / XIII+. | |||
| German | Select when installing unofficial patch 1.4.2.1 / XIII+. | |||
| Hungarian | Local retial only. Also fan translations are available. | |||
| Italian | Select when installing unofficial patch 1.4.2.1 / XIII+. | |||
| Japanese | ||||
| Korean | ||||
| Polish | Local retail release only. | |||
| Russian | ||||
| Spanish | Select when installing unofficial patch 1.4.2.1 / XIII+. | |||
| Turkish | Fan translation, download. |
VR support
| 3D modes | State | Notes | |
|---|---|---|---|
| vorpX | G3D User created profile, requires dgVoodoo v2.55.4, see profile introdution. Note: Profile may not work with the latest wrapper, in case of issues please report to the vorpx forum. |
||
Network
Multiplayer types
| Type | Native | Players | Notes | |
|---|---|---|---|---|
| LAN play | 8 | Versus |
||
| Online play | 8 | Versus Download and install unofficial patch 1.4.2.1 / XIII+.[3] A list of running game servers can be found here. |
||
Connection types
| Type | Native | Notes |
|---|---|---|
| Matchmaking | ||
| Peer-to-peer | ||
| Dedicated | See Issues with dedicated server. | |
| Self-hosting | Use <path-to-game>\system\ServerLauncher.exe. Alternatively, you can use standalone dedicated XIII server. |
|
| Direct IP | Open the console (F2) and use SWITCHLEVEL followed by the IP and port.[8] Alternatively, you can use XIII IP Join. |
Ports
| Protocol | Port(s) and/or port range(s)[9] |
|---|---|
| UDP | 7099, 7777 |
- Universal Plug and Play (UPnP) support status is unknown.
Issues fixed
4-CD installation problem
- Refers to the 4-CD retail version. The following message appears on CD 2:
Delete all configuration and saved games files? (Answering YES will delete the XIII installation folder and all of its content). Answering Yes or No stops the installation and constantly reappears if you start the installation again.
| Use unofficial patch 1.4.2.1 / XIII+[3] |
|---|
|
Apply compatibility settings and rename the setup.exe file[10]
|
|---|
|
Game crashes and starting problems
- Fixed in GOG.com version.
| Download and install unofficial patch 1.4.2.1 / XIII+[11] |
|---|
| Set CPU affinity in Task Manager[6] |
|---|
|
Game will not start in fullscreen
| Download and install unofficial patch 1.4.2.1 / XIII+[11] |
|---|
Modify XIII.ini[11]
|
|---|
|
Game runs in slow motion
- Fixed in GOG.com version.
| Download and install unofficial patch 1.4.2.1 / XIII+[3] |
|---|
Left click leaves game
- Left mouse click causes focus change away from the fullscreen window back to your desktop.
| Use Alt+Tab ↹[11] |
|---|
Checkpoints are not saved permanently
- Checkpoint save only applies when you die during your current play through and does not save your game. You need to quick/manually save it. Loading any level manually can be done if needed.
Use SWITCHLEVEL followed by the internal level identifier in the in-game console (F2)[12]
|
|---|
Issues with dedicated server
Server launcher does not work
- Server console window disappears immediately after start.
| Download and install unofficial patch 1.4[13] |
|---|
Failed to register the game server
- The above error appears in the server console.
Modify XIII.ini[4]
|
|---|
|
Other information
API
| Technical specs | Supported | Notes |
|---|---|---|
| Direct3D | 8 |
| Executable | 32-bit | 64-bit | Notes |
|---|---|---|---|
| Windows | |||
| macOS (OS X) |
Middleware
| Middleware | Notes | |
|---|---|---|
| Audio | HXAudio | Obscure driver that lacks surround sound support. |
| Cutscenes | Bink Video | 1.5v |
System requirements
| Windows | ||
|---|---|---|
| Minimum | Recommended | |
| Operating system (OS) | 98 | ME, 2000, XP |
| Processor (CPU) | Intel Pentium III 700 MHz | Intel Pentium III 1 GHz |
| System memory (RAM) | 128 MB | 256 MB |
| Hard disk drive (HDD) | 1.2 GB | 2.5 GB |
| Video card (GPU) | 32 MB of VRAM DirectX 8.1 compatible | 64 MB of VRAM |
| Sound (audio device) | DirectX compatible 16-bit sound card | |
Notes
- ↑ 1.0 1.1 When running this game without elevated privileges (Run as administrator option), write operations against a location below
%PROGRAMFILES%,%PROGRAMDATA%, or%WINDIR%might be redirected to%LOCALAPPDATA%\VirtualStoreon Windows Vista and later (more details).
References
- ↑ InsideXIII - The XIII Community - News » XIII-The-Game, what next ?
- ↑ Ubisoft Support - Multiplayer wurde eingestellt!
- ↑ 3.0 3.1 3.2 3.3 3.4 3.5 XIII All-In-One Installer (HD / Multiplayer ready) file - Mod DB - from patch description
- ↑ 4.0 4.1 4.2 Verified by User:Orzelek303 on 2019-10-05
- ↑ 5.0 5.1 XIII | WSGF
- ↑ 6.0 6.1 Verified by User:Keith on 2018-03-27
- ↑ 7.0 7.1 Verified by User:Stereo3D on 2017-06-07
- ↑ Legacy:Console Commands/Admin Console Commands - Unreal Wiki - last accessed on 2015-12-13
- ↑ InsideXIII - last accessed on 2019-10-05
- "Required ports to forward: 7099 (ping lamp) and 7777 (connect to server), both UDP."
- ↑ installing XIII Windows 7+delete your savegames error fix - YouTube
- ↑ 11.0 11.1 11.2 11.3 11.4 Verified by User:Locke on 2019-10-04
- Confirmed by the author of the unofficial patch 1.4.2.1 / XIII+.
- ↑ Skipping levels?, page 1 - Forum - GOG.com
- ↑ Opaquit's XIII Files - XIII Downloads - last accessed on 2019-10-05
- "Dedicated servers work again, just like with version 1.0"