Difference between revisions of "Dark Souls: Prepare to Die Edition"
From PCGamingWiki, the wiki about fixing PC games
Ricardinho (talk | contribs) m |
|||
| Line 66: | Line 66: | ||
===Skip intro videos=== | ===Skip intro videos=== | ||
{{Fixbox| | {{Fixbox| | ||
| − | {{fixbox/fix| | + | {{fixbox/fix|Skip intro}} |
# Install [[#DSfix|DSfix]]. | # Install [[#DSfix|DSfix]]. | ||
# Add <code>skipIntro 1</code> to <code>DSfix.ini</code> | # Add <code>skipIntro 1</code> to <code>DSfix.ini</code> | ||
| Line 171: | Line 171: | ||
{{Fixbox/fix|3D Vision fixby Helix}} | {{Fixbox/fix|3D Vision fixby Helix}} | ||
{{ii}} Use together with [[#DSfix|DSfix]]. | {{ii}} Use together with [[#DSfix|DSfix]]. | ||
| − | + | # Download the fix from [http://helixmod.blogspot.dk/2012/08/dark-souls-prepare-to-die-edition-3d.html Helix Mod's web site]. | |
| − | + | # Extract the content to Dark Souls DATA directory <code>\Steam\steamapps\common\Dark Souls Prepare to Die Edition\DATA</code>. | |
| − | + | # Extract [[#DSfix|DSfix]] to another folder. | |
| − | + | # Rename <code>d3d9.dll</code> to <code>res.dll</code> | |
| − | + | # Copy <code>res.dll</code> to your DATA folder inside Dark Souls. | |
| − | + | # Open up <code>DX9Settings.ini</code> | |
| − | + | # Make sure it looks like below, where ProxyLib should be changed to wherever res.dll is on your system. | |
| − | |||
| − | |||
| − | |||
| − | |||
| − | |||
| − | |||
| − | |||
<pre>[General] | <pre>[General] | ||
| Line 250: | Line 243: | ||
{{Fixbox/fix|Controller driver reinstall}} | {{Fixbox/fix|Controller driver reinstall}} | ||
{{ii}} Game detects 'first' controller driver.<ref>http://forums.steampowered.com/forums/showthread.php?p=32501436</ref> | {{ii}} Game detects 'first' controller driver.<ref>http://forums.steampowered.com/forums/showthread.php?p=32501436</ref> | ||
| − | + | # Uninstall controller drivers. | |
| − | + | # Reinstall controller drivers. If using [[Xbox 360 Controller]], use these drivers: | |
| − | |||
*[http://www.microsoft.com/hardware/en-us/p/xbox-360-wireless-controller-for-windows/jr9-00011#support Wireless drivers] | *[http://www.microsoft.com/hardware/en-us/p/xbox-360-wireless-controller-for-windows/jr9-00011#support Wireless drivers] | ||
*[http://www.microsoft.com/hardware/en-us/p/xbox-360-controller-for-windows#support Wired drivers] | *[http://www.microsoft.com/hardware/en-us/p/xbox-360-controller-for-windows#support Wired drivers] | ||
| Line 262: | Line 254: | ||
{{Fixbox/fix|Use X360ce}} | {{Fixbox/fix|Use X360ce}} | ||
{{ii}} Use [[X360ce]] to fix the issue by emulating the official [[Xbox 360 Controller]]. | {{ii}} Use [[X360ce]] to fix the issue by emulating the official [[Xbox 360 Controller]]. | ||
| − | + | # Download [[X360ce]]. | |
| − | + | # Put <code>xBox360ce.exe</code> into the Dark Souls directory (usually C:\Program Files (x86)\Steam\steamapps\common\Dark Souls\DATA\ | |
| − | + | # Start <code>xBox360ce.exe</code> and confirm creation of all dlls. | |
| − | + | # Controller should be detected. Test all buttons and sticks. | |
| − | + | # Open Dark Souls, which should now detect the non-[[Xbox 360 Controller]] as an official [[Xbox 360 Controller]]. | |
| − | |||
| − | |||
| − | |||
| − | |||
}} | }} | ||
| Line 330: | Line 318: | ||
{{Fixbox/fix|Data.exe Priority}} | {{Fixbox/fix|Data.exe Priority}} | ||
{{ii}} Reportedly working with Nvidia cards.<ref>http://www.reddit.com/r/Games/comments/ys0jc/amd_users_having_trouble_running_dark_souls/c5yehq9?context=3</ref> | {{ii}} Reportedly working with Nvidia cards.<ref>http://www.reddit.com/r/Games/comments/ys0jc/amd_users_having_trouble_running_dark_souls/c5yehq9?context=3</ref> | ||
| − | + | # Open [[Task Manager]]. | |
| − | + | # Set priority of <code>data.exe</code> to a higher value. | |
| − | |||
}} | }} | ||
| Line 351: | Line 338: | ||
{{Fixbox/fix|Set Catalyst Control Center 3D Profile}} | {{Fixbox/fix|Set Catalyst Control Center 3D Profile}} | ||
{{ii}} This fix sets a new 3D profile for the game.<ref>http://forums.steamgames.com/forums/showthread.php?t=2900333&page=2</ref> | {{ii}} This fix sets a new 3D profile for the game.<ref>http://forums.steamgames.com/forums/showthread.php?t=2900333&page=2</ref> | ||
| − | + | # Enter [[Catalyst Control Center]] and 3D Application Settings (advanced view). | |
| − | + | # Tweak settings by unchecking 'Use application settings' and switching sliders to the right. | |
| − | + | # Apply the 3D profile to Dark Souls. | |
| − | |||
| − | |||
}} | }} | ||
| Line 361: | Line 346: | ||
{{Fixbox|1= | {{Fixbox|1= | ||
{{Fixbox/fix|Force Optimus To Use Nvidia Instead Of Intel Graphics}} | {{Fixbox/fix|Force Optimus To Use Nvidia Instead Of Intel Graphics}} | ||
| − | + | # Go to Nvidia Control Panel (Control Panel > Hardware and Sound > NVIDIA Control Panel). | |
| − | + | # Go to Manage 3D Settings > Program Settings. | |
| − | + | # Add both executables (<code>DarkSouls.exe</code> and <code>data.exe</code>), and set the preferred graphics processor for both to Nvidia graphics instead of auto. | |
| − | |||
| − | |||
}} | }} | ||
| Line 377: | Line 360: | ||
{{Fixbox|1= | {{Fixbox|1= | ||
{{Fixbox/fix|End Install Processes}} | {{Fixbox/fix|End Install Processes}} | ||
| − | + | # Make sure [[DirectX]] and [[Games For Windows Live]] are individually updated. | |
| − | + | # Win+R <code>taskmgr</code> and open the 'Processes' tab. | |
| − | + | # When <code>dxsetup</code> or <code>gfwlsetup</code> show up, cancel the processes. Note: the <code>gfwlsetup</code> may appear only briefly. | |
| − | + | # This should allow installation to continue. | |
| − | |||
| − | |||
| − | |||
}} | }} | ||
Revision as of 19:06, 28 November 2013
| Cover image missing, please upload it | |
| Developers | |
|---|---|
| From Software | |
| Publishers | |
| Namco Bandai Games | |
| Engines | |
| PhyreEngine | |
| Release dates | |
| Windows | August 23, 2012 |
Warnings
- For Games for Windows - LIVE on Windows 8 or later, install the latest Games for Windows - LIVE software.
| Dark Souls | |
|---|---|
| Dark Souls: Prepare to Die Edition | 2012 |
| Dark Souls II | 2014 |
| Dark Souls II: Scholar of the First Sin | 2015 |
| Dark Souls III | 2016 |
| Dark Souls: Remastered | 2018 |
Key points
- Using a controller is highly recommended over keyboard and mouse controls.
- If using keyboard and mouse controls, apply the DSMfix to improve mouse control issues.
- A poor port of the console versions of the game with few PC options.[1]
- Use DSfix to increase rendering resolution along with many other options.
General information
Availability
- All versions require Games for Windows - LIVE.
Essential improvements

Using DSfix with in-game anti-aliasing enabled causes the game to only use part of the screen.
- HD textures and fonts are available to download.
DSfix
- A GUI for DSfix is available for inexperienced users
- DSfix increases the rendering resolution for better visual quality; without it the game outputs anamorphic 1024x720. It also allows the 30fps lock to be lifted, HD or other alternate textures to be used, as well as giving options for Anti-Aliasing (AA), Screen space ambient occlusion (SSAO), Depth of Field (DOF) blurring, Anisotropic Filtering (AF) and many other features.
| Instructions |
|---|
1.02 Patch (2013-09-17) breaks compatibility of many mods
The main executable was patched so any mod reliant on locations in the executable/RAM need to be updated.
- DSfix has been updated to version 2.2 which restores all features broken by patch 1.02.
- DSVfix is no longer required as all of its fixes have been implemented into the game.
- DSMfix has been unofficially updated by a fan of the project.
- DSCfix has been reported to be unaffected by the patch.
Skip intro videos
| Instructions |
|---|
DS Connectivity fix by M0tah
| Instructions |
|---|
Game data
Save game location
Save game cloud syncing
| System | Native | Notes |
|---|---|---|
| Steam Cloud |
Games for Windows Live
Saves are linked to GFWL profile, without it you can't load them.
To access GFWL 'local profile' saves on different machine you need copy that profile too.
Local profile files are stored in: %LOCALAPPDATA%\Microsoft\XLive
Video settings
Borderless fullscreen windowed
| Instructions |
|---|
3D support
- The game suffers from poor 3D support.
| Instructions |
|---|
120Hz
| Instructions |
|---|
Input settings

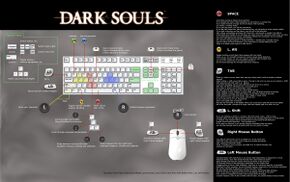
Control scheme tips from Tru3Magic.
Keyboard
- Unintuitive default keyboard scheme, for example, 'End' brings up menu (and 'Escape' does nothing).
Mouse
- Mouse controls feel very jittery, with very unintuitive results when the camera collides with a wall or the floor.
| Instructions |
|---|
Controller support
- 'Hot swap' between keyboard and mouse controls and controller is available.[2]
- Use of controller is highly recommended.[3]
- Works well with the DualShock3 using XInput Wrapper. PS buttons textures can be found here
Controller not working
| Instructions |
|---|
Controller with wrong mapping
- Non-Xbox 360 controllers most likely have incorrect button mapping.
| Instructions |
|---|
Audio settings
Network settings
- Signing into Games For Windows Live is mandatory for the first time, and a connection needs to be maintained for multiplayer.
| Instructions |
|---|
| Instructions |
|---|
Issues fixed
Improving FPS on lower-spec machines
| Instructions |
|---|
| Instructions |
|---|
- Certain areas of the game are more demanding on your hardware causing slowdown in-game. It seem the engine, when faced with an area where it struggles to keep at 30FPS, will cut down to 15FPS. The most famous is Blighttown, but large animated characters can also produce this slowdown.
- Unlock the FPS cap with DSfix (unlockFPS 1), set the frame cap at 30 (FPSlimit 30) and enable Vsync (enableVsync 1) For the most part you will have the same experience, but where the game would usually dip to 15FPS it will only drop as far as it needs to (results dependant on your machine).
General low performance
| Instructions |
|---|
| Instructions |
|---|
| Instructions |
|---|
Low performance ATI/AMD
- Appears that ATI/AMD graphics cards are underutilised.
| Instructions |
|---|
Low performance Nvidia Optimus
| Instructions |
|---|
Crash VSFilter.dll
- Crash occurs after start screen.[4]
| Instructions |
|---|
Progress bar stuck during installation
- Problem may be caused by setup utility getting stuck whilst installing DirectX and Games For Windows Live.
| Instructions |
|---|
Minimize with multiple monitors
- When playing with two screens, the game seems to minimize.
| Instructions |
|---|
Windows 8
| Instructions |
|---|
| Instructions |
|---|
System requirements
| Windows | ||
|---|---|---|
| Minimum | ||
| Operating system (OS) | XP, Vista, 7 | |
| Processor (CPU) | ||
| System memory (RAM) | ||
| Hard disk drive (HDD) | 4 GB | |
| Video card (GPU) | ATI Radeon HD 4870 GeForce 9800 GTX+ |
|


