
Difference between revisions of "Nvidia Profile Inspector"
(Filled out article,essentially complete. Blank entries are because I don't know what it does or someone has not come forward to give an explanation for me.) |
|||
| Line 1: | Line 1: | ||
| − | + | [[Category:Utility]] | |
| − | |||
{{infobox non-game | {{infobox non-game | ||
|cover = Nvidia Profile Inspector.png | |cover = Nvidia Profile Inspector.png | ||
| − | |developer = Orbmu2k | + | |developer = [http://forums.guru3d.com/member.php?u=231184 Orbmu2k] |
}} | }} | ||
| − | == | + | '''Useful Links''' |
| − | + | {{ii}} [https://github.com/Orbmu2k/nvidiaProfileInspector Github project page] | |
| + | {{ii}} [https://ci.appveyor.com/project/Orbmu2k/nvidiaprofileinspector/build/artifacts Download the latest build] | ||
| + | {{ii}}[https://docs.google.com/spreadsheet/pub?key=0AnHpuYHx21sjdENRSHg1ZkhndWF5R05tQjhCbTFNUVE Anti-Aliasing Compatibility Flags] | ||
| + | {{ii}}[https://docs.google.com/spreadsheets/d/1sq0vgFlerS-YT093TS2jEpx6xjZP7X1x1BcAs7EHXYY/pubhtml HBAO+ Compatibility Flags] | ||
| + | {{ii}}[https://www.forum-3dcenter.org/vbulletin/showthread.php?t=509912 SLI Compatibility Flags] | ||
| + | |||
| + | ==Introduction== | ||
| + | Nvidia Profile Inspector is a tool created for pulling up and editing Application Profile settings within the Nvidia drivers. | ||
| + | Much like the "3D settings" page in Nvidia Control Panel.But not only more in-depth, but much more responsive. NVCP requires you to rely on Nvidia for just about everything. Problem is they don't expose every useful feature,might make some wrong assumptions about any given game and the interface is cumbersome. | ||
| + | <br><br> | ||
| + | NPI was spun off of the original [https://www.guru3d.com/files-details/nvidia-inspector-download.html Nvidia Inspector] which featured an overclocking utility and required you to create a shortcut just to launch the profile editor. | ||
==Setting Up== | ==Setting Up== | ||
{{Fixbox|1= | {{Fixbox|1= | ||
{{Fixbox/fix|Instructions}} | {{Fixbox/fix|Instructions}} | ||
| − | # | + | # [https://ci.appveyor.com/project/Orbmu2k/nvidiaprofileinspector/build/artifacts Download the latest build] |
| − | # Run | + | # Save it to a location that you can permanently use as it's home and extract it there. |
| + | # Run <code>nvidiaProfileInspector.exe</code> to start the application. It may be worth making a shortcut and pinning it to your start menu or desktop. | ||
}} | }} | ||
| − | == | + | When you run Nvidia Profile Inspector for the first time you will be greeted with this screen. The "Global" profile |
| − | { | + | ''These are the settings that globally apply to any application. It is '''VERY IMPORTANT''' that you minimize what you force globally to only basic things such as Texture Filtering settings'' [[File:NPI2016.jpg|none|left]] |
| − | { | + | <br>[http://images.nvidia.com/geforce-com/international/comparisons/just-cause-3/just-cause-3-nvidia-control-panel-anisotropic-filtering-interactive-comparison-001-on-vs-off-rev.html This is an example] of why you should set Texture Filtering globally and forget it. Some developer's own solutions are not as high quality as they should be. |
| − | + | <br>If any game has a conflict with driver forced Texture Filtering, Nvidia usually sets a special flag on a profile for texture filtering that disables driver overriding for that game. (Far Cry 3 and Doom 2016 are examples of this) | |
| − | # | + | <br> |
| − | + | [http://pcgamingwiki.com/images/1/10/Globalprofile.jpg Here] is an example of a modified Global Profile. You don't have to copy it verbatim, but I at least recommend setting AF to override and HQ at the very minimum. | |
| + | |||
| + | |||
| + | It is worth noting however that whether you want to use <code>Adaptive</code> performance mode or <code>Prefer Max Performance</code> is up to you. | ||
| + | Adaptive WILL cause problems with many games. | ||
| + | The card will do a variety of things such as not maintaining the base clock as a minimum. Therefore causing performance issues because the card will essentially start going back to idle clocks. | ||
| + | On the flip side: Adaptive will reduce idle temperatures depending on individual circumstances and the card will otherwise downclock correctly when not playing games. | ||
| + | <br>So, if you want to use Adaptive. Just remember to set <code>Prefer Maximum Performance</code> in each profile for each game you play. | ||
| + | ==First steps for tweaking driver settings== | ||
| + | * '''The first thing you will always want to do for any given is search to see whether Nvidia has already made a profile for your game. | ||
| + | ''' | ||
| + | To do this, left click in the white "Profiles" box, and start typing in the name of the game. The application will search through the list and narrow the list down the more characters you type. | ||
| + | *'''If your game does not have a profile, you will need to create one by clicking on the Sun icon.''' | ||
| + | It will prompt you to name the profile. | ||
| + | *'''You then will need to add the game <code>.exe</code> to this new profile by hitting the folder with the green + icon. | ||
| + | ''' | ||
| + | *'''If you attempt to add an executable to a profile and it prompts you with a message that the <code>Insert Here.exe</code> already belongs to a profile.''' | ||
| + | Pay attention to the name of the profile/s it gives you. For example if the game you were looking for didn't show up in a search, it's possible you may have worded it differently than they have it set in the driver. | ||
| + | HOWEVER, if the profiles it mentions to you aren't related to the game at all in any way we will need to set up the profile to use an <code>.exe</code> based on directory. | ||
| + | <br>When you go to select an <code>.exe</code> click the drop down box in the right hand corner and set to ''"Absolute Application Path"'' | ||
| + | *'''Now you are ready to change settings on the profile. Don't forget to hit Apply Changes to any changes you make! | ||
| + | ''' | ||
| + | |||
| + | == List of basic options and explanations == | ||
| + | === ''Compatibility'' === | ||
| + | *'''Ambient Occlusion Compatibility''' | ||
| + | This is where you would enter or paste an 8 digit Hexadecimal code (Always with the prefix "0x") to get HBAO+ to work with any given game.<br> | ||
| + | There is an official list of Flags built into the driver configured for specific games (Though not necessarily well for older titles). These flags are not a combination of functions put together to form a flag as with Anti-Aliasing, but rather are directions pointed a set of programmed parameters for each flag.<br> | ||
| + | The first 2 bytes of the flag are reserved for Flags pertaining to DX10 and above. While the second set of bytes are reserved for Flags pertaining to DX9 only.<br> | ||
| + | <code>0x'''0000'''0000 < DX10+, 0x0000'''0000''' < DX9</code><br> | ||
| + | Each of the 8 slots goes from a value of 1-16<br> | ||
| + | <code>0,1,2,3,4,5,6,7,8,9,A,B,C,D,E,F</code><br> | ||
| + | Giving them an approximate total of 65536 potential Flags for each set of APIs.<br> | ||
| + | *'''Antialiasing Compatibility''' | ||
| + | This is where you would enter or paste an 8 digit Hexadecimal code (Always with the prefix "0x") to get various forms of Anti-Aliasing to work with any given DX9 game. | ||
| + | This Hex code unlike AO Compatibility, is actually a combination of possible functions that tell the driver what to do in regards to what kind of buffer formats to look for, how to process them among other things.<br> | ||
| + | *'''Antialiasing compatibility (DX1x)''' | ||
| + | This is where you would enter or paste an 8 digit Hexadecimal code to force AA in DirectX10+...if you had one! (Insert Fairly Odd Parents reference) | ||
| + | Nvidia's effort sadly did not continue. There are few functions available for this and none of them work in any meaningful way for games other than the ones listed. Often only restricted to MSAA.<br> | ||
| + | *'''Antialiasing Fix''' | ||
| + | This is somewhat a mystery almost. Initially this was apparently made just for an issue relating to Team Fortress 2. (As such was originally known as the TF2Fix). But as it turned out, this affected a very large number of games. | ||
| + | |||
| + | Currently the only description of the function available is <code>FERMI_SETREDUCECOLORTHRESHOLDSENABLE (Fermi> Set Reduce Color Thresholds Enable)</code><br> | ||
| + | This would suggest it's a Fermi issue, but it applies really to at least Fermi and everything after it. | ||
| + | It's also interesting that turning the AA fix on disables this. The default setting of "Off" is actually a value of <code>0x00000001</code>. The On value is <code>0x00000000(Team Fortress 2)</code><br> | ||
| + | ''Do Not Enable This Globally''| As what it does depends on a per game basis. It is noted whether a game needs it or not in the Anti-Aliasing flags thread or whether it causes issues. | ||
| + | *'''SLI Compatibility bits''' | ||
| + | This is where you would enter or paste an 8 digit Hexadecimal code (Always with the prefix "0x") to get SLI working in DX9 applications. if the application doesn't already have a flag in the driver. OR if the official flag doesn't work well and is of poor quality. | ||
| + | |||
| + | Like AA compatibility bits. These flags are a combination of functions within the driver.<br> | ||
| + | *'''SLI compatiblity bits (DX10+DX11)''' | ||
| + | This is where you would enter or paste an 8 digit Hexadecimal code (Always with the prefix "0x") to get SLI working in DX10+ applications. if the application doesn't already have a flag in the driver. OR if the official flag doesn't work well and is of poor quality.<br> | ||
| + | *'''SLI compatiblity bits (DX12)''' | ||
| + | This is a new one. It is assumed it is the same as the other two. Currently there are only 2 flags in the driver. But as more DX12 games come out there will be more and this should actually be interesting to see how it plays out | ||
| + | |||
| + | <br> | ||
| + | === ''Sync and Refresh'' === | ||
| + | *'''Frame Rate Limiter''' | ||
| + | This setting will enable the driver's built in Frame Rate limiter in a series of pre-defined values non whole number values. It's worth noting that the quality of it has historically been a bit spotty. [http://forums.guru3d.com/showpost.php?p=5250232&postcount=108 The behavior was changed at some point so whole numbers aren't possible.] Before the limiter with whole values would never really stick to those numbers.<br> | ||
| + | The 60FPS setting is 59.7 or 60.7, Vsync may or may not clamp this value. | ||
| + | Some people may prefer [https://www.guru3d.com/files-details/rtss-rivatuner-statistics-server-download.html Unwinder's RTSS] as more useful. As it lets you set the value yourself.<br> | ||
| + | *'''GSYNC Application Mode''' | ||
| + | *'''GSYNC Requested State''' | ||
| + | *'''GSYNC Global Feature''' | ||
| + | *'''GSYNC Global Mode''' | ||
| + | *'''GSYNC Indicator Overlay''' | ||
| + | *'''Maximum pre-rendered frames''' | ||
| + | "The 'maximum pre-rendered frames' function operates within the DirectX API and serves to explicitly define the maximum number of frames the CPU can process ahead of the frame currently being drawn by the graphics subsystem. This is a dynamic, time-dependent queue that reacts to performance: at low frame rates, a higher value can produce more consistent gameplay, whereas a low value is less likely to introduce input latencies incurred by the extended storage time (of higher values) within the cache/memory. Its influence on performance is usually barely measurable, but its primary intent is to control peripheral latency."<ref>https://forums.geforce.com/default/topic/476977/sli/maximum-pre-rendered-frames-for-sli/post/3405124/#3405124</ref><br> | ||
| + | Values from <code>1-8</code>, the default is <code>3</code> by the driver and it is not recommended to use higher than that. <br>A value of 1 or 2 will reduce Input Latency further<ref>http://www.displaylag.com/reduce-input-lag-in-pc-games-the-definitive-guide/</ref> at the cost of slightly higher CPU performance.<br> | ||
| + | When using 1/2 Refresh Rate Vsync a value of 1(Sometimes 2 will suffice but 1 generally reduces latency more) is essentially required. As 1/2 sync will introduce significantly more Input Latency.<br> | ||
| + | *'''Triple buffering''' | ||
| + | Enables Triple Buffering for Vsync, but ONLY for the OpenGL API. For a run down of TB [http://www.anandtech.com/show/2794/2 here is an article.] If you wish to enable TB for D3D APIs you can download and use [http://community.pcgamingwiki.com/files/file/84-d3doverrider/ D3DOverrider.]<br> | ||
| + | It's worth noting that GSYNC makes the concept of Double and Triple Buffering entirely irrelevant. This is only for standard sync monitors.<br> | ||
| + | *'''Vertical Sync Smooth AFR behavior''' | ||
| + | "Smooth Vsync is a new technology that can reduce stutter when Vsync is enabled and SLI is active.<br> | ||
| + | |||
| + | When SLI is active and natural frame rates of games are below the refresh rate of your monitor, traditional vsync forces frame rates to quickly oscillate between the refresh rate and half the refresh rate (for example, between 60Hz and 30Hz). This variation is often perceived as stutter. Smooth Vsync improves this by locking into the sustainable frame rate of your game and only increasing the frame rate if the game performance moves sustainably above the refresh rate of your monitor. This does lower the average framerate of your game, but the experience in many cases is far better. "<ref>https://nvidia.custhelp.com/app/answers/detail/a_id/3283/~/what-is-smooth-vsync%3F</ref><br> | ||
| + | *'''Vertical Sync Tear Control'''<ref>http://www.geforce.com/hardware/technology/adaptive-vsync/technology</ref> | ||
| + | This controls when a frame drop is detected whether Vsync should be disabled to maintain performance or sync should drop to the next sync rate.<br> At 60hz, without adaptive the frame rate will drop to 45 or 30FPS because they are the next available sync rate; 3/4 & 1/2.<br> | ||
| + | You can use TB as mentioned above instead of adaptive, or as long as you ensure you have enough power to sustain the performance you are aiming for it shouldn't be an issue.<br>Also irrelevant with Gsync.<br> | ||
| + | *'''Vertical Sync''' | ||
| + | Controls whether Vsync can be enabled for any given application. Typically it's set to "Application Controlled". Which means instead it's up to the individual application itself to enable/disable or offer the option for Vsync.<br> | ||
| + | One recent example is Fallout 4. The game has no Vsync option, but it is forced on no matter what. You can disable it by setting this to "Force Off" on the Fallout 4 profile. | ||
| + | {| class="wikitable" | ||
| + | |- | ||
| + | | Use 3D Application Setting || Uses application setting for Vsync || Application will decide whether Vsync is enabled. | ||
| + | |- | ||
| + | | Force Off|| Forces Vsync Off || Forces application to not use Vsync. Even if it has no option. Will not stop Vsync from Windows Compositor in W8/W10 in Windowed mode. In some games this will unlock the framerate, or will simply cause tearing and reduce Input Latency | ||
| + | |- | ||
| + | | Force On || Forces Vsync On || Forces application to use Vsync. Even if it has no option. Will not work on games that are Borderless Windowed/Windowed only. | ||
| + | |- | ||
| + | | 1/2 Refresh Rate || Forces 1/2 rate Sync.<br> This is very useful for playing at 30FPS or on 30FPS games that usually have some microstutter problems when syncing at 60hz. Remember to use a lower Pre-Rendered Frames setting when using it || 144/72hz, 120hz/60, 60hz/30, 50hz/25 | ||
| + | |- | ||
| + | | 1/3 Refresh Rate || Forces 1/3 rate Sync || 144hz/48 , 120hz/40, 60hz/20, 50hz/Not possible with whole numbers. | ||
| + | |- | ||
| + | | 1/4 Refresh Rate || Forces 1/4 rate Sync || 144hz/36, 120hz/30, 60hz/15, 50hz/Not possible with whole numbers | ||
| + | |- | ||
| + | | Fast Sync || Enables Nvidia's Fast Sync<ref>https://www.technopat.net/sosyal/konu/video-what-is-nvidia-fast-sync.329258/</ref> Does not work with DX12 games.|| Fast Sync eliminates tearing when playing games without Vsync on and reduces Input Latency significantly. However to work best, you need to be maintaining multiples of your refresh rate. Apparently only for Pascal GPUs, but some have had success with Maxwell GPUs. YMMV | ||
| + | |} | ||
| + | <br> | ||
| + | === ''Antialiasing'' === | ||
| + | *'''Antialiasing - Behavior Flags''' | ||
| + | These mostly exist as a method of governing usage of AA from Nvidia Control Panel.But, they also affect Inspector as well. So you will want to make sure you are clearing out any flags in this field for a game profile when forcing AA. | ||
| + | As it will interfere and cause it not to work if you aren't careful.<br> | ||
| + | *'''Antialiasing - Gamma Correction''' | ||
| + | Gamma correction for MSAA, this is defaulted through function in the drivers to ON for any GPU Fermi generations and forward. It was new about 10 years ago with Half Life 2 and there is no reason to disable it on modern hardware.<ref>http://www.anandtech.com/show/2116/12</ref><br> | ||
| + | *'''Antialiasing - Line Gamma''' | ||
| + | *'''Antialiasing - Mode''' | ||
| + | This has 3 settings | ||
| + | {| class="wikitable" | ||
| + | |- | ||
| + | | Application Controlled || Application decides whether to use AA | ||
| + | |- | ||
| + | | Override Application Setting || Driver overrides application setting. This allows you to force AA from the driver. General rule of thumb is you have to disable any in game AA/MSAA when using this to avoid conflict. There are exceptions though. And are noted in the AA Flags link generally. | ||
| + | |- | ||
| + | | Enhance Application Setting || Enhances application AA settings (Ex: Enhance in game MSAA with TrSSAA). | ||
| + | |} | ||
| + | <br> | ||
| + | When overriding AA in and game you will want to set "Override" and not either of the other two. Enhancing AA will become entirely dependent on the implementation of MSAA in the game you are modifying a profile for. | ||
| + | More often than not, especially in modern DX10+ games. This is a total crap shoot, either it doesn't work, breaks something, or looks very bad.<br> | ||
| + | |||
| + | However, there are a few exceptions here. In certain game/game engines like Monolith Productions mid 2000s LithTech based games that use some sort of MSAA/FSAA hybrid the above 3 settings will generally not matter.<br> | ||
| + | <br> | ||
| + | Example: With F.E.A.R 2 if you have the correct AA Flag on the profile and leave it at Application Controlled but have 8xQ MSAA and 8xSGSSAA enabled below it and enable F.E.A.R 2's FSAA it will enhance the FSAA.<br> | ||
| + | In this specific case, this actually looks much better than 8xSGSSAA or FSAA by themselves!<br><br> | ||
| + | |||
| + | Another great example is Red Faction Guerrilla, you can't force AA in this game.<br> | ||
| + | However you can Enhance the in game MSAA with various methods of AA to some decent results. But it shines when you combine the in game AA+Enhanced AA and then downsample(Using DSR) while also enabling FXAA in the game Profile.<br> | ||
| + | ''(FXAA works when Enhancing in game AA. It used to when Overriding as well, but has been broken since after 331.82. It is applied last in the chain so it doesn't cause conflicts with other AA. Though it's not recommended to use it at native over enhanced AA if that makes sense. Oversampling from Downsampling negates any smoothing issues)''<br> | ||
| + | This is a rather unique exception as most games don't yield this good of results.<br><br> | ||
| + | |||
| + | Here is a few comparisons showing it off.<br> | ||
| + | http://screenshotcomparison.com/comparison.php?id=103126 <br> | ||
| + | This first one shows no AA by default | Vs | The game running at 2x2 Native resolution with 2xMSAA enabled in game with "Enhance Application Setting" enabled and set to 4xS (1x2 OGSSAA + 2xMSAA) together with 2xSGSSAA. Finally with FXAA enabled on the profile.<br><br> | ||
| + | |||
| + | http://screenshotcomparison.com/comparison.php?id=103127 <br> | ||
| + | This second one is cropped from the native 3200x1800 buffer with 2xMSAA+4xS+2xSGSSAA |Vs| That with FXAA also enabled showing that there are still some rough edges that FXAA cleans up before it is downsampled back to native 1600x900 | ||
| + | <br><br> | ||
| + | |||
| + | http://screenshotcomparison.com/comparison/161297 | ||
| + | The 3rd comparison shows 2x2 native resolution + 2xMSAA | Vs | 2x2 Native + 2xMSAA+4xS+2xSGSSAA+FXAA cropped and upsampled with point filtering by 2x2 to show how much more aliasing is tackled and resolved compared to without enhancing AA.<br> | ||
| + | *'''Antialiasing - setting''' | ||
| + | This is where you would set any primary form of forced Anti Aliasing. <br> | ||
| + | Which can be MSAA,CSAA(G80 to Kepler GPUs ONLY), OGSSAA (Ex 2x2 supersampling) or HSAA (Ex 16xS). | ||
| + | If you are going to use SGSSAA, you can use MSAA modes ONLY(2x,2xQ,4x,8xQ). The number of Color Samples have to match.<br> | ||
| + | [http://community.pcgamingwiki.com/topic/1858-aa-af-vsync-and-forcing-through-gpu/?p=8482 Refer to this post on which ones do what][http://u.cubeupload.com/MrBonk/revisedaaoverviewtgr.png And also this info graphic by GuruKnight of Guru3D forums]<br> | ||
| + | *'''Antialiasing - Transparency Multisampling'''<ref>http://http.download.nvidia.com/developer/SDK/Individual_Samples/DEMOS/Direct3D9/src/AntiAliasingWithTransparency/docs/AntiAliasingWithTransparency.pdf</ref> | ||
| + | The number of games this works with is unknown, but the results can be nice when it does work.<br> | ||
| + | http://screenshotcomparison.com/comparison/149642<br> | ||
| + | Nvidia has a demo of this you can download that also includes a demo of 4xTrSSAA<br> | ||
| + | https://www.nvidia.com/object/transparency_aa.html<br> | ||
| + | *'''Antialiasing - Transparency Supersampling''' | ||
| + | The only options here are <code>Supersampling</code> and <code>Sparse Grid Supersampling</code>.<br> | ||
| + | In reality they are both SGSSAA, but they are different in their approach. TrSSAA is formally SGSSAA while SGSSAA is actually FSSGSSAA <code>Full Scene Sparse Grid Super Sampling Anti Aliasing</code>. | ||
| + | This works by replaying the pixel shading by N times number of color samples. TrSSAA(SGSSAA)does the same however it is decoupled from the main MSAA pass in that it only applies SGSSAA to Alpha Test surfaces like flat textures that come in all forms and varieties.<br> | ||
| + | While SGSSAA (FSSGSSAA) is coupled with MSAA and needs the sample counts to match for it to work properly. Though in certain cases you can get away with mixing 4xMSAA with 2xSGSSAA. As 2xSGSSAA is poor in those cases.<br> | ||
| + | [http://community.pcgamingwiki.com/topic/1858-aa-af-vsync-and-forcing-through-gpu/?p=8482 Further Reference]<br> | ||
| + | ''In OpenGL <code>Supersampling</code> is equivalent to <code>Sparse Grid Supersampling</code>. Meaning 4xMSAA+4xTrSSAA will give you 4xFSSGSSAA in OpenGL games that work.'' | ||
| + | <br>Do note that, usually these require AA compatibility Flags to work properly in DX9 games!<br> | ||
| + | *'''Enable Maxwell sample interleaving (MFAA)'''<ref>http://www.geforce.com/whats-new/articles/multi-frame-sampled-anti-aliasing-delivers-better-performance-and-superior-image-quality</ref> | ||
| + | This enables Nvidia's Multi Frame Anti Aliasing mode. This only works in DXGI (DX10+) and requires either the game to have MSAA enabled in the game or MSAA to be forced.<br> | ||
| + | What it does is change the sub sample grid pattern every frame and then is reconstructed in motion with a "Temporal Synthesis Filter" as Nvidia calls it.<br> | ||
| + | There are some caveats to using this though.<br> | ||
| + | # It is not compatible with SGSSAA as far as shown in limited testing (SGSSAA in unlikely in DX10+ anyway since you would have to use <code>Enhance Application Setting</code> and in DX10+ games the quality usually isn't good when doing so. | ||
| + | #It causes visible flickering on geometric edges and other temporal artifacts depending on the game and it's MSAA implementation. Part of this is nullified with Downsampling though. So it's GREAT to use with downsampling (In conjunction with FXAA as well)to improve AA/Performance | ||
| + | #With screenshots and videos captured locally, there will be visible sawtooth patterns. | ||
| + | #It has a Minimum Framerate requirement of about 40FPS. Otherwise the Temporal Synthesis Filter seems to fall apart in a strange way depending on the game. | ||
| + | #It does not work with SLI. Supposedly it was supposed to happen in a driver update. But, well you know. | ||
| + | |||
| + | *'''Nvidia Predefined FXAA usage''' | ||
| + | Simply tells the driver whether FXAA is allowed to be turned on in Nvidia Control Panel (Primarily) or Nvidia Inspector.<br> | ||
| + | *'''Toggle FXAA indicator on or off''' | ||
| + | This will display a small green icon in the left upper corner if enabled showing whether FXAA is enabled or not.<br> | ||
| + | *'''Toggle FXAA on or off''' | ||
| + | Turns FXAA on or Off. You can also enable this when you are Enhancing in game AA as shown above. | ||
| + | <br><br> | ||
| + | |||
| + | === ''Texture Filtering'' === | ||
| + | |||
| + | *'''Anisotropic Filtering mode''' | ||
| + | Simply tells the driver whether the Driver controls AF for the application or the application is allowed to do its own thing. | ||
| + | It is recommended you leave this set to "User Defined/Off". Because lots of games do not have Texture Filtering options and lots of games also have mediocre or intentionally mediocre Texture Filtering.<br> | ||
| + | Most of the time Driver AF is higher quality than in game AF.<br> | ||
| + | Modern recent examples: Just Cause 3, Assassin's Creed Syndicate,Black Ops 3.<br> | ||
| + | Only rarely will this incur a performance hit of any significance when overriding globally.<br> | ||
| + | AC:Syndicate is one example of there being a minor performance cost, but it's worth it IMO and it's is a rare duck. Most games do not incur the same kind of performance with Driver AF.<br> | ||
| + | *'''Anisotropic Filtering setting''' | ||
| + | If you have it set as above. This determines what level of Texture Filtering is forced on an Application. <code>16x</code> is the best. But it also has options for <code>Off[point]</code> which is Point Filtering(You wouldn't want this 9/10 times.) <code>Off[Linear]</code> which is assumed Bilinear filtering.<br> | ||
| + | *'''Prevent Anisotropic Filtering''' | ||
| + | Similar to AA Behavior Flags, if this is set to On it will ignore Driver Overrides from NI or NVCP. Some games default to this. Such as Quake 4, Rage, Doom 2016, Far Cry 3 and Far Cry Blood Dragon.<br> | ||
| + | *'''Texture Filtering - Anisotropic filter optimization'''<ref>NvGames.dll</ref> | ||
| + | "Anisotropic filter optimization improves performance by limiting trilinear filtering to the primary texture stage where the general appearance and color of objects is determined. Bilinear filtering is used for all other stages, such as those used for lighting, shadows, and other effects. This setting only affects DirectX programs."<br> | ||
| + | |||
| + | This might have been necessary 10-12 years ago. But not now.<br> | ||
| + | *'''Texture Filtering - Anisotropic sample optimization '''<ref>NvGames.dll</ref> | ||
| + | "Anisotropic sample optimization limits the number of anisotropic samples used based on texel size. This setting only affects DirectX programs."<br> | ||
| + | Same as above, unnecessary to use today.<br> | ||
| + | *'''Texture Filtering - Driver Controlled LOD Bias''' | ||
| + | When using SGSSAA with this enabled will allow the driver to compute it's own Negative LOD Bias for textures to help improve sharpness (At cost of potential for more aliasing)for those who prefer it. It's generally less than the fixed amounts that are recommended.<br> | ||
| + | When this is enabled setting a manual bias will not do anything. And AutoLOD will always be applied.<br> | ||
| + | *'''Texture Filtering - LOD Bias (DX)''' | ||
| + | The Level of Detail Bias setting for textures in DirectX Backends. This normally only works under 2 circumstances.<br> | ||
| + | For both "Driver Controlled LoD Bias" must be set to "Off"<br> | ||
| + | #When Overriding or Enhancing AA. | ||
| + | #The last choice is an interesting one. If you leave the <code>Antialiasing Mode</code> setting to <code>Application Controlled</code> or <code>Enhance Application Setting</code>(Try Application controlled first!) but you set the AA and Transparency setting to SGSSAA (Eg 4xMSAA and 4xSGSSAA;TrSSAA in OpenGL then you can freely set the LOD bias and the changes will work without forcing AA. This has the side effect that in some games if the game has MSAA, it will act as if you were "Enhancing" the game setting. Even if you are using <code>Application Controlled</code><br> | ||
| + | Comparison example http://screenshotcomparison.com/comparison/159382<br> | ||
| + | <br>"The so called Level of Detail BIAS (LOD BIAS) controls at which distance from the viewer the switch to lower resolution mip maps takes place. The standard value of the LOD BIAS is 0.0. If you lower the LOD BIAS below zero, the mip map levels are moved farther away, resulting in seemingly sharper textures. But if the scene is moving, the textures start to shimmer."<ref>http://naturalviolence.webs.com/lodbias.htm</ref> | ||
| + | <br><br> | ||
| + | If you wish to use a -LOD Bias when forcing SGSSAA, these are the recommended amounts | ||
| + | #2xSGSSAA (2 samples): -0.5 | ||
| + | #4xSGSSAA (4 samples): -1.0 | ||
| + | #8xSGSSAA (8 samples): -1.5 <br> | ||
| + | Do not use a -LOD Bias when using OGSSAA and HSAA modes, these already have their own automatic LOD bias (Which can cause problems in some games)<ref>http://naturalviolence.webs.com/sgssaa.htm</ref><br> | ||
| + | *'''Texture Filtering - LOD Bias (OGL)''' | ||
| + | The same as the above except for OpenGL. If you'd like to try changing the LOD bias without forcing AA. Set the Transparency setting to one of the <code>Supersampling</code> modes instead of <code>Sparse Grid Supersampling</code><br> | ||
| + | *'''Texture Filtering - Negative LOD bias''' | ||
| + | This used to control whether NLOD's were Clamped (Not allowed) or Allowed . With Fermi GPU's and on, this no longer really functions. By default it clamps. Driver Controlled LoD Bias works either way.<br> | ||
| + | *'''Texture Filtering - Quality''' | ||
| + | Leave this at High Quality, this is an old optimization for older hardware to improve AF performance at the cost of some quality. If you have older hardware, like G80(8000 series) and prior, feel free to play around to see if it helps at all.<br> | ||
| + | *'''Texture Filtering - Trilinear Optimization''' | ||
| + | Same as above, an optimization of the number of texture samples taken for texture filtering. The HQ Setting above disables this anyway. Might only have to do when using Trilinear filtering.<ref>http://www.freepatentsonline.com/7193627.html</ref><br> | ||
| + | <br> | ||
| + | === ''Common'' === | ||
| + | *'''Ambient Occlusion setting''' | ||
| + | This needs to be set to enable HBAO+, there are 3 settings. | ||
| + | #<code>Performance</code> | ||
| + | #<code>Quality</code> | ||
| + | #<code>High Quality</code> | ||
| + | Q and HQ are pretty much the same (Though before HBAO+ was introduced there was a significant difference). | ||
| + | <br>Performance lowers the resolution and precision of the effect noticeably in many games. With less accurate and stronger shading. <br>However in some games, using <code>Performance</code> actually fixes some issues when using the Q and HQ settings without other drawbacks. (Ex: Oddworld New N Tasty,) The HBAO+ thread and list usually mention if needed.<br> | ||
| + | *'''Ambient Occlusion usage''' | ||
| + | When using HBAO+ set this to <code>On</code><br> | ||
| + | *'''Extension limit''' | ||
| + | "Extension limit indicates whether the driver extension string has been trimmed for compatibility with particular applications. Some older applications cannot process long extension strings and will crash if extensions are unlimited."<br> | ||
| + | "If you are using an older OpenGL application, turning this option on may prevent crashing. If you are using a newer OpenGL application, you should turn this option off"<ref>NvGames.dll</ref><br> | ||
| + | *'''Multi-display/mixed-GPU acceleration''' | ||
| + | "This controls GPU-based acceleration in OpenGL applications and will not have any effect on performance on DirectX platforms. Mixed GPU acceleration permits the use of heterogeneous graphics boards driving multiple monitors independently." <ref>https://forums.geforce.com/default/topic/449234/sli/mulit-display-mixed-gpu-acceleration-how-to-use-/</ref><br> | ||
| + | *'''Power management mode''' | ||
| + | "Setting Power management mode from "Adaptive" to "Maximum Performance" can improve performance in certain applications when the GPU is throttling the clock speeds incorrectly."<ref>https://nvidia.custhelp.com/app/answers/detail/a_id/3130/~/setting-power-management-mode-from-adaptive-to-maximum-performance</ref> | ||
| + | <br>Often GPU Boost GPUs will not clock correctly in <code>Adaptive</code> mode. They will idle whenever they feel like it. This can cause performance problems. However using <code>Prefer Maximum Performance</code> globally may not allow your GPU to downclock back to idle properly depending on your setup. | ||
| + | If you wish to try and see, when you set this on the Global Profile, you may need to reset the Driver for it to take effect. (Easiest is to restart PC). For setting it on individual Application Profiles, it isn't usually necessary.<br> | ||
| + | *'''Shader cache''' | ||
| + | This was added in driver 337.88<br> | ||
| + | <br> | ||
| + | "Shaders are used in almost every game, adding numerous visual effects that can greatly improve image quality (you can see the dramatic impact of shader technology in Watch Dogs here). Generally, shaders are compiled during loading screens, or during gameplay in seamless world titles, such as Assassin's Creed IV, Batman: Arkham Origins, and the aforementioned Watch Dogs. During loads their compilation increases the time it takes to start playing, and during gameplay increases CPU usage, lowering frame rates. When the shader is no longer required, or the game is closed, it is disgarded, forcing its recompilation the next time you play.<br> | ||
| + | |||
| + | In today's 337.88 WHQL drivers we've introduced a new NVIDIA Control Panel feature called "Shader Cache", which saves compiled shaders to a cache on your hard drive. Following the compilation and saving of the shader, the shader can simply be recalled from the hard disk the next time it is required, potentially reducing load times and CPU usage to optimize and improve your experience.<br> | ||
| + | |||
| + | By default the Shader Cache is enabled for all games, and saves up to 256MB of compiled shaders in %USERPROFILE%\AppData\Local\Temp\NVIDIA Corporation\NV_Cache. This location can be changed by moving your entire Temp folder using Windows Control Panel > System > System Properties > Advanced > Environmental Variables > Temp, or by using a Junction Point to relocate the NV_Cache folder. To change the use state of Shader Cache on a per-game basis simply locate the option in the NVIDIA Control Panel, as shown below. "<ref>http://www.geforce.com/whats-new/articles/nvidia-geforce-337-88-whql-watch-dog-drivers</ref><br> | ||
| + | *'''Threaded optimization''' | ||
| + | It is unknown what this actually does. But it works in DX and OGL and apparently can help and make things worse depending on the game. It defaults to Auto, so that might be the best way to leave it aside from known problematic games.<br> | ||
| + | ''Games with known issues with Threaded Optimization''<br> | ||
| + | #Neverwinter Nights | ||
| + | #Battlefield Bad Company 2 in MP | ||
| + | #The Chronicles of Riddick: Assault on Dark Athena | ||
| + | #DayZ/Arma 2 (Might not be the case anymore. Verification would be nice) | ||
| + | ''Games that Threaded Optimization helps''<br> | ||
| + | #Source Engine games | ||
| + | #Sleeping Dogs | ||
| + | If you know of any other games it helps or hurts. Post in the discussion tab! | ||
| + | <br> | ||
| + | === ''SLI'' === | ||
| + | *'''Antialiasing - SLI AA''' | ||
| + | "SLI AA essentially disables normal AFR rendering, and in 2-way mode will use the primary GPU for rendering+forced AA, while the secondary GPU is only used to do AA work.<br> | ||
| + | In SLI8x mode for example, each GPU would then do 4xMSAA after which the final result becomes 4xMSAA+4xMSAA=8xMSAA.<br> | ||
| + | This can be useful in games without proper SLI support, so at least the second GPU is not just idling.<br> | ||
| + | |||
| + | However it unfortunately only works correctly in OpenGL, and there will be no difference in temporal behavior between for example normal forced 4xMSAA+4xSGSSAA and SLI8x+8xSGSSAA in DX9."<ref>http://forums.guru3d.com/showpost.php?p=5248459&postcount=69</ref><ref>http://www.nvidia.com/object/slizone_sliAA_howto1.html</ref><br> | ||
| + | *'''Disable SLI (Explicitly set through NVAPI)''' | ||
| + | *'''Number of GPUs to use on SLI rendering mode''' | ||
| + | *'''NVIDIA predefined number of GPUs to use on SLI rendering mode''' | ||
| + | *'''NVIDIA predefined number of GPUs to use on SLI rendering mode on DX10''' | ||
| + | *'''NVIDIA predefined SLI mode''' | ||
| + | *'''NVIDIA predefined SLI mode on DX10''' | ||
| + | *'''SLI indicator''' | ||
| + | *'''SLI rendering mode''' | ||
| + | |||
| + | |||
| − | |||
| − | |||
| − | |||
| − | + | {{References}} | |
Revision as of 05:36, 12 August 2016
 |
Useful Links
- Github project page
- Download the latest build
- Anti-Aliasing Compatibility Flags
- HBAO+ Compatibility Flags
- SLI Compatibility Flags
Introduction
Nvidia Profile Inspector is a tool created for pulling up and editing Application Profile settings within the Nvidia drivers.
Much like the "3D settings" page in Nvidia Control Panel.But not only more in-depth, but much more responsive. NVCP requires you to rely on Nvidia for just about everything. Problem is they don't expose every useful feature,might make some wrong assumptions about any given game and the interface is cumbersome.
NPI was spun off of the original Nvidia Inspector which featured an overclocking utility and required you to create a shortcut just to launch the profile editor.
Setting Up
| Instructions |
|---|
When you run Nvidia Profile Inspector for the first time you will be greeted with this screen. The "Global" profile
These are the settings that globally apply to any application. It is VERY IMPORTANT that you minimize what you force globally to only basic things such as Texture Filtering settings

This is an example of why you should set Texture Filtering globally and forget it. Some developer's own solutions are not as high quality as they should be.
If any game has a conflict with driver forced Texture Filtering, Nvidia usually sets a special flag on a profile for texture filtering that disables driver overriding for that game. (Far Cry 3 and Doom 2016 are examples of this)
Here is an example of a modified Global Profile. You don't have to copy it verbatim, but I at least recommend setting AF to override and HQ at the very minimum.
It is worth noting however that whether you want to use Adaptive performance mode or Prefer Max Performance is up to you.
Adaptive WILL cause problems with many games.
The card will do a variety of things such as not maintaining the base clock as a minimum. Therefore causing performance issues because the card will essentially start going back to idle clocks.
On the flip side: Adaptive will reduce idle temperatures depending on individual circumstances and the card will otherwise downclock correctly when not playing games.
So, if you want to use Adaptive. Just remember to set Prefer Maximum Performance in each profile for each game you play.
First steps for tweaking driver settings
- The first thing you will always want to do for any given is search to see whether Nvidia has already made a profile for your game.
To do this, left click in the white "Profiles" box, and start typing in the name of the game. The application will search through the list and narrow the list down the more characters you type.
- If your game does not have a profile, you will need to create one by clicking on the Sun icon.
It will prompt you to name the profile.
- You then will need to add the game
.exeto this new profile by hitting the folder with the green + icon.
- If you attempt to add an executable to a profile and it prompts you with a message that the
Insert Here.exealready belongs to a profile.
Pay attention to the name of the profile/s it gives you. For example if the game you were looking for didn't show up in a search, it's possible you may have worded it differently than they have it set in the driver.
HOWEVER, if the profiles it mentions to you aren't related to the game at all in any way we will need to set up the profile to use an .exe based on directory.
When you go to select an .exe click the drop down box in the right hand corner and set to "Absolute Application Path"
- Now you are ready to change settings on the profile. Don't forget to hit Apply Changes to any changes you make!
List of basic options and explanations
Compatibility
- Ambient Occlusion Compatibility
This is where you would enter or paste an 8 digit Hexadecimal code (Always with the prefix "0x") to get HBAO+ to work with any given game.
There is an official list of Flags built into the driver configured for specific games (Though not necessarily well for older titles). These flags are not a combination of functions put together to form a flag as with Anti-Aliasing, but rather are directions pointed a set of programmed parameters for each flag.
The first 2 bytes of the flag are reserved for Flags pertaining to DX10 and above. While the second set of bytes are reserved for Flags pertaining to DX9 only.
0x00000000 < DX10+, 0x00000000 < DX9
Each of the 8 slots goes from a value of 1-16
0,1,2,3,4,5,6,7,8,9,A,B,C,D,E,F
Giving them an approximate total of 65536 potential Flags for each set of APIs.
- Antialiasing Compatibility
This is where you would enter or paste an 8 digit Hexadecimal code (Always with the prefix "0x") to get various forms of Anti-Aliasing to work with any given DX9 game.
This Hex code unlike AO Compatibility, is actually a combination of possible functions that tell the driver what to do in regards to what kind of buffer formats to look for, how to process them among other things.
- Antialiasing compatibility (DX1x)
This is where you would enter or paste an 8 digit Hexadecimal code to force AA in DirectX10+...if you had one! (Insert Fairly Odd Parents reference)
Nvidia's effort sadly did not continue. There are few functions available for this and none of them work in any meaningful way for games other than the ones listed. Often only restricted to MSAA.
- Antialiasing Fix
This is somewhat a mystery almost. Initially this was apparently made just for an issue relating to Team Fortress 2. (As such was originally known as the TF2Fix). But as it turned out, this affected a very large number of games.
Currently the only description of the function available is FERMI_SETREDUCECOLORTHRESHOLDSENABLE (Fermi> Set Reduce Color Thresholds Enable)
This would suggest it's a Fermi issue, but it applies really to at least Fermi and everything after it.
It's also interesting that turning the AA fix on disables this. The default setting of "Off" is actually a value of 0x00000001. The On value is 0x00000000(Team Fortress 2)
Do Not Enable This Globally| As what it does depends on a per game basis. It is noted whether a game needs it or not in the Anti-Aliasing flags thread or whether it causes issues.
- SLI Compatibility bits
This is where you would enter or paste an 8 digit Hexadecimal code (Always with the prefix "0x") to get SLI working in DX9 applications. if the application doesn't already have a flag in the driver. OR if the official flag doesn't work well and is of poor quality.
Like AA compatibility bits. These flags are a combination of functions within the driver.
- SLI compatiblity bits (DX10+DX11)
This is where you would enter or paste an 8 digit Hexadecimal code (Always with the prefix "0x") to get SLI working in DX10+ applications. if the application doesn't already have a flag in the driver. OR if the official flag doesn't work well and is of poor quality.
- SLI compatiblity bits (DX12)
This is a new one. It is assumed it is the same as the other two. Currently there are only 2 flags in the driver. But as more DX12 games come out there will be more and this should actually be interesting to see how it plays out
Sync and Refresh
- Frame Rate Limiter
This setting will enable the driver's built in Frame Rate limiter in a series of pre-defined values non whole number values. It's worth noting that the quality of it has historically been a bit spotty. The behavior was changed at some point so whole numbers aren't possible. Before the limiter with whole values would never really stick to those numbers.
The 60FPS setting is 59.7 or 60.7, Vsync may or may not clamp this value.
Some people may prefer Unwinder's RTSS as more useful. As it lets you set the value yourself.
- GSYNC Application Mode
- GSYNC Requested State
- GSYNC Global Feature
- GSYNC Global Mode
- GSYNC Indicator Overlay
- Maximum pre-rendered frames
"The 'maximum pre-rendered frames' function operates within the DirectX API and serves to explicitly define the maximum number of frames the CPU can process ahead of the frame currently being drawn by the graphics subsystem. This is a dynamic, time-dependent queue that reacts to performance: at low frame rates, a higher value can produce more consistent gameplay, whereas a low value is less likely to introduce input latencies incurred by the extended storage time (of higher values) within the cache/memory. Its influence on performance is usually barely measurable, but its primary intent is to control peripheral latency."[1]
Values from 1-8, the default is 3 by the driver and it is not recommended to use higher than that.
A value of 1 or 2 will reduce Input Latency further[2] at the cost of slightly higher CPU performance.
When using 1/2 Refresh Rate Vsync a value of 1(Sometimes 2 will suffice but 1 generally reduces latency more) is essentially required. As 1/2 sync will introduce significantly more Input Latency.
- Triple buffering
Enables Triple Buffering for Vsync, but ONLY for the OpenGL API. For a run down of TB here is an article. If you wish to enable TB for D3D APIs you can download and use D3DOverrider.
It's worth noting that GSYNC makes the concept of Double and Triple Buffering entirely irrelevant. This is only for standard sync monitors.
- Vertical Sync Smooth AFR behavior
"Smooth Vsync is a new technology that can reduce stutter when Vsync is enabled and SLI is active.
When SLI is active and natural frame rates of games are below the refresh rate of your monitor, traditional vsync forces frame rates to quickly oscillate between the refresh rate and half the refresh rate (for example, between 60Hz and 30Hz). This variation is often perceived as stutter. Smooth Vsync improves this by locking into the sustainable frame rate of your game and only increasing the frame rate if the game performance moves sustainably above the refresh rate of your monitor. This does lower the average framerate of your game, but the experience in many cases is far better. "[3]
- Vertical Sync Tear Control[4]
This controls when a frame drop is detected whether Vsync should be disabled to maintain performance or sync should drop to the next sync rate.
At 60hz, without adaptive the frame rate will drop to 45 or 30FPS because they are the next available sync rate; 3/4 & 1/2.
You can use TB as mentioned above instead of adaptive, or as long as you ensure you have enough power to sustain the performance you are aiming for it shouldn't be an issue.
Also irrelevant with Gsync.
- Vertical Sync
Controls whether Vsync can be enabled for any given application. Typically it's set to "Application Controlled". Which means instead it's up to the individual application itself to enable/disable or offer the option for Vsync.
One recent example is Fallout 4. The game has no Vsync option, but it is forced on no matter what. You can disable it by setting this to "Force Off" on the Fallout 4 profile.
| Use 3D Application Setting | Uses application setting for Vsync | Application will decide whether Vsync is enabled. |
| Force Off | Forces Vsync Off | Forces application to not use Vsync. Even if it has no option. Will not stop Vsync from Windows Compositor in W8/W10 in Windowed mode. In some games this will unlock the framerate, or will simply cause tearing and reduce Input Latency |
| Force On | Forces Vsync On | Forces application to use Vsync. Even if it has no option. Will not work on games that are Borderless Windowed/Windowed only. |
| 1/2 Refresh Rate | Forces 1/2 rate Sync. This is very useful for playing at 30FPS or on 30FPS games that usually have some microstutter problems when syncing at 60hz. Remember to use a lower Pre-Rendered Frames setting when using it |
144/72hz, 120hz/60, 60hz/30, 50hz/25 |
| 1/3 Refresh Rate | Forces 1/3 rate Sync | 144hz/48 , 120hz/40, 60hz/20, 50hz/Not possible with whole numbers. |
| 1/4 Refresh Rate | Forces 1/4 rate Sync | 144hz/36, 120hz/30, 60hz/15, 50hz/Not possible with whole numbers |
| Fast Sync | Enables Nvidia's Fast Sync[5] Does not work with DX12 games. | Fast Sync eliminates tearing when playing games without Vsync on and reduces Input Latency significantly. However to work best, you need to be maintaining multiples of your refresh rate. Apparently only for Pascal GPUs, but some have had success with Maxwell GPUs. YMMV |
Antialiasing
- Antialiasing - Behavior Flags
These mostly exist as a method of governing usage of AA from Nvidia Control Panel.But, they also affect Inspector as well. So you will want to make sure you are clearing out any flags in this field for a game profile when forcing AA.
As it will interfere and cause it not to work if you aren't careful.
- Antialiasing - Gamma Correction
Gamma correction for MSAA, this is defaulted through function in the drivers to ON for any GPU Fermi generations and forward. It was new about 10 years ago with Half Life 2 and there is no reason to disable it on modern hardware.[6]
- Antialiasing - Line Gamma
- Antialiasing - Mode
This has 3 settings
| Application Controlled | Application decides whether to use AA |
| Override Application Setting | Driver overrides application setting. This allows you to force AA from the driver. General rule of thumb is you have to disable any in game AA/MSAA when using this to avoid conflict. There are exceptions though. And are noted in the AA Flags link generally. |
| Enhance Application Setting | Enhances application AA settings (Ex: Enhance in game MSAA with TrSSAA). |
When overriding AA in and game you will want to set "Override" and not either of the other two. Enhancing AA will become entirely dependent on the implementation of MSAA in the game you are modifying a profile for.
More often than not, especially in modern DX10+ games. This is a total crap shoot, either it doesn't work, breaks something, or looks very bad.
However, there are a few exceptions here. In certain game/game engines like Monolith Productions mid 2000s LithTech based games that use some sort of MSAA/FSAA hybrid the above 3 settings will generally not matter.
Example: With F.E.A.R 2 if you have the correct AA Flag on the profile and leave it at Application Controlled but have 8xQ MSAA and 8xSGSSAA enabled below it and enable F.E.A.R 2's FSAA it will enhance the FSAA.
In this specific case, this actually looks much better than 8xSGSSAA or FSAA by themselves!
Another great example is Red Faction Guerrilla, you can't force AA in this game.
However you can Enhance the in game MSAA with various methods of AA to some decent results. But it shines when you combine the in game AA+Enhanced AA and then downsample(Using DSR) while also enabling FXAA in the game Profile.
(FXAA works when Enhancing in game AA. It used to when Overriding as well, but has been broken since after 331.82. It is applied last in the chain so it doesn't cause conflicts with other AA. Though it's not recommended to use it at native over enhanced AA if that makes sense. Oversampling from Downsampling negates any smoothing issues)
This is a rather unique exception as most games don't yield this good of results.
Here is a few comparisons showing it off.
http://screenshotcomparison.com/comparison.php?id=103126
This first one shows no AA by default | Vs | The game running at 2x2 Native resolution with 2xMSAA enabled in game with "Enhance Application Setting" enabled and set to 4xS (1x2 OGSSAA + 2xMSAA) together with 2xSGSSAA. Finally with FXAA enabled on the profile.
http://screenshotcomparison.com/comparison.php?id=103127
This second one is cropped from the native 3200x1800 buffer with 2xMSAA+4xS+2xSGSSAA |Vs| That with FXAA also enabled showing that there are still some rough edges that FXAA cleans up before it is downsampled back to native 1600x900
http://screenshotcomparison.com/comparison/161297
The 3rd comparison shows 2x2 native resolution + 2xMSAA | Vs | 2x2 Native + 2xMSAA+4xS+2xSGSSAA+FXAA cropped and upsampled with point filtering by 2x2 to show how much more aliasing is tackled and resolved compared to without enhancing AA.
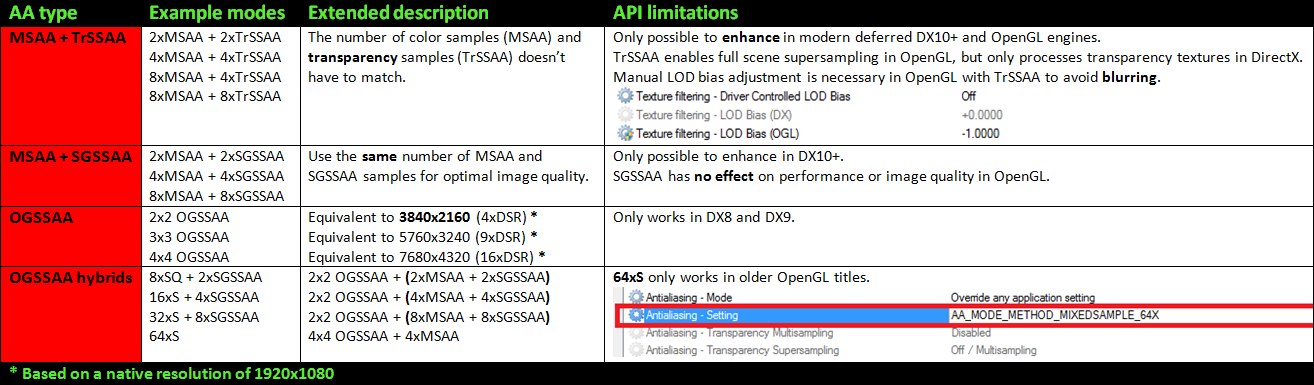
- Antialiasing - setting
This is where you would set any primary form of forced Anti Aliasing.
Which can be MSAA,CSAA(G80 to Kepler GPUs ONLY), OGSSAA (Ex 2x2 supersampling) or HSAA (Ex 16xS).
If you are going to use SGSSAA, you can use MSAA modes ONLY(2x,2xQ,4x,8xQ). The number of Color Samples have to match.
Refer to this post on which ones do whatAnd also this info graphic by GuruKnight of Guru3D forums
- Antialiasing - Transparency Multisampling[7]
The number of games this works with is unknown, but the results can be nice when it does work.
http://screenshotcomparison.com/comparison/149642
Nvidia has a demo of this you can download that also includes a demo of 4xTrSSAA
https://www.nvidia.com/object/transparency_aa.html
- Antialiasing - Transparency Supersampling
The only options here are Supersampling and Sparse Grid Supersampling.
In reality they are both SGSSAA, but they are different in their approach. TrSSAA is formally SGSSAA while SGSSAA is actually FSSGSSAA Full Scene Sparse Grid Super Sampling Anti Aliasing.
This works by replaying the pixel shading by N times number of color samples. TrSSAA(SGSSAA)does the same however it is decoupled from the main MSAA pass in that it only applies SGSSAA to Alpha Test surfaces like flat textures that come in all forms and varieties.
While SGSSAA (FSSGSSAA) is coupled with MSAA and needs the sample counts to match for it to work properly. Though in certain cases you can get away with mixing 4xMSAA with 2xSGSSAA. As 2xSGSSAA is poor in those cases.
Further Reference
In OpenGL Supersampling is equivalent to Sparse Grid Supersampling. Meaning 4xMSAA+4xTrSSAA will give you 4xFSSGSSAA in OpenGL games that work.
Do note that, usually these require AA compatibility Flags to work properly in DX9 games!
- Enable Maxwell sample interleaving (MFAA)[8]
This enables Nvidia's Multi Frame Anti Aliasing mode. This only works in DXGI (DX10+) and requires either the game to have MSAA enabled in the game or MSAA to be forced.
What it does is change the sub sample grid pattern every frame and then is reconstructed in motion with a "Temporal Synthesis Filter" as Nvidia calls it.
There are some caveats to using this though.
- It is not compatible with SGSSAA as far as shown in limited testing (SGSSAA in unlikely in DX10+ anyway since you would have to use
Enhance Application Settingand in DX10+ games the quality usually isn't good when doing so. - It causes visible flickering on geometric edges and other temporal artifacts depending on the game and it's MSAA implementation. Part of this is nullified with Downsampling though. So it's GREAT to use with downsampling (In conjunction with FXAA as well)to improve AA/Performance
- With screenshots and videos captured locally, there will be visible sawtooth patterns.
- It has a Minimum Framerate requirement of about 40FPS. Otherwise the Temporal Synthesis Filter seems to fall apart in a strange way depending on the game.
- It does not work with SLI. Supposedly it was supposed to happen in a driver update. But, well you know.
- Nvidia Predefined FXAA usage
Simply tells the driver whether FXAA is allowed to be turned on in Nvidia Control Panel (Primarily) or Nvidia Inspector.
- Toggle FXAA indicator on or off
This will display a small green icon in the left upper corner if enabled showing whether FXAA is enabled or not.
- Toggle FXAA on or off
Turns FXAA on or Off. You can also enable this when you are Enhancing in game AA as shown above.
Texture Filtering
- Anisotropic Filtering mode
Simply tells the driver whether the Driver controls AF for the application or the application is allowed to do its own thing.
It is recommended you leave this set to "User Defined/Off". Because lots of games do not have Texture Filtering options and lots of games also have mediocre or intentionally mediocre Texture Filtering.
Most of the time Driver AF is higher quality than in game AF.
Modern recent examples: Just Cause 3, Assassin's Creed Syndicate,Black Ops 3.
Only rarely will this incur a performance hit of any significance when overriding globally.
AC:Syndicate is one example of there being a minor performance cost, but it's worth it IMO and it's is a rare duck. Most games do not incur the same kind of performance with Driver AF.
- Anisotropic Filtering setting
If you have it set as above. This determines what level of Texture Filtering is forced on an Application. 16x is the best. But it also has options for Off[point] which is Point Filtering(You wouldn't want this 9/10 times.) Off[Linear] which is assumed Bilinear filtering.
- Prevent Anisotropic Filtering
Similar to AA Behavior Flags, if this is set to On it will ignore Driver Overrides from NI or NVCP. Some games default to this. Such as Quake 4, Rage, Doom 2016, Far Cry 3 and Far Cry Blood Dragon.
- Texture Filtering - Anisotropic filter optimization[9]
"Anisotropic filter optimization improves performance by limiting trilinear filtering to the primary texture stage where the general appearance and color of objects is determined. Bilinear filtering is used for all other stages, such as those used for lighting, shadows, and other effects. This setting only affects DirectX programs."
This might have been necessary 10-12 years ago. But not now.
- Texture Filtering - Anisotropic sample optimization [10]
"Anisotropic sample optimization limits the number of anisotropic samples used based on texel size. This setting only affects DirectX programs."
Same as above, unnecessary to use today.
- Texture Filtering - Driver Controlled LOD Bias
When using SGSSAA with this enabled will allow the driver to compute it's own Negative LOD Bias for textures to help improve sharpness (At cost of potential for more aliasing)for those who prefer it. It's generally less than the fixed amounts that are recommended.
When this is enabled setting a manual bias will not do anything. And AutoLOD will always be applied.
- Texture Filtering - LOD Bias (DX)
The Level of Detail Bias setting for textures in DirectX Backends. This normally only works under 2 circumstances.
For both "Driver Controlled LoD Bias" must be set to "Off"
- When Overriding or Enhancing AA.
- The last choice is an interesting one. If you leave the
Antialiasing Modesetting toApplication ControlledorEnhance Application Setting(Try Application controlled first!) but you set the AA and Transparency setting to SGSSAA (Eg 4xMSAA and 4xSGSSAA;TrSSAA in OpenGL then you can freely set the LOD bias and the changes will work without forcing AA. This has the side effect that in some games if the game has MSAA, it will act as if you were "Enhancing" the game setting. Even if you are usingApplication Controlled
Comparison example http://screenshotcomparison.com/comparison/159382
"The so called Level of Detail BIAS (LOD BIAS) controls at which distance from the viewer the switch to lower resolution mip maps takes place. The standard value of the LOD BIAS is 0.0. If you lower the LOD BIAS below zero, the mip map levels are moved farther away, resulting in seemingly sharper textures. But if the scene is moving, the textures start to shimmer."[11]
If you wish to use a -LOD Bias when forcing SGSSAA, these are the recommended amounts
- 2xSGSSAA (2 samples): -0.5
- 4xSGSSAA (4 samples): -1.0
- 8xSGSSAA (8 samples): -1.5
Do not use a -LOD Bias when using OGSSAA and HSAA modes, these already have their own automatic LOD bias (Which can cause problems in some games)[12]
- Texture Filtering - LOD Bias (OGL)
The same as the above except for OpenGL. If you'd like to try changing the LOD bias without forcing AA. Set the Transparency setting to one of the Supersampling modes instead of Sparse Grid Supersampling
- Texture Filtering - Negative LOD bias
This used to control whether NLOD's were Clamped (Not allowed) or Allowed . With Fermi GPU's and on, this no longer really functions. By default it clamps. Driver Controlled LoD Bias works either way.
- Texture Filtering - Quality
Leave this at High Quality, this is an old optimization for older hardware to improve AF performance at the cost of some quality. If you have older hardware, like G80(8000 series) and prior, feel free to play around to see if it helps at all.
- Texture Filtering - Trilinear Optimization
Same as above, an optimization of the number of texture samples taken for texture filtering. The HQ Setting above disables this anyway. Might only have to do when using Trilinear filtering.[13]
Common
- Ambient Occlusion setting
This needs to be set to enable HBAO+, there are 3 settings.
PerformanceQualityHigh Quality
Q and HQ are pretty much the same (Though before HBAO+ was introduced there was a significant difference).
Performance lowers the resolution and precision of the effect noticeably in many games. With less accurate and stronger shading.
However in some games, using Performance actually fixes some issues when using the Q and HQ settings without other drawbacks. (Ex: Oddworld New N Tasty,) The HBAO+ thread and list usually mention if needed.
- Ambient Occlusion usage
When using HBAO+ set this to On
- Extension limit
"Extension limit indicates whether the driver extension string has been trimmed for compatibility with particular applications. Some older applications cannot process long extension strings and will crash if extensions are unlimited."
"If you are using an older OpenGL application, turning this option on may prevent crashing. If you are using a newer OpenGL application, you should turn this option off"[14]
- Multi-display/mixed-GPU acceleration
"This controls GPU-based acceleration in OpenGL applications and will not have any effect on performance on DirectX platforms. Mixed GPU acceleration permits the use of heterogeneous graphics boards driving multiple monitors independently." [15]
- Power management mode
"Setting Power management mode from "Adaptive" to "Maximum Performance" can improve performance in certain applications when the GPU is throttling the clock speeds incorrectly."[16]
Often GPU Boost GPUs will not clock correctly in Adaptive mode. They will idle whenever they feel like it. This can cause performance problems. However using Prefer Maximum Performance globally may not allow your GPU to downclock back to idle properly depending on your setup.
If you wish to try and see, when you set this on the Global Profile, you may need to reset the Driver for it to take effect. (Easiest is to restart PC). For setting it on individual Application Profiles, it isn't usually necessary.
- Shader cache
This was added in driver 337.88
"Shaders are used in almost every game, adding numerous visual effects that can greatly improve image quality (you can see the dramatic impact of shader technology in Watch Dogs here). Generally, shaders are compiled during loading screens, or during gameplay in seamless world titles, such as Assassin's Creed IV, Batman: Arkham Origins, and the aforementioned Watch Dogs. During loads their compilation increases the time it takes to start playing, and during gameplay increases CPU usage, lowering frame rates. When the shader is no longer required, or the game is closed, it is disgarded, forcing its recompilation the next time you play.
In today's 337.88 WHQL drivers we've introduced a new NVIDIA Control Panel feature called "Shader Cache", which saves compiled shaders to a cache on your hard drive. Following the compilation and saving of the shader, the shader can simply be recalled from the hard disk the next time it is required, potentially reducing load times and CPU usage to optimize and improve your experience.
By default the Shader Cache is enabled for all games, and saves up to 256MB of compiled shaders in %USERPROFILE%\AppData\Local\Temp\NVIDIA Corporation\NV_Cache. This location can be changed by moving your entire Temp folder using Windows Control Panel > System > System Properties > Advanced > Environmental Variables > Temp, or by using a Junction Point to relocate the NV_Cache folder. To change the use state of Shader Cache on a per-game basis simply locate the option in the NVIDIA Control Panel, as shown below. "[17]
- Threaded optimization
It is unknown what this actually does. But it works in DX and OGL and apparently can help and make things worse depending on the game. It defaults to Auto, so that might be the best way to leave it aside from known problematic games.
Games with known issues with Threaded Optimization
- Neverwinter Nights
- Battlefield Bad Company 2 in MP
- The Chronicles of Riddick: Assault on Dark Athena
- DayZ/Arma 2 (Might not be the case anymore. Verification would be nice)
Games that Threaded Optimization helps
- Source Engine games
- Sleeping Dogs
If you know of any other games it helps or hurts. Post in the discussion tab!
SLI
- Antialiasing - SLI AA
"SLI AA essentially disables normal AFR rendering, and in 2-way mode will use the primary GPU for rendering+forced AA, while the secondary GPU is only used to do AA work.
In SLI8x mode for example, each GPU would then do 4xMSAA after which the final result becomes 4xMSAA+4xMSAA=8xMSAA.
This can be useful in games without proper SLI support, so at least the second GPU is not just idling.
However it unfortunately only works correctly in OpenGL, and there will be no difference in temporal behavior between for example normal forced 4xMSAA+4xSGSSAA and SLI8x+8xSGSSAA in DX9."[18][19]
- Disable SLI (Explicitly set through NVAPI)
- Number of GPUs to use on SLI rendering mode
- NVIDIA predefined number of GPUs to use on SLI rendering mode
- NVIDIA predefined number of GPUs to use on SLI rendering mode on DX10
- NVIDIA predefined SLI mode
- NVIDIA predefined SLI mode on DX10
- SLI indicator
- SLI rendering mode
References
- ↑ https://forums.geforce.com/default/topic/476977/sli/maximum-pre-rendered-frames-for-sli/post/3405124/#3405124
- ↑ http://www.displaylag.com/reduce-input-lag-in-pc-games-the-definitive-guide/
- ↑ https://nvidia.custhelp.com/app/answers/detail/a_id/3283/~/what-is-smooth-vsync%3F
- ↑ http://www.geforce.com/hardware/technology/adaptive-vsync/technology
- ↑ https://www.technopat.net/sosyal/konu/video-what-is-nvidia-fast-sync.329258/
- ↑ http://www.anandtech.com/show/2116/12
- ↑ http://http.download.nvidia.com/developer/SDK/Individual_Samples/DEMOS/Direct3D9/src/AntiAliasingWithTransparency/docs/AntiAliasingWithTransparency.pdf
- ↑ http://www.geforce.com/whats-new/articles/multi-frame-sampled-anti-aliasing-delivers-better-performance-and-superior-image-quality
- ↑ NvGames.dll
- ↑ NvGames.dll
- ↑ http://naturalviolence.webs.com/lodbias.htm
- ↑ http://naturalviolence.webs.com/sgssaa.htm
- ↑ http://www.freepatentsonline.com/7193627.html
- ↑ NvGames.dll
- ↑ https://forums.geforce.com/default/topic/449234/sli/mulit-display-mixed-gpu-acceleration-how-to-use-/
- ↑ https://nvidia.custhelp.com/app/answers/detail/a_id/3130/~/setting-power-management-mode-from-adaptive-to-maximum-performance
- ↑ http://www.geforce.com/whats-new/articles/nvidia-geforce-337-88-whql-watch-dog-drivers
- ↑ http://forums.guru3d.com/showpost.php?p=5248459&postcount=69
- ↑ http://www.nvidia.com/object/slizone_sliAA_howto1.html