|
|
| Line 49: |
Line 49: |
| | {{Availability/row| GOG.com | xiii | DRM-free | | | Windows }} | | {{Availability/row| GOG.com | xiii | DRM-free | | | Windows }} |
| | {{Availability/row| Steam | 1170760 | Steam | | | Windows }} | | {{Availability/row| Steam | 1170760 | Steam | | | Windows }} |
| | + | {{Availability/row| Publisher | https://www.zoom-platform.com/#store-xiii | DRM-free | | | Windows, OS X, Linux }} |
| | + | |
| | }} | | }} |
| | | | |
Revision as of 03:09, 10 July 2020
This page is for the original game. For the 2020 remake, see XIII (2020).
Warnings
- The macOS (OS X) version of this game does not work on macOS Catalina (version 10.15) or later due to the removal of support for 32-bit-only apps.
Key points
- Official master server for online multiplayer has been shut down in 2012[1][2] (see Network for solutions).
General information
- InsideXIII - fan site
- Opaquit's XIII Files - fan site
- GOG.com Community Discussions
- GOG.com Support Page
Availability
- A demo is available.
Essential improvements
Patches
- Official patches
- Unofficial patches
- All patches include previous patch updates.
Skip intro videos
|
Replace video files[4]
|
- Go to
<path-to-game>\Video\.
- Delete or rename the files:
alien.bik, nvidia.bik and ubi.bik.
- Download the blank video file.
- Move the file to
<path-to-game>\Video\.
- Create two copies of this file in the same location.
- Rename all three blank video files respectively to
alien.bik, nvidia.bik and ubi.bik.
|
Game data
Configuration file(s) location
Save game data location
- 1 quicksave slot + 9 autosave slots available. Addition save slots can be made by creating an additional profile. Game does not autosave progress.
Video
Modify XIII.ini[4][5]
|
- Go to the configuration file(s) location.
- Open the
XIII.ini file with Notepad or other text editor.
- Change the values of
FullscreenViewportX and FullscreenViewportY to your desired resolution.
- Save the changes.
- Set the field of view (FOV) according to the given aspect ratio or resolution:
- 16:9 - 101.4
- 16:10 - 95.43
- 2560x1080 - 116.91
- 1366x768 - 101.43
- 1360x768 - 101.18
- Cursor is upscaled.
|
Modify DefUser.ini[5]
|
- Go to the configuration file(s) location.
- Open the
DefUser.ini file with Notepad or other text editor.
- Change the values of
DesiredFOV and DefaultFOV to your desired FOV.
- Save the changes.
- Requires starting a new profile.
|
|
Use DxWnd[citation needed]
|
- Download, extract and run DxWnd.
- Click on Edit, then Add.
- Set Name (e.g. XIII) and Path (
<path-to-game>\system\XIII.exe).
- Check Do not notify on task switch.
- Set Window initial position & size.
- Select Desktop for borderless fullscreen windowed.
- Click on the Mouse tab, then for Mouse clipper select LOCKED.
- Click OK and File, then Save and Yes.
|
Modify XIII.ini[citation needed]
|
- Go to the configuration file(s) location.
- Open the
XIII.ini file with Notepad or other text editor.
- Change the value of
UseVSync to:
False to disable Vsync;True to enable Vsync.
- Save the changes.
- Enabled causes issues with frame rate pacing, stuttering, as well as with severe input lag.
- Enable in the graphics card control panel for best results.
|
- Fullscreen mode defaults to 60 Hz, even if the screen refresh rate is set higher than that.
|
Use dgVoodoo 2[6]
|
- Download and extract dgVoodoo 2.
- Open the
MS folder and copy the contents of the x86 folder to <path-to-game>\system\.
- Run the
dgVoodooCpl.exe file.
- Click Add and select
<path-to-game>\system\.
- Check Enumerate refresh rates.
- Go to the DirectX tab.
- Select Resolution from the list (e.g. 1920x1080, 119Hz).
- Uncheck Disable Alt-Enter to toggle screen state and dgVoodoo Watermark, then click OK.
Note: As of 10/10/19 the above steps only work when one of the following game clients is running: steam, origin, battle.net, epic game store, or rockstar game launcher. Without one of the aforementioned clients running the game seems to max out at 50ish fps. With one of the aforementioned clients running the game remains at about 120 fps. The game wont always remain stable at 120 fps, if the game wobbles between 50-60fps to 90ish fps when starting or after a cut-scene, assuming the Patch 1.4.2.1 / XIII+ is installed, simply hit f11 to toggle down to windowed mode and wait a few moments then hit f11 to toggle back into full screen, repeat this process until the frame rate remains around 120 fps again (shouldn't need to window and full screen more than a couple times to get a stable fps) - cause for this is unknown at this time.
|
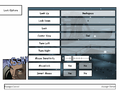
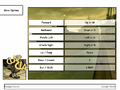
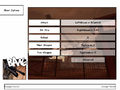
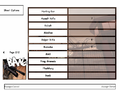
Input
In-game control settings (1/6).
In-game control settings (2/6).
In-game control settings (3/6).
In-game control settings (4/6).
In-game control settings (5/6).
In-game control settings (6/6).
Modify DefUser.ini[7]
|
- Go to the configuration file(s) location.
- Open the
DefUser.ini file with Notepad or other text editor.
- Change the value of
bMaxMouseSmoothing to:
False to disable mouse smoothing;True to enable mouse smoothing.
- Save the changes.
- Requires starting a new profile.
|
Modify DefUser.ini[7]
|
- Go to the configuration file(s) location.
- Open the
DefUser.ini file with Notepad or other text editor.
- Change the values of
MouseX=Axis aMouseX Speed=6.0, MouseY=Axis aMouseY Speed=6.0 and MouseSensitivity=3.00000 to fine-tune your sensitivity.
- Save the changes.
- It's not recommended to adjust
MouseSensitivity as the in-game slider may override it.
- Requires starting a new profile.
|
Audio
| Audio feature |
State |
Notes |
| Separate volume controls |
|
Music can be toggled on/off. |
| Surround sound |
|
|
| Subtitles |
|
Fan made pre-rendered cutscenes with subtitles for English and Turkish languages are also available. See Localizations. |
| Closed captions |
|
|
| Mute on focus lost |
|
|
Localizations
VR support
Network
Multiplayer types
Connection types
Ports
| Protocol |
Port(s) and/or port range(s)[9] |
| UDP |
7099, 7777 |
- Universal Plug and Play (UPnP) support status is unknown.
Issues fixed
4-CD installation problem
- Refers to the 4-CD retail version. The following message appears on CD 2:
Delete all configuration and saved games files? (Answering YES will delete the XIII installation folder and all of its content). Answering Yes or No stops the installation and constantly reappears if you start the installation again.
|
Use unofficial patch 1.4.2.1 / XIII+[3]
|
- Download unofficial patch 1.4.2.1 / XIII+.
- Install the patch by selecting the (Re-)Install XIII The Game method.
- Supported versions of the game can be found in the patch description.
|
Apply compatibility settings and rename the setup.exe file[10]
|
- Create a folder on Desktop named
XIII.
- Inside
XIII folder, create folders named CD 1, CD 2, CD 3, and CD 4.
- Copy the entire CD to each of their respective folders, e.g. CD 1 to the
CD 1 folder, and so on.
- Enable the following compatibility settings for the
setup.exe file in the CD 1 folder: Compatibility mode (Windows 98 / Windows ME).
- Open the Task Manager (Ctrl+⇧ Shift+Esc) and go to Processes.
- Start
setup.exe in the CD 1 folder.
- In the Task Manager you'll notice a bunch of new processes start up, when this happens change the name of the
setup.exe to something else, e.g. to abc.exe.
- Installation of CD 1 will continue.
- When it asks for CD 2, change whatever you named the
setup.exe back to setup.exe.
- Follow the rest of the installation instructions.
|
Game crashes and starting problems
- Fixed in GOG.com version.
|
Set CPU affinity in Task Manager[6]
|
- Launch the game.
- While in main menu minimize the game (Alt+Tab ↹).
- Open the Task Manager (Ctrl+⇧ Shift+Esc) and click on the Processes tab.
- Right click XIII.exe and click on Set Affinity.
- Make sure only CPU 0 is selected.
- May cause some timing or framerate issues in multiplayer.[11]
|
Game will not start in fullscreen
Modify XIII.ini[11]
|
- Go to the configuration file(s) location.
- Open the
XIII.ini file with Notepad or other text editor.
- Change the value of
ReduceMouseLag to False.
- Save the changes.
|
Game runs in slow motion
- Fixed in GOG.com version.
Left click leaves game
- Left mouse click causes focus change away from the fullscreen window back to your desktop.
Checkpoints are not saved permanently
- Checkpoint save only applies when you die during your current play through and does not save your game. You need to quick/manually save it. Loading any level manually can be done if needed.
- When you start a level with SWITCHLEVEL, you will start the level you have chosen with no weapons and no skills.
Issues with dedicated server
Server launcher does not work
- Server console window disappears immediately after start.
Failed to register the game server
- The above error appears in the server console.
Other information
API
| Technical specs |
Supported |
Notes |
| Direct3D |
8 |
|
| Executable |
32-bit |
64-bit |
Notes |
| Windows |
|
|
|
| macOS (OS X) | |
|
|
Middleware
|
Middleware |
Notes |
| Audio |
HXAudio |
Obscure driver that lacks surround sound support. |
| Cutscenes |
Bink Video |
1.5v |
System requirements
| Windows |
|
Minimum |
Recommended |
| Operating system (OS) |
98 |
ME, 2000, XP |
| Processor (CPU) |
Intel Pentium III 700 MHz
| Intel Pentium III 1 GHz |
| System memory (RAM) |
128 MB |
256 MB |
| Hard disk drive (HDD) |
1.2 GB |
2.5 GB |
| Video card (GPU) |
32 MB of VRAM
DirectX 8.1 compatible
| 64 MB of VRAM |
| Sound (audio device) |
DirectX compatible 16-bit sound card | |
Notes
References


