Difference between revisions of "Scarface: The World Is Yours"
From PCGamingWiki, the wiki about fixing PC games
(Added reception and HLTB fields; rewording; fixed Blackbird's refs; →Localizations: added french; →API: corrected DirectX version and added shader model.) |
|||
| Line 8: | Line 8: | ||
|release dates= | |release dates= | ||
{{Infobox game/row/date|Windows|July 25, 2006}} | {{Infobox game/row/date|Windows|July 25, 2006}} | ||
| + | |reception = | ||
| + | {{Infobox game/row/reception|Metacritic|scarface-the-world-is-yours|73}} | ||
| + | {{Infobox game/row/reception|IGDB|scarface-the-world-is-yours|79}} | ||
|steam appid = | |steam appid = | ||
|gogcom id = | |gogcom id = | ||
| + | |hltb = 8168 | ||
|strategywiki = Scarface: The World Is Yours | |strategywiki = Scarface: The World Is Yours | ||
|mobygames = scarface-the-world-is-yours | |mobygames = scarface-the-world-is-yours | ||
| Line 18: | Line 22: | ||
'''Key points''' | '''Key points''' | ||
| − | {{--}} Graphics are corrupted on modern versions of Windows | + | {{--}} Graphics are corrupted on modern versions of Windows. See [[#Corrupted graphics|Corrupted graphics]]. |
| − | {{--}} PC version is based off the Xbox version, which has | + | {{--}} PC version is based off the Xbox version, which has less detailed textures and missing blood effects on clothing and skin.<ref>{{Refurl|url=https://i.imgur.com/518PZRj.png|title=Missing Blood Effects|date=2018-05-28}}</ref> |
'''General information''' | '''General information''' | ||
| Line 33: | Line 37: | ||
==Essential improvements== | ==Essential improvements== | ||
===Patches=== | ===Patches=== | ||
| − | {{ii}} [https://www.patches-scrolls.de/patch/3573/7/ | + | {{ii}} [https://www.patches-scrolls.de/patch/3573/7/ Official patches] |
| − | {{ii}} To install patches | + | {{ii}} To install patches it is required to have the game installed in the default path (C:\Program Files (x86)\Radical Games\Scarface). |
====[https://cookieplmonster.github.io/mods/scarface/ SilentPatch]==== | ====[https://cookieplmonster.github.io/mods/scarface/ SilentPatch]==== | ||
| − | {{++}} Fixes some corrupted graphics | + | {{++}} Fixes some corrupted graphics. |
| − | {{++}} Improves performance | + | {{++}} Improves performance. |
| − | {{ii}} Allows all resolutions to be selected | + | {{ii}} Allows all resolutions to be selected. |
| − | {{ii}} Works only with latest retail version 1.00.2 | + | {{ii}} Works only with latest retail version 1.00.2. |
===Skip intro videos=== | ===Skip intro videos=== | ||
| Line 51: | Line 55: | ||
{{Game data/config|Windows|{{p|hklm}}\SOFTWARE\{{p|wow64}}\VUGAMES\Scarface\}} | {{Game data/config|Windows|{{p|hklm}}\SOFTWARE\{{p|wow64}}\VUGAMES\Scarface\}} | ||
}} | }} | ||
| − | {{ii}} [[#SilentPatch|SilentPatch]] relocates the settings to | + | {{ii}} [[#SilentPatch|SilentPatch]] relocates the settings to {{P|game}}\{{file|settings.ini}}. |
===Save game data location=== | ===Save game data location=== | ||
| Line 92: | Line 96: | ||
|hdr = unknown<!--there is obviously no HDR support--> | |hdr = unknown<!--there is obviously no HDR support--> | ||
|hdr notes = | |hdr notes = | ||
| − | |color blind = | + | |color blind = false |
|color blind notes = | |color blind notes = | ||
}} | }} | ||
===[[Glossary:Widescreen resolution|Widescreen resolution]]=== | ===[[Glossary:Widescreen resolution|Widescreen resolution]]=== | ||
| − | {{Fixbox|description=Use [[#SilentPatch|SilentPatch]]|ref=<ref name=" | + | {{Fixbox|description=Use [[#SilentPatch|SilentPatch]]|ref=<ref name="Blackbird_selfref">{{Refcheck|user=Blackbird|date=March 29, 2019}}</ref>|fix= |
}} | }} | ||
| Line 166: | Line 170: | ||
{{Fixbox|description=Use XInput to DInput translator|ref=<ref>[https://github.com/aap/XDinput/issues/1 Injecting scarface_dinput.dll · Issue #1 · aap/XDinput]</ref>|fix= | {{Fixbox|description=Use XInput to DInput translator|ref=<ref>[https://github.com/aap/XDinput/issues/1 Injecting scarface_dinput.dll · Issue #1 · aap/XDinput]</ref>|fix= | ||
# Download [https://github.com/ThirteenAG/Ultimate-ASI-Loader/releases Ultimate ASI Loader]. | # Download [https://github.com/ThirteenAG/Ultimate-ASI-Loader/releases Ultimate ASI Loader]. | ||
| − | # Copy | + | # Copy {{file|dinput8.dll}} to the installation folder. |
| − | # Rename | + | # Rename {{file|dinput8.dll}} to {{file|vorbisFile.dll}} (if the file already exists, rename the original to something else). |
| − | # Download | + | # Download {{file|scarface_dinput.dll}} and {{file|dinput8.dll}} from [https://github.com/aap/XDinput/tree/master/bin here], and copy both files to the installation folder. |
| − | # Rename | + | # Rename {{file|scarface_dinput.dll}} to {{file|scarface_dinput.asi}}. |
# Once in game, turn off '''Vibration''' to avoid game crashes. | # Once in game, turn off '''Vibration''' to avoid game crashes. | ||
}} | }} | ||
| Line 198: | Line 202: | ||
|notes = | |notes = | ||
|fan = | |fan = | ||
| + | }} | ||
| + | {{L10n/switch | ||
| + | |language = French | ||
| + | |interface = true | ||
| + | |audio = false | ||
| + | |subtitles = true | ||
}} | }} | ||
{{L10n/switch | {{L10n/switch | ||
| Line 231: | Line 241: | ||
==Issues fixed== | ==Issues fixed== | ||
===Corrupted graphics=== | ===Corrupted graphics=== | ||
| − | {{Fixbox|description=Use [[#SilentPatch|SilentPatch]]|ref=<ref name=" | + | {{Fixbox|description=Use [[#SilentPatch|SilentPatch]]|ref=<ref name="Blackbird_selfref"/>|fix= |
}} | }} | ||
| Line 241: | Line 251: | ||
{{Fixbox|description=Override refresh rate set by game|ref=<ref>{{Refcheck|user=Keith|date=2019-10-27|comment=}}</ref>|fix= | {{Fixbox|description=Override refresh rate set by game|ref=<ref>{{Refcheck|user=Keith|date=2019-10-27|comment=}}</ref>|fix= | ||
# Download and extract [http://dege.freeweb.hu/dgVoodoo2/dgVoodoo2.html dgVoodoo 2]. | # Download and extract [http://dege.freeweb.hu/dgVoodoo2/dgVoodoo2.html dgVoodoo 2]. | ||
| − | # | + | # Copy {{file|D3D9.dll}} from the <code>MS\x86\</code> folder to the game folder. |
# Run dgVoodoo, and add the game folder to the list. | # Run dgVoodoo, and add the game folder to the list. | ||
| − | # Enable the | + | # Enable the '''Enumerate refresh rates''' option. |
| − | # Go to the DirectX tab, and set | + | # Go to the DirectX tab, and set the desired resolution (e.g. 1920x1080, 119Hz). |
| − | # Disable the | + | # (Optional) Disable the '''dgVoodoo Watermark''' option to prevent the dgVoodoo logo from showing on game launch. |
| − | # Click OK to | + | # Click OK to apply changes. |
}} | }} | ||
===Low frame rate=== | ===Low frame rate=== | ||
| − | {{Fixbox|description=Use [[#SilentPatch|SilentPatch]]|ref=<ref name=" | + | {{Fixbox|description=Use [[#SilentPatch|SilentPatch]]|ref=<ref name="Blackbird_selfref">|fix= |
}} | }} | ||
===Game won't start on Windows 7 and above=== | ===Game won't start on Windows 7 and above=== | ||
{{Fixbox|description=Download 3D Ripper DX|ref={{cn|date=August 2018}}|fix= | {{Fixbox|description=Download 3D Ripper DX|ref={{cn|date=August 2018}}|fix= | ||
| − | #Download [http://www.deep-shadows.com/hax/3DRipperDX.htm 3D Ripper DX]. | + | # Download [http://www.deep-shadows.com/hax/3DRipperDX.htm 3D Ripper DX]. |
| − | #While installing, | + | # While installing, select '''3DS MAX 9x 32-bit''' and press '''Next'''. |
| − | #Check all the checkboxes on page 2 of installation. | + | # Check all the checkboxes on page 2 of installation. |
| − | #Skip the last page and continue to install. | + | # Skip the last page and continue to install. |
| − | #Launch 3D Ripper DX. | + | # Launch 3D Ripper DX. |
| − | # | + | # Click on the folder icon to the right of "Please select DirectX 6/8/9 application to analyze" (the first option at the top), navigate to the game folder and select {{file|Scarface.exe}}. |
| − | #Press | + | # Press '''Launch''' at the bottom right of the program. |
}} | }} | ||
===Can't load saved games, red square without prompts when trying to load saved profiles=== | ===Can't load saved games, red square without prompts when trying to load saved profiles=== | ||
| − | {{Fixbox|description= Unplug any gamepads/controllers connected | + | {{Fixbox|description= Unplug any gamepads/controllers connected before launching the game|ref=<ref name="Blackbird_selfref">|fix= |
}} | }} | ||
| Line 271: | Line 281: | ||
===API=== | ===API=== | ||
{{API | {{API | ||
| − | |direct3d versions = 9 | + | |direct3d versions = 9.0c |
|direct3d notes = | |direct3d notes = | ||
|directdraw versions = | |directdraw versions = | ||
| Line 289: | Line 299: | ||
|dos modes = | |dos modes = | ||
|dos modes notes = | |dos modes notes = | ||
| − | |shader model versions = | + | |shader model versions = 3.0 |
|shader model notes = | |shader model notes = | ||
|windows 32-bit exe = true | |windows 32-bit exe = true | ||
Revision as of 10:18, 5 May 2020
 |
|
| Developers | |
|---|---|
| Radical Entertainment | |
| Publishers | |
| Sierra Entertainment | |
| Release dates | |
| Windows | July 25, 2006 |
| Reception | |
| Metacritic | 73 |
| IGDB | 79 |
Key points
- Graphics are corrupted on modern versions of Windows. See Corrupted graphics.
- PC version is based off the Xbox version, which has less detailed textures and missing blood effects on clothing and skin.[1]
General information
- Scarface Wiki - A wiki about the Scarface universe
Availability
| Source | DRM | Notes | Keys | OS |
|---|---|---|---|---|
| Retail | SecuROM 7 DRM disc check. Russian copies use StarForce 3 DRM[Note 1] instead. |
- StarForce DRM for this game does not work on modern versions of Windows (see above for affected versions).
- Collector's Edition was not released for PC.
- This game is no longer available digitally.
Essential improvements
Patches
- Official patches
- To install patches it is required to have the game installed in the default path (C:\Program Files (x86)\Radical Games\Scarface).
SilentPatch
- Fixes some corrupted graphics.
- Improves performance.
- Allows all resolutions to be selected.
- Works only with latest retail version 1.00.2.
Skip intro videos
| Use Scarface intro skip[citation needed] |
|---|
Game data
Configuration file(s) location
| System | Location |
|---|---|
| Windows | HKEY_LOCAL_MACHINE\SOFTWARE\Wow6432Node\VUGAMES\Scarface\[Note 2] |
- SilentPatch relocates the settings to <path-to-game>\
settings.ini.
Save game data location
| System | Location |
|---|---|
| Windows | <path-to-game>[Note 3] |
Video settings
Widescreen resolution
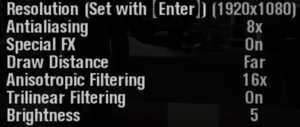
| Use SilentPatch[6] |
|---|
| Edit registry keys[7] |
|---|
|
Input settings
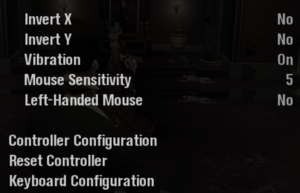
XInput-compatible controllers
- XInput triggers can't be assigned to actions by default.
| Use XInput to DInput translator[8] |
|---|
|
Audio settings
Localizations
| Language | UI | Audio | Sub | Notes |
|---|---|---|---|---|
| English | ||||
| French | ||||
| German | ||||
| Italian | ||||
| Russian | Only available in Russian retail copy. | |||
| Spanish |
Issues unresolved
Controls reset after dying
Issues fixed
Corrupted graphics
| Use SilentPatch[6] |
|---|
| Use dgVoodoo 2[9] |
|---|
Run the game at screen refresh rate
- The game defaults to a 60 Hz refresh rate. Enforcing a 60 FPS cap is still recommended.
| Override refresh rate set by game[10] |
|---|
|
Low frame rate
| Use SilentPatch<ref name="Blackbird_selfref"> |
|---|
Game won't start on Windows 7 and above
| Download 3D Ripper DX[citation needed] |
|---|
|
Can't load saved games, red square without prompts when trying to load saved profiles
| Unplug any gamepads/controllers connected before launching the game<ref name="Blackbird_selfref"> |
|---|
Other information
API
| Technical specs | Supported | Notes |
|---|---|---|
| Direct3D | 9.0c | |
| Shader Model support | 3.0 |
| Executable | 32-bit | 64-bit | Notes |
|---|---|---|---|
| Windows |
Middleware
| Middleware | Notes | |
|---|---|---|
| Audio | Vorbis | |
| Cutscenes | Bink Video | 1.8d |
System requirements
| Windows | ||
|---|---|---|
| Minimum | Recommended | |
| Operating system (OS) | 2000 | XP SP2 |
| Processor (CPU) | Intel Pentium 4 1.8 GHz AMD Athlon XP 2200+ |
Intel Pentium 4 2.8 GHz AMD Athlon 64 3600+ |
| System memory (RAM) | 256 MB | 512 MB |
| Hard disk drive (HDD) | 2.9 GB | 5 GB |
| Video card (GPU) | ATI Radeon 9200 Nvidia GeForce FX 5500 128 MB of VRAM DirectX 9.0c compatible | ATI Radeon X800 Nvidia GeForce 6800 256 MB of VRAM |
Notes
- ↑ This version of StarForce DRM does not work on Windows Vista or later.[2][3][4][5] For supported versions of Windows the StarForce driver may need to be updated manually using SFUPDATE.
- ↑ Applications writing to
HKEY_LOCAL_MACHINE\SOFTWAREwill be redirected to other locations based on various criterias, see the glossary page for more details. - ↑ When running this game without elevated privileges (Run as administrator option), write operations against a location below
%PROGRAMFILES%,%PROGRAMDATA%, or%WINDIR%might be redirected to%LOCALAPPDATA%\VirtualStoreon Windows Vista and later (more details).
References
- ↑ Missing Blood Effects - last accessed on 2018-05-28
- ↑ Windows Vista support - StarForce Support
- ↑ Windows 7 support - StarForce Support
- ↑ Windows 8.1 support - StarForce Support
- ↑ Windows 10 support - StarForce Support
- ↑ 6.0 6.1 Verified by User:Blackbird on March 29, 2019
- ↑ Verified by User:AlRayes BRN on 2019-11-25
- ↑ Injecting scarface_dinput.dll · Issue #1 · aap/XDinput
- ↑ VOGONS • View topic - WIP versions
- ↑ Verified by User:Keith on 2019-10-27


