Difference between revisions of "Monster Truck Madness 2"
From PCGamingWiki, the wiki about fixing PC games
(→Video) |
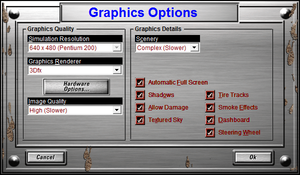
(→Video: Since the video settings screenshots clearly show what appears to be a v-sync option, reinstated and reworded previous note.) |
||
| (2 intermediate revisions by the same user not shown) | |||
| Line 115: | Line 115: | ||
|antialiasing notes = Use [https://www.pcgamingwiki.com/wiki/DgVoodoo_2#DirectX_2-8 dgVoodoo2] or set <code>antialiasFlag=0</code> to <code>1</code> in [[#Game data|Monster.ini]]. | |antialiasing notes = Use [https://www.pcgamingwiki.com/wiki/DgVoodoo_2#DirectX_2-8 dgVoodoo2] or set <code>antialiasFlag=0</code> to <code>1</code> in [[#Game data|Monster.ini]]. | ||
|vsync = always on | |vsync = always on | ||
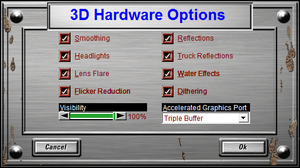
| − | |vsync notes = | + | |vsync notes = "Accelerated Graphics Port" options do not refer to v-sync; setting it to <code>Off</code> merely lowers texture resolution.<ref>{{Refcheck|user=Stereo3D|date=2021-01-21}}</ref> |
|60 fps = true | |60 fps = true | ||
|60 fps notes = | |60 fps notes = | ||
|120 fps = limited | |120 fps = limited | ||
| − | |120 fps notes = | + | |120 fps notes = Framerate is tied to refresh rate. Physics and AI are fps dependent.<ref>{{Refcheck|user=Stereo3D|date=2021-01-21}}</ref> |
|hdr = false | |hdr = false | ||
|hdr notes = | |hdr notes = | ||
| Line 175: | Line 175: | ||
|controller hotplug = false | |controller hotplug = false | ||
|controller hotplug notes = | |controller hotplug notes = | ||
| − | |haptic feedback = | + | |haptic feedback = true |
| − | |haptic feedback notes = | + | |haptic feedback notes = |
|simultaneous input = false | |simultaneous input = false | ||
|simultaneous input notes = | |simultaneous input notes = | ||
Revision as of 14:33, 21 January 2021
 |
|
| Developers | |
|---|---|
| Terminal Reality | |
| Publishers | |
| Microsoft Studios | |
| Engines | |
| Photex2 | |
| Release dates | |
| Windows | April 30, 1998 |
| Monster Truck Madness | |
|---|---|
| Monster Truck Madness | 1996 |
| Monster Truck Madness 2 | 1998 |
Key points
- Game is DRM-free and natively portable due to one-size-fits-all installation size.
- Massive selection of free tracks and trucks from community sites.
- Issues using Direct3D renderer under modern operating systems.
General information
- MTM2.com for a database of Monster Truck 2 tracks, trucks, and fan sites.
Availability
| Source | DRM | Notes | Keys | OS |
|---|---|---|---|---|
| Retail |
Essential improvements
Skip intro videos
| Skip intro videos[1] |
|---|
|
Skip title screen
| Disable title screen[1] |
|---|
|
Import original Monster Truck Madness tracks into Monster Truck Madness 2
| Add GAME.POD and TRUCK.POD to Monster Truck Madness 2's list of tracks[2] |
|---|
|
Play in Windows 10
- Monster Truck Madness 2 can be run in Windows 10 and even in 64-bit. There's a few tweaks that are required in order to make this game made in 1999 work on new hardware.
| Play in Windows 10[citation needed] |
|---|
|
Game data
Configuration file(s) location
| System | Location |
|---|---|
| Windows | <path-to-game>\System[Note 1] |
Save game data location
| System | Location |
|---|---|
| Windows | <path-to-game>\[Note 1] |
Video
| Graphics feature | State | WSGF | Notes |
|---|---|---|---|
| Widescreen resolution | Use dgVoodoo2 and Community Patch #2. | ||
| Multi-monitor | |||
| Ultra-widescreen | |||
| 4K Ultra HD | Use dgVoodoo2 and Community Patch #2. | ||
| Field of view (FOV) | Use zoom hotkeys. | ||
| Windowed | |||
| Borderless fullscreen windowed | See the glossary page for potential workarounds. | ||
| Anisotropic filtering (AF) | Use dgVoodoo2. | ||
| Anti-aliasing (AA) | Use dgVoodoo2 or set antialiasFlag=0 to 1 in Monster.ini. |
||
| Vertical sync (Vsync) | "Accelerated Graphics Port" options do not refer to v-sync; setting it to Off merely lowers texture resolution.[3] |
||
| 60 FPS | |||
| 120+ FPS | Framerate is tied to refresh rate. Physics and AI are fps dependent.[4] | ||
| High dynamic range display (HDR) | |||
Input
| Keyboard and mouse | State | Notes |
|---|---|---|
| Remapping | ||
| Mouse acceleration | ||
| Mouse sensitivity | ||
| Mouse input in menus | ||
| Mouse Y-axis inversion | ||
| Controller | ||
| Controller support | ||
| Full controller support | ||
| Controller remapping | ||
| Controller sensitivity | ||
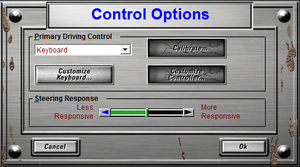
| Controller Y-axis inversion | Listed as "Swap Pedals" in the "Customize Controller..." section of Control Options |
| Controller types |
|---|
| XInput-compatible controllers |
|---|
| PlayStation controllers |
|---|
| Generic/other controllers |
|---|
| Additional information | ||
|---|---|---|
| Controller hotplugging | ||
| Haptic feedback | ||
| Digital movement supported | ||
| Simultaneous controller+KB/M |
Audio
- Playing without the game CD forces each race track to use a single, unique music track.
| Audio feature | State | Notes |
|---|---|---|
| Separate volume controls | ||
| Surround sound | ||
| Subtitles | ||
| Closed captions | ||
| Mute on focus lost | ||
| Red Book CD audio | On Windows, CD music might not play correctly; see the troubleshooting guide for solutions. |
Localizations
| Language | UI | Audio | Sub | Notes |
|---|---|---|---|---|
| English |
Network
Multiplayer types
| Type | Native | Players | Notes | |
|---|---|---|---|---|
| LAN play | 8 | |||
| Online play | 8 | |||
Connection types
| Type | Native | Notes |
|---|---|---|
| Matchmaking | Uses MSN Gaming Zone (no longer available). | |
| Peer-to-peer | ||
| Dedicated | ||
| Self-hosting | ||
| Direct IP |
Ports
| Protocol | Port(s) and/or port range(s) |
|---|---|
| TCP | 2300-2400, 47624 |
| UDP | 2300-2400 |
- Universal Plug and Play (UPnP) support status is unknown.
Issues unresolved
Game crashes to desktop during races while using Direct3D renderer
| Set compatibility options[1] |
|---|
Notes
|
| Use Glide renderer[1] |
|---|
Notes
|
Issues fixed
"Feature not included" or "Help not supported" error when trying to open help files
- Windows Vista and later need an update to open legacy Help files.
| Install Windows Help program[5] |
|---|
|
CD music not available
- CD music requires the disc in the first drive (CD-ROM 0).
- Some virtual drive software might not support CD music.
| Check drive is CD-ROM 0 |
|---|
|
Check that the drive is set to CD-ROM 0. |
Other information
API
| Technical specs | Supported | Notes |
|---|---|---|
| Direct3D | 5 | |
| Software renderer |
| Executable | 32-bit | 64-bit | Notes |
|---|---|---|---|
| Windows |
Middleware
| Middleware | Notes | |
|---|---|---|
| Multiplayer | MSN Gaming Zone | Shut down as of June 16, 2006. |
System requirements
| Windows | ||
|---|---|---|
| Minimum | Recommended | |
| Operating system (OS) | 95, NT | |
| Processor (CPU) | Intel Pentium 133 (133 MHz) | Intel Pentium MMX 200 (200 MHz) |
| System memory (RAM) | 16 MB | |
| Hard disk drive (HDD) | 30 MB | 110 MB |
| Video card (GPU) | SVGA-compatible DirectX 5.0 compatible | |
| Other | 3D accelerator recommended. | |
Notes
- ↑ 1.0 1.1 When running this game without elevated privileges (Run as administrator option), write operations against a location below
%PROGRAMFILES%,%PROGRAMDATA%, or%WINDIR%might be redirected to%LOCALAPPDATA%\VirtualStoreon Windows Vista and later (more details).
References
- ↑ 1.0 1.1 1.2 1.3 Verified by User:Expack3 on 2013-12-31
- ↑ Monster Truck Madness 2 Readme, Section 1.2
- ↑ Verified by User:Stereo3D on 2021-01-21
- ↑ Verified by User:Stereo3D on 2021-01-21
- ↑ Microsoft Support KB #917607


