|
|
| Line 652: |
Line 652: |
| | # Move or delete the {{file|PhysXLocal|folder}} folder, as well as the {{file|PhysXCore.dll}} and {{file|PhysXDevice.dll}} files.<ref>{{Refurl|url=https://justinalex.com/gaming-mirrors-edge-physx-fix/|title=justinalex.com|date=May 2023}}</ref> | | # Move or delete the {{file|PhysXLocal|folder}} folder, as well as the {{file|PhysXCore.dll}} and {{file|PhysXDevice.dll}} files.<ref>{{Refurl|url=https://justinalex.com/gaming-mirrors-edge-physx-fix/|title=justinalex.com|date=May 2023}}</ref> |
| | # For alternative methods, see [[Glossary:PhysX#Games prefer private own libraries to system ones|Games prefer private own libraries to system ones]]. | | # For alternative methods, see [[Glossary:PhysX#Games prefer private own libraries to system ones|Games prefer private own libraries to system ones]]. |
| − | }}
| |
| − |
| |
| − | ===Game does not saves settings/progress (Origin)===
| |
| − | {{Fixbox|description=Run [[Origin]] as a administrator.|fix=
| |
| | }} | | }} |
| | | | |
| | ===Game does not launch on Windows 10=== | | ===Game does not launch on Windows 10=== |
| − | {{Fixbox|description=Mandatory ASLR prevents game from running|fix= | + | {{Fixbox|description=Disable Mandatory ASLR for the game|ref=<ref>[https://steamcommunity.com/app/17410/discussions/0/3833171151458736010/ Game won't start, other solutions don't work. :: Steam Community Discussions]</ref>|fix= |
| − | # Open Windows Defender | + | # Open Windows Security |
| | # In App & browser control, open Exploit protection settings | | # In App & browser control, open Exploit protection settings |
| − | # In Program settings, add an exception for {{file|MirrorsEdge.exe}} | + | # In Program settings, add an exception for {{file|{{p|game}}\Binaries\MirrorsEdge.exe}} |
| | # Disable "Force randomization for images (Mandatory ASLR)" | | # Disable "Force randomization for images (Mandatory ASLR)" |
| − | }}
| |
| − |
| |
| − | ===Game does not launch/crash at startup===
| |
| − | {{Fixbox|description=Instructions|ref={{cn|January 2023}}|fix=
| |
| − | # Download and install the latest Nvidia PhysX version.
| |
| − | # Open {{file|TdEngine.ini}} in {{file|{{p|userprofile|documents}}\EA Games\Mirror's Edge\TdGame\Config|folder}}
| |
| − | # Replace these lines:
| |
| − | #* <code>MaxMultisamples=4</code> with <code>MaxMultisamples=1</code>
| |
| − | #* <code>PhysXEnhanced=True</code> with <code>PhysXEnhanced=False</code>
| |
| − | # Save the changes.
| |
| − | # In case of further issues, run {{file|MirrorsEdge.exe}} in [[Windows Compatibility Mode|compatibility mode]] for Windows XP SP3.
| |
| | }} | | }} |
| | | | |
Mirror's Edge is a sci-fi first-person action game developed by DICE, creators of the Battlefield franchise, and published by Electronic Arts. The game makes use of Unreal Engine 3, as DICE's own Frostbite engine wasn't complete when the title began full-scale production. A lighting system christened "Beast" was developed for the game by Illuminate Labs in association with DICE which was previously called "Turtle" and was used in Maya as a renderer.[1] The new technology would accentuate the art style of the game by allowing for the reflection of colors as well as light. The title takes advantage of many of Unreal Engine 3's features, such as Nvidia's PhysX physics simulation system, allowing for optional physics effects like detailed debris and cloth, emulating dynamic and unscripted physics.
The game was released on Steam and Origin on January 12th, 2009. The Origin release of the game featured extra DRM, including online activation and a limit to how many computers the game could be activated on, alongside needing to install the launcher to begin with. De-authorization tools have been made officially available.
General information
- GOG.com Community Discussions
- GOG.com Support Page
- Steam Community Discussions
- Community Discord Servers list.
Availability
Monetization
DLC and expansion packs
| Name |
Notes |
|
| Pure Time Trials Map Pack |
Were only available for Origin version; it is not compatible with the Steam and GOG version. |
|
- The DLC was only ever present in the Origin version of the game, and is no longer available to buy. Fortunately, it can be modded into versions other than the Origin one (unless if using Origin Fix) by using the Pure Time Trial Map Pack mod.
Essential improvements
Patches
- Patch 1.01. The Origin and Steam versions are already patched.
- This patch fixes Origin version of Mirror's Edge. Patch affects game's main executable, as well as cleans game directory from useless SecuROM/Origin files and folders and fixes PhysX issues.
- Can possibly make Pure Time Trial Map Pack Restoration Mod compatible with this version.
|
Installation
|
- Download files from the link above.
- Extract the
Binaries folder and Fix.bat into <path-to-game>.
- Run
Fix.bat and wait the necessary changes are made.
|
Skip intro videos and wait periods
|
Skip intro videos
|
|
Use the -nostartupmovies command line argument, or delete/comment out (add a ; to the beginning of) the StartupMovies line from TdEngine.ini.
- Note that only the second skip intro method works with MEMLA.
|
|
Remove "Press any key" delay
|
|
You can further speed up the time to enter the game by removing the 4 second wait period before the "Press any key" message appears. Locate DefaultUI.ini at <path-to-game>\TdGame\Config and change TimeTillStartButton=4 to TimeTillStartButton=0.
- Note that this change requires MEMLA.
|
Improve performance with PhysX
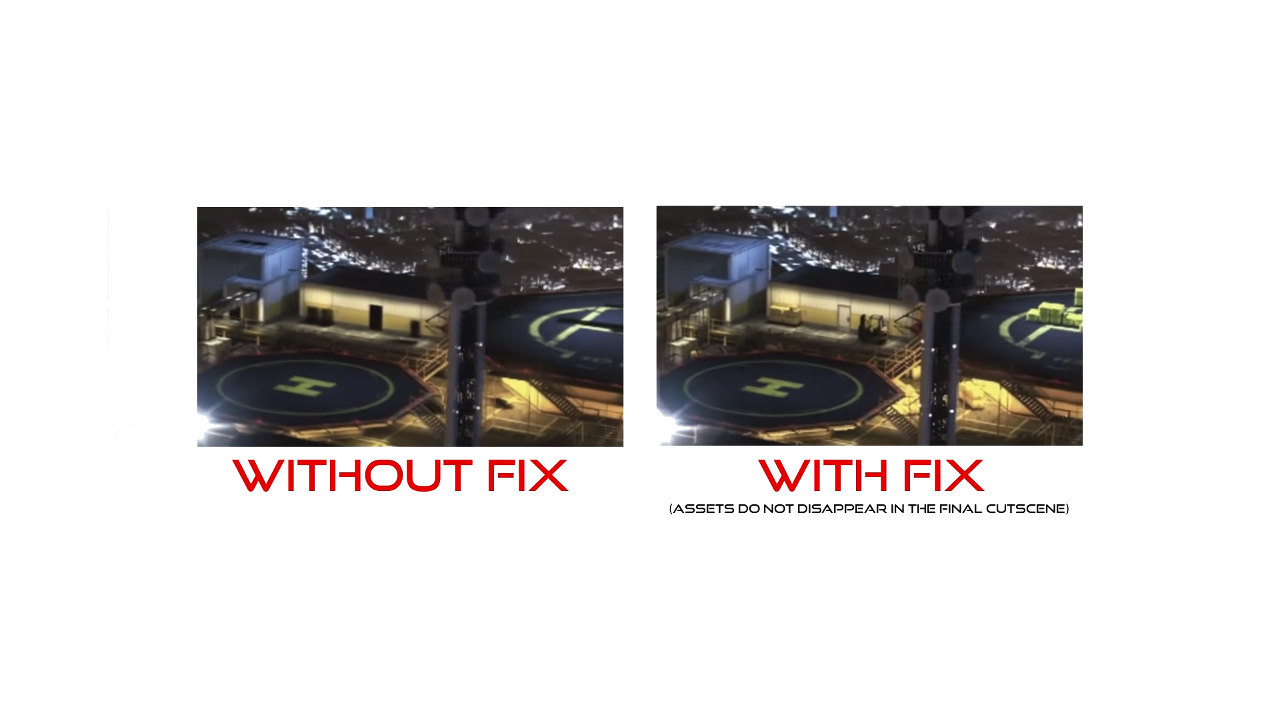
- This mod fixes drawing distance problems, that can be encountered at game epilog.[4]
|
Installation
|
- Download files from the link above.
- Extract the
TdGame folder into %USERPROFILE%\Documents\EA Games\Mirror's Edge.
|
Game data
In-game general settings.
Configuration file(s) location
- Some settings can be also edited in the INI files stored in
<path-to-game>\TdGame\Config, but MEMLA is required for the game to launch after altering the files.[5] MEMLA can be launched directly from within Steam. To do that, add the "<path-to-game>\MEMLA.exe" %command% command line argument in the game properties.
Save game data location
Video
|
Instructions[10]
|
- Go to the configuration file(s) location.
- Open
TdInput.ini.
- Add the following line under the
[Engine.PlayerInput] section and change # to the prefered FOV:
Bindings=(Name="One",Command="FOV #",Control=False,Shift=False,Alt=False)
Notes
- The desired FOV value key has to be pressed upon every game launch, after a level is loaded.
- Resets between levels.
- Setting a FOV higher than 105 can cause the skybox to break in certain scenes.
|
- The following methods do not present the same issues as the one above.
|
Use the Persistent FOV addon[11]
|
- Applies only to gameplay, respects the FOV set by in-game cutscenes.
- FOV values between 60 to 179 can be applied
|
|
Use Flawless Widescreen[6]
|
- Changes the FOV of the main menu and at times can scale the UI.
- -20 to +20 FOV only.
- Needs to be running in the background.
|
|
Use dxwrapper[12]
|
- Download dxwrapper.
- Extract
dxwrapper.dll and dxwrapper.ini to <path-to-game>\Binaries.
- Rename the two files to
d3d9.dll and d3d9.ini respectively.
- Open
d3d9.ini and set EnableD3d9Wrapper and EnableWindowMode to 1.
Notes
- Set
FullscreenWindowMode to 1 for Borderless fullscreen windowed.
- Set
WindowModeBorder to 1 if you don't want borderless mode.
|
|
Use modded files, also fixes Alt+Tab ↹ "out of focus" crash on Windows 7+[13]
|
- Download the Windowed/Fullscreen buttons and Console mod.
- Extract
CookedPC folder in %USERPROFILE%\Documents\EA Games\Mirror's Edge\TdGame\Published
- Press the windowed button in the main menu.
Notes
- The option is hardcoded to 1366x768 resolution. Hex edit the second
setres instance in TdUI_FrontEnd.upk to adjust it.
|
|
Use Custom Hotkeys[14]
|
- Go to the configuration file(s) location.
- Open
TdInput.ini.
- Add the following line under the
[Engine.PlayerInput] section and change # to the prefered hotkey, HW for resolution and after x32 W for windowed:
Bindings=(Name="#",Command="setres HxWx32W",Control=False,Shift=False,Alt=False)
Example of 1280x720 in windowed on hotkey F2.
Bindings=(Name="F2",Command="setres 1280x720x32W",Control=False,Shift=False,Alt=False)
Notes
- The option does not work in the main menu.
|
|
Force SGSSAA (Nvidia only)[15][16]
|
- Download and run Nvidia Profile Inspector.
- Select the Mirror's Edge profile.
- Change
Antialiasing compatibility value to 0x080000C1.
- Change
Antialiasing - Behavior Flags to None.
- Change
Antialiasing - Mode to Override any application setting.
- Change
Antialiasing - Setting to 4x [4x Multisampling].
- Change
Antialiasing - Transparency Supersampling to 4x Sparse Grid Supersampling.
- Press "Apply Changes" in the top-right corner.
|
Ambient occlusion
|
Force HBAO+ (Nvidia only)[17][18]
|
- Download and run Nvidia Profile Inspector.
- Select the Mirror's Edge profile.
- Change
Ambient Occlusion compatibility value to 0x00000030.
- Change
Ambient Occlusion setting to High Quality.
- Change
Ambient Occlusion usage to Enabled.
- Press "Apply Changes" in the top-right corner.
|
Depth of field
Bloom
Radial Blur
Streak Effect
|
Disables edge streaks (white streaks appearing when running at high speeds - not to be confused with radial blur)[22]
|
- Go to the
<path-to-game>\TdGame\Config
- Back up
DefaultHudEffects.ini as modifying it can cause corruption and prevent the game to start.
- Open
DefaultHudEffects.ini.
- Set
StreakDistanceInMovementDirection, StreakDistanceInCameraDirection and StreakEffectFadeTime to 0. Note: Setting bEnableStreakEffect to false does nothing.
- Save the file.
- Note that this change requires MEMLA.
|
Shadows
|
Increase shadow quality[23]
|
- Go to the configuration file(s) location.
- Open
TdEngine.ini.
- Change the following lines to the values presented, then save the file:
bEnableVSMShadows=True
bEnableBranchingPCFShadows=True
bAllowBetterModulatedShadows=True
ShadowFilterRadius=6
DepthBias=0.02
ModShadowFadeDistanceExponent=0
ShadowFilterQualityBias=16
MinShadowResolution=512
MaxShadowResolution=2048
Notes
- Setting
MinShadowResolution and MaxShadowResolution too high may impact performance; testing and further adjusting these settings is recommended.
|
|
Use Special K after D3D11 upgrade[24]
|
- Install DgVoodoo 2 in
<path-to-game>\Binaries\.
- Use its configuration utility to force the highest available Direct3D 11 feature level API, and the DirectX Videocard VRAM the closest to your GPU.
- Download Special K.
- Install it locally into the aforementioned game folder with
SpecialK32.dll renamed to dinput8.dll.
- Start the game, and from the SpecialK UI (Ctrl+⇧ Shift+← Backspace) make sure Active Render API is D3D9→11.
- From the Compatibility Settings, disable support for the D3D9 render backend
- if nothing shows up set
d3d9 and d3d9ex to false in the newly created dinput8.ini and launch the game again
- Set an Override Resolution by clicking once over Window Resolution
- From the Display drop-down menu, select Windowed Mode and the Force Override checkbox alongside it.
- if wanting fullscreen, enable Borderless and Fullscreen Borderless under in the Window Management panel
- Follow the remainder of the Special K HDR guide.
Notes
- When changing the resolution (in-game or elsewhere), make sure to also adjust
OverrideRes in the SK .ini file.
|
Input
In-game control settings.
In-game gamepad settings.
Mouse smoothing
|
Edit configuration files manualy[citation needed]
|
- Go to the configuration file(s) location.
- Open
TdInput.ini.
- Locate the line
bEnableMouseSmoothing and change the value to False.
|
Audio
| Audio feature |
State |
Notes |
| Separate volume controls |
|
|
| Surround sound |
|
7.1 is supported.[25] OpenAL Soft can replace the existing OpenAL driver, enabling HRTFs and fixing sampling issues (see 3D Surround Sound/HRTF). |
| Subtitles |
|
In Game Settings. |
| Closed captions |
|
|
| Mute on focus lost |
|
|
| Royalty free audio |
|
|
3D Surround Sound/HRTF Support
|
Override default audio renderer[26]
|
- Mirror's Edge uses OpenAL for rendering audio. By default, the game will use the OpenAL driver that is distributed with a standard OpenAL installation, which happens to be a pretty shoddy implementation of OpenAL. This can be replaced with a better version called "OpenAL Soft" and configured to enable HRTFs for accurate, 3D surround sound using only your stereo headphones. Sounds coming from in-front and behind will be distinctly different and even sounds coming from above or below will be clearly discernible.
- Download the latest OpenAL Soft binaries from the releases section.
- Extract the downloaded file and locate
soft_oal.dll in \bin\Win32
- Rename
soft_oal.dll to OpenAL32.dll
- Navigate to
<path-to-game>\Binaries and replace the existing OpenAL32.dll with the renamed version.
- Navigate to
%USERPROFILE%\Documents\EA Games\Mirror's Edge\TdGame\Config and open TdEngine.ini.
- Locate
DeviceName under [ALAudio.ALAudioDevice] and enter "OpenAL Soft" (e.g. DeviceName=OpenAL Soft)
- Set
TdEngine.ini to Read Only to prevent the game from overriding the changes.
Notes
- This also fixes the sampling issues of footstep volume/other sounds quickly fading in. The initial attack/transients of these sounds are no longer cut off.
|
Localizations
- Language codes to be used for manual switching are provided in the notes. First value is for the registry setting, second one is for the files extension and path.
| Language |
UI |
Audio |
Sub |
Notes |
| English |
|
|
|
en_UK (INT) |
| Traditional Chinese |
|
|
|
|
| Czech |
|
|
|
cs (CZE) |
| French |
|
|
|
fr_FR (FRA) |
| German |
|
|
|
de_DE (DEU) |
| Hungarian |
|
|
|
hu_HU (HUN) |
| Italian |
|
|
|
it_IT (ITA) |
| Japanese |
|
|
|
Region locked.[27] |
| Polish |
|
|
|
pl_PL (POL) |
| Brazilian Portuguese |
|
|
|
pt_PT (POR) |
| Russian |
|
|
|
ru_RU (RUS) |
| Spanish |
|
|
|
es_ES (ESN) |
| Turkish |
|
|
|
Download here. |
Independent dubbing and captioning
|
Override language files
|
- The Steam/Origin version should skip the first 3 steps and just set the appropriate language in the client game proprieties.
- Open regedit
- Go to
HKEY_LOCAL_MACHINE\SOFTWARE\Wow6432Node\EA GAMES\Mirror's Edge
- Set the
locale string to XXX (where XXX is the code for the desired voice language)
- Navigate to
<path-to-game>\TdGame\Localization (where YYY is the code for the desired UI/subtitles language)
- Copy
YYY to %USERPROFILE%\Documents\EA Games\Mirror's Edge\TdGame\Localization (create it if missing)
- Rename the folder from
YYY to XXX.
- Open a command prompt inside the renamed folder
- Run
ren *.YYY *.XXX
Notes
- Interface can be further decoupled by swapping only those localization files whose name start with
Td.
|
Network
Multiplayer types
VR support
Issues fixed
PhysX causes issues
- The PhysX enhanced effects are enormously taxing on the CPU due to using single-threaded X87 instructions[28] without an Nvidia GPU, may cause the game not to start or crash during gameplay, and may also cause performance issues on Nvidia GPUs due to the game using the older PhysX library files included in the game folder by default rather than the up to date ones from the driver.
Game does not launch on Windows 10
|
Disable Mandatory ASLR for the game[31]
|
- Open Windows Security
- In App & browser control, open Exploit protection settings
- In Program settings, add an exception for
<path-to-game>\Binaries\MirrorsEdge.exe
- Disable "Force randomization for images (Mandatory ASLR)"
|
Crash just after splash screen
|
Manually set resolution[32]
|
- Go to the configuration file(s) location.
- Open
TdEngine.ini.
- Change
ResX and ResY to the monitor's horizontal and vertical resolution.
- Save the changes.
|
No sound during cutscenes/FMVs in Windows 7
Merc's audio cuts off before end of sentence
|
Disable GX mode in Xonar Audio Center[citation needed]
|
- Open the Control Panel.
- Select Xonar Control Center.
- Near the bottom right is a button with
GX on it, press it and GX mode should now be disabled.
|
Other information
API
| Technical specs |
Supported |
Notes |
| Direct3D |
9.0c |
|
| Shader Model support |
3 |
|
| Executable |
32-bit |
64-bit |
Notes |
| Windows |
|
|
|
Middleware
|
Middleware |
Notes |
| Physics |
PhysX |
Version 2.8.0. Nvidia GPUs can accelerate optional physics effects like detailed debris and cloth. The simulation timestep can be increased for smoother physics rendering with the following mod.[34] |
| Audio |
OpenAL, Speex |
Ships with router version 6.14.357.22 and wrapper 2.2.0.5. Can be updated. |
| Interface |
Scaleform |
|
| Cutscenes |
Bink Video |
v1.9a |
Crosshair toggle
|
Crosshair Toggle[citation needed]
|
- This tweak will bind F11 to toggle the crosshair.
- Go to the configuration file(s) location.
- Open
TdInput.ini.
- Search for section
[Engine.PlayerInput] and add this line in it:
Bindings=(Name="F11",Command="Showhud",Control=False,Shift=False,Alt=False)
|
Adding binoculars
|
Binoculars tweak[citation needed]
|
- This tweak will add switchable two staged zoom simulating binoculars behavior from other games.
- Go to the configuration file(s) location.
- Open
TdInput.ini.
- Search for section
[Engine.PlayerInput] and add these lines in it:
Bindings=(Name="ZoomIn1",Command="FOV 50 | setbind YYY ZoomIn2",Control=False,Shift=False,Alt=False)
Bindings=(Name="ZoomIn2",Command="FOV 30 | setbind YYY ZoomOut",Control=False,Shift=False,Alt=False)
Bindings=(Name="ZoomOut",Command="FOV XXX | setbind YYY ZoomIn1",Control=False,Shift=False,Alt=False)
Bindings=(Name="YYY",Command="ZoomIn1",Control=False,Shift=False,Alt=False)
where XXX is the desired FOV (90 is the default), and YYY is name of key which will trigger zoom. Look out for examples in TdInput.ini. Alternatively, set your custom magnification by changing values 50 and 30.
|
Low end configuration
|
Use custom settings[35]
|
- Go to the configuration file(s) location.
- Open
TdEngine.ini.
- Replace the whole section below
[SystemSettings]
StaticDecals=False
DynamicDecals=False
DynamicLights=False
DynamicShadows=False
LightEnvironmentShadows=False
CompositeDynamicLights=False
DirectionalLightmaps=False
MotionBlur=false
DepthOfField=False
AmbientOcclusion=false
Bloom=False
QualityBloom=False
Distortion=False
DropParticleDistortion=False
SpeedTreeLeaves=False
SpeedTreeFronds=False
OnlyStreamInTextures=False
LensFlares=False
FogVolumes=False
FloatingPointRenderTargets=True
Trilinear=False
OneFrameThreadLag=True
UseVsync=False
UpscaleScreenPercentage=False
Fullscreen=True
AllowD3D10=False
EnableHighPolyChars=False
SkeletalMeshLODBias=0
ParticleLODBias=0
DetailMode=0
ShadowFilterQualityBias=-1
MaxAnisotropy=1
MaxMultisamples=1
MinShadowResolution=32
MaxShadowResolution=256
ResX=640
ResY=480
ScreenPercentage=100.000000
SceneCaptureStreamingMultiplier=0.800000
FoliageDrawRadiusMultiplier=0.000000
ShadowTexelsPerPixel=1.000000
TEXTUREGROUP_World=(MinLODSize=256,MaxLODSize=256,LODBias=1)
TEXTUREGROUP_WorldNormalMap=(MinLODSize=256,MaxLODSize=256,LODBias=2)
TEXTUREGROUP_WorldSpecular=(MinLODSize=256,MaxLODSize=256,LODBias=1)
TEXTUREGROUP_Character=(MinLODSize=256,MaxLODSize=256,LODBias=1)
TEXTUREGROUP_CharacterNormalMap=(MinLODSize=256,MaxLODSize=256,LODBias=2)
TEXTUREGROUP_CharacterSpecular=(MinLODSize=256,MaxLODSize=256,LODBias=1)
TEXTUREGROUP_Weapon=(MinLODSize=256,MaxLODSize=256,LODBias=1)
TEXTUREGROUP_WeaponNormalMap=(MinLODSize=256,MaxLODSize=256,LODBias=2)
TEXTUREGROUP_WeaponSpecular=(MinLODSize=256,MaxLODSize=256,LODBias=1)
TEXTUREGROUP_Vehicle=(MinLODSize=256,MaxLODSize=256,LODBias=1)
TEXTUREGROUP_VehicleNormalMap=(MinLODSize=256,MaxLODSize=256,LODBias=2)
TEXTUREGROUP_VehicleSpecular=(MinLODSize=256,MaxLODSize=256,LODBias=1)
TEXTUREGROUP_Cinematic=(MinLODSize=1,MaxLODSize=4096,LODBias=0)
TEXTUREGROUP_Effects=(MinLODSize=256,MaxLODSize=256,LODBias=1)
TEXTUREGROUP_Skybox=(MinLODSize=256,MaxLODSize=512,LODBias=1)
TEXTUREGROUP_UI=(MinLODSize=1,MaxLODSize=4096,LODBias=0)
TEXTUREGROUP_LightAndShadowMap=(MinLODSize=256,MaxLODSize=512,LODBias=1)
TEXTUREGROUP_RenderTarget=(MinLODSize=1,MaxLODSize=4096,LODBias=1)
PhysXEnhanced=False
TdMotionBlur=False
TdSunHaze=False
TdTonemapping=False
TdBicubicFiltering=False |
Modifications
Mirror's Edge cut ending recreation
Custom maps
System requirements
| Windows |
|
Minimum |
Recommended |
| Operating system (OS) |
XP SP2 |
Vista |
| Processor (CPU) |
Intel Pentium 4 3.0 GHz
| Intel Core 2 Duo 2.0 GHz |
| System memory (RAM) |
1 GB |
2 GB |
| Hard disk drive (HDD) |
8 GB | |
| Video card (GPU) |
Nvidia GeForce 6800
ATI Radeon X1650
256 MB of VRAM
DirectX 9.0c compatible
Shader model 3.0 support |
Nvidia GeForce 8800
512 MB of VRAM |
- Nvidia GeForce 7300 is below the minimum requirements, integrated chipsets may experience issues.
- Laptop versions of these chipsets may work but are not supported.
Notes
- ↑ 1.0 1.1 Notes regarding Steam Play (Linux) data:
References


