
Difference between revisions of "Dishonored"
(Moved out all the cruft from essential improvements. Improved first time setup instructions and references. Added low end configuration) |
|||
| Line 1: | Line 1: | ||
| + | {{cleanup|Other information section is probably too cluttered}} | ||
{{Infobox game | {{Infobox game | ||
|cover = Dishonored cover.jpg | |cover = Dishonored cover.jpg | ||
| Line 82: | Line 83: | ||
# Find <code>[FullScreenMovie]</code> section heading. | # Find <code>[FullScreenMovie]</code> section heading. | ||
# Replace <code>bForceNoStartupMovies=false</code> with <code>bForceNoStartupMovies=True</code> or create as new entry if missing.}} | # Replace <code>bForceNoStartupMovies=false</code> with <code>bForceNoStartupMovies=True</code> or create as new entry if missing.}} | ||
| − | |||
| − | |||
| − | |||
| − | |||
| − | |||
| − | |||
| − | |||
| − | |||
| − | |||
| − | |||
| − | |||
| − | |||
| − | |||
| − | |||
| − | |||
| − | |||
| − | |||
| − | |||
| − | |||
| − | |||
| − | |||
| − | |||
| − | |||
| − | |||
| − | |||
| − | |||
| − | |||
| − | |||
| − | |||
| − | |||
| − | |||
| − | |||
| − | |||
| − | |||
| − | |||
| − | |||
| − | |||
| − | |||
| − | |||
| − | |||
| − | |||
| − | |||
| − | |||
| − | |||
| − | |||
| − | |||
| − | |||
| − | |||
| − | |||
| − | |||
| − | |||
| − | |||
==Game data== | ==Game data== | ||
| Line 538: | Line 487: | ||
==="First time setup" runs every time game is started=== | ==="First time setup" runs every time game is started=== | ||
| − | {{Fixbox|description= | + | {{Fixbox|description=Flag PhysX installation|ref=<ref>[https://web.archive.org/web/20170602184817/http://forums.steampowered.com/forums/showthread.php?t=2966084#post33074483 First time setup every launch. - Steam Users' Forums] (retrieved)</ref>|fix= |
| − | + | # Make sure the latest [[Glossary:PhysX#Latest version|PhysX driver]] is installed | |
| + | # Open [[Windows#Command Prompt|cmd.exe]] and run: <code>reg add HKLM\SOFTWARE\Valve\Steam\Apps\205100 /v PhysXRedist /t REG_DWORD /d 1 /f /reg:32</code>. | ||
}} | }} | ||
| − | |||
| − | |||
| − | |||
===Texture pop-in when switching weapons=== | ===Texture pop-in when switching weapons=== | ||
| Line 631: | Line 578: | ||
|multiplayer = | |multiplayer = | ||
|multiplayer notes= | |multiplayer notes= | ||
| + | }} | ||
| + | |||
| + | ===Low end configuration=== | ||
| + | {{Fixbox|description=Use custom settings|ref=<ref>[https://www.youtube.com/watch?v=rnfHgnytezE Tweak-Fix | Dishonored | Framerate Boost For Very Low End PC's - YouTube]</ref><ref>[https://www.youtube.com/watch?v=1dADQJ4SDEQ Dishonored on super low graphics for low end computer - YouTube]</ref>|fix= | ||
| + | # Go to the [[#Game data|configuration file(s) location]]. | ||
| + | # Open {{file|DishonoredEngine.ini}}. | ||
| + | <div class="mw-collapsible mw-collapsed"><ol><li value="3"> Replace the entire <code>[SystemSettings]</code> section with</li></ol><div class="mw-collapsible-content"><small><pre>[SystemSettings] | ||
| + | SkeletalLODDistanceFactorMultiplier=1 | ||
| + | StaticLODDistanceFactorMultiplier=1 | ||
| + | TextureForcedLODBias=0 | ||
| + | iType_AntiAlias=0 | ||
| + | bUseMaxQualityMode=False | ||
| + | StaticDecals=False | ||
| + | DynamicDecals=True | ||
| + | UnbatchedDecals=False | ||
| + | DecalCullDistanceScale=1.0 | ||
| + | DynamicLights=False | ||
| + | DynamicShadows=False | ||
| + | LightEnvironmentShadows=False | ||
| + | CompositeDynamicLights=False | ||
| + | SHSecondaryLighting=False | ||
| + | DirectionalLightmaps=True | ||
| + | MotionBlur=False | ||
| + | MotionBlurPause=False | ||
| + | DepthOfField=False | ||
| + | AmbientOcclusion=False | ||
| + | Bloom=False | ||
| + | UseHighQualityBloom=False | ||
| + | bAllowLightShafts=False | ||
| + | bAllowRatsShadow=False | ||
| + | Distortion=False | ||
| + | FilteredDistortion=False | ||
| + | DropParticleDistortion=False | ||
| + | bAllowDownsampledTranslucency=False | ||
| + | SpeedTreeLeaves=False | ||
| + | SpeedTreeFronds=False | ||
| + | OnlyStreamInTextures=False | ||
| + | LensFlares=False | ||
| + | FogVolumes=False | ||
| + | FloatingPointRenderTargets=True | ||
| + | OneFrameThreadLag=True | ||
| + | UseVsync=False | ||
| + | UpscaleScreenPercentage=True | ||
| + | Fullscreen=True | ||
| + | AllowD3D10=False | ||
| + | AllowRadialBlur=False | ||
| + | SkeletalMeshLODBias=0 | ||
| + | ParticleLODBias=0 | ||
| + | DetailMode=1 | ||
| + | ShadowFilterQualityBias=0 | ||
| + | MaxAnisotropy=2 | ||
| + | MaxMultisamples=1 | ||
| + | MinShadowResolution=64 | ||
| + | MinPreShadowResolution=8 | ||
| + | MaxShadowResolution=800 | ||
| + | MaxWholeSceneDominantShadowResolution=1344 | ||
| + | ShadowFadeResolution=128 | ||
| + | PreShadowFadeResolution=16 | ||
| + | ShadowFadeExponent=.25 | ||
| + | ResX=640 | ||
| + | ResY=480 | ||
| + | ScreenPercentage=100.000000 | ||
| + | SceneCaptureStreamingMultiplier=1.000000 | ||
| + | FoliageDrawRadiusMultiplier=1.000000 | ||
| + | ShadowTexelsPerPixel=1.27324 | ||
| + | PreShadowResolutionFactor=.5 | ||
| + | bEnableVSMShadows=False | ||
| + | bEnableBranchingPCFShadows=False | ||
| + | bAllowHardwareShadowFiltering=False | ||
| + | bAllowBetterModulatedShadows=False | ||
| + | bEnableForegroundShadowsOnWorld=False | ||
| + | bEnableForegroundSelfShadowing=False | ||
| + | bAllowWholeSceneDominantShadows=False | ||
| + | ShadowFilterRadius=2 | ||
| + | ShadowDepthBias=.012 | ||
| + | CSMSplitPenumbraScale=.5 | ||
| + | CSMSplitSoftTransitionDistanceScale=4 | ||
| + | CSMSplitDepthBiasScale=.7 | ||
| + | UnbuiltWholeSceneDynamicShadowRadius=20000 | ||
| + | UnbuiltNumWholeSceneDynamicShadowCascades=3 | ||
| + | WholeSceneShadowUnbuiltInteractionThreshold=50 | ||
| + | bAllowFracturedDamage=True | ||
| + | NumFracturedPartsScale=1.0 | ||
| + | FractureDirectSpawnChanceScale=1.0 | ||
| + | FractureRadialSpawnChanceScale=1.0 | ||
| + | FractureCullDistanceScale=1.0 | ||
| + | bForceCPUAccessToGPUSkinVerts=false | ||
| + | bDisableSkeletalInstanceWeights=false | ||
| + | SpeakerConfiguration=0 | ||
| + | TEXTUREGROUP_World=(MinLODSize=10,MaxLODSize=10,LODBias=0) | ||
| + | TEXTUREGROUP_WorldNormalMap=(MinLODSize=10,MaxLODSize=10,LODBias=0) | ||
| + | TEXTUREGROUP_WorldSpecular=(MinLODSize=10,MaxLODSize=10,LODBias=0) | ||
| + | TEXTUREGROUP_Character=(MinLODSize=10,MaxLODSize=10,LODBias=0) | ||
| + | TEXTUREGROUP_CharacterNormalMap=(MinLODSize=10,MaxLODSize=10,LODBias=0) | ||
| + | TEXTUREGROUP_CharacterSpecular=(MinLODSize=10,MaxLODSize=10,LODBias=0) | ||
| + | TEXTUREGROUP_Weapon=(MinLODSize=10,MaxLODSize=10,LODBias=0) | ||
| + | TEXTUREGROUP_WeaponNormalMap=(MinLODSize=10,MaxLODSize=10,LODBias=0) | ||
| + | TEXTUREGROUP_WeaponSpecular=(MinLODSize=10,MaxLODSize=10,LODBias=0) | ||
| + | TEXTUREGROUP_Vehicle=(MinLODSize=10,MaxLODSize=10,LODBias=0) | ||
| + | TEXTUREGROUP_VehicleNormalMap=(MinLODSize=10,MaxLODSize=10,LODBias=0) | ||
| + | TEXTUREGROUP_VehicleSpecular=(MinLODSize=10,MaxLODSize=10,LODBias=0) | ||
| + | TEXTUREGROUP_Cinematic=(MinLODSize=10,MaxLODSize=10,LODBias=0) | ||
| + | TEXTUREGROUP_Effects=(MinLODSize=10,MaxLODSize=10,LODBias=0) | ||
| + | TEXTUREGROUP_EffectsNotFiltered=(MinLODSize=10,MaxLODSize=10,LODBias=0,MinMagFilter=aniso,MipFilter=linear) | ||
| + | TEXTUREGROUP_Skybox=(MinLODSize=10,MaxLODSize=10,LODBias=0) | ||
| + | TEXTUREGROUP_UI=(MinLODSize=10,MaxLODSize=10,LODBias=0) | ||
| + | TEXTUREGROUP_Lightmap=(MinLODSize=10,MaxLODSize=10,LODBias=0) | ||
| + | TEXTUREGROUP_Shadowmap=(MinLODSize=10,MaxLODSize=10,LODBias=0,NumStreamedMips=3) | ||
| + | TEXTUREGROUP_RenderTarget=(MinLODSize=10,MaxLODSize=10,LODBias=0) | ||
| + | TEXTUREGROUP_MobileFlattened=(MinLODSize=10,MaxLODSize=10,LODBias=0) | ||
| + | TEXTUREGROUP_ProcBuilding_Face=(MinLODSize=10,MaxLODSize=10,LODBias=0,MinMagFilter=aniso,MipFilter=linear) | ||
| + | TEXTUREGROUP_ProcBuilding_LightMap=(MinLODSize=10,MaxLODSize=10,LODBias=0,MinMagFilter=aniso,MipFilter=linear) | ||
| + | TEXTUREGROUP_Terrain_Heightmap=(MinLODSize=10,MaxLODSize=10,LODBias=0,MinMagFilter=aniso,MipFilter=linear) | ||
| + | TEXTUREGROUP_Terrain_Weightmap=(MinLODSize=10,MaxLODSize=10,LODBias=0,MinMagFilter=aniso,MipFilter=linear)</pre></small></div></div> | ||
| + | }} | ||
| + | |||
| + | ===Increase Texture Quality and Turn Off Texture Streaming=== | ||
| + | {{Fixbox|description=Edit Configuration File|ref={{cn|date=July 2016}}|fix= | ||
| + | # Go to the [[#Game data|configuration files location]]. | ||
| + | # Open {{file|DishonoredEngine.ini}}. | ||
| + | # To disable mipmapping for world-textures (which should be most noticable), find the line <code>TEXTUREGROUP_World=(MinLODSize=256,MaxLODSize=2048,LODBias=0)</code> and replace it with <code>TEXTUREGROUP_World=(MinLODSize=256,MaxLODSize=2048,LODBias=0,NumStreamedMips=0)</code> (similarly, to disable mipmapping for any other texture group, simply append <code>NumStreamedMips=0</code> inside the parentheses, making sure to add the needed comma(s)). | ||
| + | # Change these lines and save as read-only: | ||
| + | <pre> | ||
| + | MipFadeInSpeed0=0 | ||
| + | MipFadeOutSpeed0=0 | ||
| + | MipFadeInSpeed1=0 | ||
| + | MipFadeOutSpeed1=0 | ||
| + | StopIncreasingLimit=20 | ||
| + | MinTimeToGuaranteeMinMipCount=0 | ||
| + | MaxTimeToGuaranteeMinMipCount=0 | ||
| + | OnlyStreamInTextures=True | ||
| + | PoolSize=0 | ||
| + | LoadMapTimeLimit=999 | ||
| + | LightmapStreamingFactor=0 | ||
| + | ShadowmapStreamingFactor=0 | ||
| + | bAllowSwitchingStreamingSystem=False | ||
| + | UseDynamicStreaming=False | ||
| + | SkeletalLODDistanceFactorMultiplier=0 | ||
| + | StaticLODDistanceFactorMultiplier=0 | ||
| + | TextureForcedLODBias=0 | ||
| + | DetailMode=4 | ||
| + | </pre> | ||
| + | {{ii}} May cause game to enter an infinite loading loop. If it does, turn texture streaming back on, leave that area of the game, and turn it off again once you leave the area. | ||
| + | }} | ||
| + | |||
| + | ===Increase Shadows Quality=== | ||
| + | {{Fixbox|description=Edit Configuration File|ref={{cn|date=July 2016}}|fix= | ||
| + | # Go to the [[#Game data|configuration files location]]. | ||
| + | # Open {{file|DishonoredEngine.ini}}. | ||
| + | # Change these lines and save as read-only: | ||
| + | <pre> | ||
| + | ShadowFilterQualityBias=0 | ||
| + | MinShadowResolution=2048 | ||
| + | MaxShadowResolution=4096 | ||
| + | bAllowWholeSceneDominantShadows=True | ||
| + | MaxWholeSceneDominantShadowResolution=4096 | ||
| + | ShadowTexelsPerPixel=0 | ||
| + | </pre> | ||
| + | }} | ||
| + | |||
| + | ===Stop bodies from disappearing=== | ||
| + | {{Fixbox|description=Increase Default Number of Bodies In Areas|ref={{cn|date=July 2016}}|fix= | ||
| + | # Go to the [[#Game data|configuration file(s) location]]. | ||
| + | # Open {{file|DishonoredAI.ini}}. | ||
| + | # Modify the values of <code>m_CorpseAbsoluteMaximumCount</code> and <code>m_CorpseIdealMaximumCount</code> as necessary (e.g. <code>m_CorpseAbsoluteMaximumCount=1000</code> and <code>m_CorpseIdealMaximumCount=500</code>). | ||
| + | # Modify <code>m_bCorpseCleanupInView=</code> value from <code>true</code> to <code>false</code>. | ||
}} | }} | ||
Revision as of 12:58, 22 May 2022
 |
|
| Developers | |
|---|---|
| Arkane Studios | |
| Publishers | |
| Bethesda Softworks | |
| Engines | |
| Unreal Engine 3 | |
| Release dates | |
| Windows | October 9, 2012 |
| Reception | |
| Metacritic | 91 |
| IGDB | 90 |
| Taxonomy | |
| Monetization | DLC |
| Modes | Singleplayer |
| Pacing | Real-time |
| Perspectives | First-person |
| Controls | Direct control |
| Genres | Immersive sim, Action, Stealth |
| Art styles | Stylized |
| Themes | Fantasy, Steampunk |
| Series | Dishonored |
| Dishonored | |
|---|---|
| Dishonored | 2012 |
| Dishonored 2 | 2016 |
| Dishonored: Death of the Outsider | 2017 |
Key points
- DLC is not directly accessible from the main menu.
- Editing .ini files prevents Dunwall City Trials scores to be posted to the leaderboards.[1]
- Generally regarded as a high-quality PC port.[2][3]
General information
Availability
| Source | DRM | Notes | Keys | OS |
|---|---|---|---|---|
| Retail | ||||
| Epic Games Store | Definitive Edition. | |||
| GamersGate | Definitive Edition also available. | |||
| Definitive Edition also available. | ||||
| GOG.com | Definitive Edition. | |||
| Humble Store | Definitive Edition also available. | |||
| Microsoft Store | Definitive Edition included with Xbox Game Pass for PC. | |||
| Steam | Definitive Edition also available. | |||
| Steam | RHCP (Russia, Hungary, Czech, Polish) version | |||
| Amazon.com (unavailable) | Definitive Edition also available. | |||
| Amazon.co.uk (unavailable) | Game of the Year Edition also available. | |||
| Bethesda.net (unavailable) | Definitive Edition also available. | |||
| Green Man Gaming (unavailable) | Definitive Edition also available. |
Version differences
- Definitive Edition (formerly Game of the Year Edition) includes the base game and all DLC.
DLC and expansion packs
| Name | Notes | |
|---|---|---|
| Dunwall City Trials | ||
| The Brigmore Witches | ||
| The Knife of Dunwall | ||
| Void Walker Arsenal |
Essential improvements
Skip intro videos
Use the -nostartupmovies command line argument[4]
|
|---|
| INI Method |
|---|
|
Game data

Configuration file(s) location
| System | Location |
|---|---|
| Windows | %USERPROFILE%\Documents\My Games\Dishonored\DishonoredGame\ <Steam-folder>\userdata\<user-id>\205100\remote\options.sav HKEY_CURRENT_USER\Software\Arkane\Dishonored\ |
| Steam Play (Linux) | <SteamLibrary-folder>/steamapps/compatdata/205100/pfx/[Note 1] |
- Editing any of the .ini files prevents Dunwall City Trials scores to be posted to the leaderboards.[1]
Save game data location
| System | Location |
|---|---|
| Windows | <Steam-folder>\userdata\<user-id>\205100\ <Steam-folder>\userdata\<user-id>\217980\ |
| Steam Play (Linux) | <SteamLibrary-folder>/steamapps/compatdata/205100/pfx/[Note 1] |
- The normal version uses
205100; the RHCP (Russian, Hungarian, Czech, Polish) version uses217980 - Maximum of 40 manual save slots + 9 automatic mission saves + 2 autosave slots + 1 quicksave slot.
- DLCs have a separate save slot limit.
Save game cloud syncing
| System | Native | Notes |
|---|---|---|
| Epic Games Launcher | ||
| GOG Galaxy | ||
| Steam Cloud | Syncs save games and settings. | |
| Xbox Cloud |
Video


| Graphics feature | State | WSGF | Notes |
|---|---|---|---|
| Widescreen resolution | |||
| Multi-monitor | Use Flawless Widescreen for the best experience. | ||
| Ultra-widescreen | [5] | ||
| 4K Ultra HD | |||
| Field of view (FOV) | 65-110°;[6] for custom values, see Field of view (FOV). | ||
| Windowed | Toggled with F11, menu option, or the -windowed parameter.[7] |
||
| Borderless fullscreen windowed | Works with GeDoSaTo. | ||
| Anisotropic filtering (AF) | Default is 4x. See Anisotropic filtering (AF). | ||
| Anti-aliasing (AA) | FXAA, MLAA. | ||
| Vertical sync (Vsync) | |||
| 60 FPS and 120+ FPS | Uses frame rate smoothing with maximum value of 130. For higher frame rates see High frame rate. | ||
| High dynamic range display (HDR) | See the glossary page for potential alternatives. | ||
Field of view (FOV)
| Use Dishonored FOV Hack[8] |
|---|
|
| Add FOV hotkey[9] |
|---|
Notes
|
Anisotropic filtering (AF)
| Changing Anisotropic Filtering level[citation needed] |
|---|
|
Anti-aliasing (AA)
| Force SGSSAA (Nvidia only)[10][11] |
|---|
|
Ambient occlusion
| Force HBAO+ (Nvidia only)[12][13] |
|---|
|
High frame rate
| Change frame rate smoothing[citation needed] |
|---|
|
Input
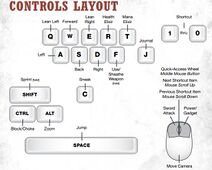
Dishonored's keyboard shortcuts.
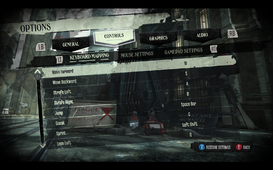
In-game key map settings.
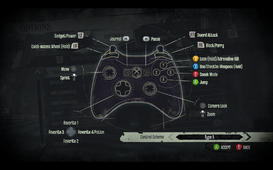
In-game gamepad layout settings.
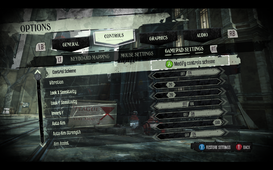
In-game gamepad settings.


| Keyboard and mouse | State | Notes |
|---|---|---|
| Remapping | ||
| Mouse acceleration | Mouse smoothing option is on by default. Slider in menu for smoothing/acceleration. | |
| Mouse sensitivity | Mouse has deadzone when zoomed in. | |
| Mouse input in menus | ||
| Mouse Y-axis inversion | ||
| Controller | ||
| Controller support | ||
| Full controller support | Supports both auto-aim and aim assist. | |
| Controller remapping | Only pre-set layouts are available. | |
| Controller sensitivity | ||
| Controller Y-axis inversion |
| Controller types |
|---|
| XInput-compatible controllers | ||
|---|---|---|
| Xbox button prompts | ||
| Impulse Trigger vibration | Use X1nput[14] |
| PlayStation controllers |
|---|
| Generic/other controllers |
|---|
| Additional information | ||
|---|---|---|
| Button prompts | ||
| Controller hotplugging | May not work properly, can happen along with settings not saving when using a controller. This can be fixed using these instructions. | |
| Haptic feedback | ||
| Digital movement supported | ||
| Simultaneous controller+KB/M | Occasionally changes button prompts |
Audio

| Audio feature | State | Notes |
|---|---|---|
| Separate volume controls | ||
| Surround sound | 5.1 but center channel is flaky[15] | |
| Subtitles | ||
| Closed captions | ||
| Mute on focus lost |
Localizations
| Language | UI | Audio | Sub | Notes |
|---|---|---|---|---|
| English | ||||
| Czech | ||||
| French | Unofficial patch. | |||
| German | ||||
| Hungarian | ||||
| Italian | ||||
| Polish | Available here. | |||
| Russian | Available here. | |||
| Spanish | ||||
| Portuguese | Download: 1, 2, 3 |
Independent UI and dubbing/captioning
| Instructions[16] |
|---|
Notes
|
VR support
| 3D modes | State | Notes | |
|---|---|---|---|
| Native 3D | |||
| Nvidia 3D Vision | |||
| TriDef 3D | |||
| iZ3D | |||
| vorpX | G3D, DirectVR Officially supported game, see official vorpx game list. |
||
| Devices | |||
|---|---|---|---|
| 3RD Space Gaming Vest | |||
Issues unresolved
The Knife of Dunwall: Crashing during the third act
The DLC appears to crash a lot for people in the third act, no solution.
Possible solution:
| Crash during third act[citation needed] |
|---|
|
The Knife of Dunwall: Low resolution textures on butchers
The game is using the low detail textures on butchers instead of the high detail textures.[17]
The Knife of Dunwall: Missing 2D image files
Generic placeholder images are replacing some 2D icons and images in-game.[18]
Game crash at startup
- Some users report that turning Steam Cloud off and on again solves the problem.
| Game crash at startup[citation needed] |
|---|
|
Issues fixed
Screen turns white or very bright randomly during gameplay

| Fix white/bright screen[citation needed] |
|---|
|
"First time setup" runs every time game is started
| Flag PhysX installation[19] |
|---|
|
Texture pop-in when switching weapons
| Instructions[citation needed] |
|---|
|
Controller hotplugging does not work
Run the game as an administrator, as detailed here.
Game options cannot be saved or loaded when using a controller
The game forces you to pick either keyboard/mouse or controller when you first open the main menu. Everything works fine with keyboard and mouse; however, with a controller, while the settings can be changed, they will never be saved and the game will reload the default settings every time a save file is loaded.
| Run the game executable as an administrator once[citation needed] |
|---|
|
"High Overseer Campbell" meeting chamber bug

- Opening the gate behind Overseer Martin during the "High Overseer Campbell" mission will trigger a bug with the main objective: High Overseer Campbell and Captain Curnow cut off their conversation too early, and everyone in the waiting area becomes alerted and rushes into the meeting chamber. The mission can still be completed, but several ways of solving the main objective are automatically failed.[20][21]
| Avoid opening the bugged gate[20][21] |
|---|
|
Complete the meeting chamber portion of the mission without opening the gate behind Overseer Martin (use climbing, Blink, or other methods to get inside without opening this particular gate). |
"Creating a Safe Haven" side objective doesn't complete
- After escorting the survivors past the Threat Zone, the game may still not give credit for the objective's completion. In order to successfully complete the quest, the player may need to perform the following action.
| Place weeper corpse in the safe zone[22][23] |
|---|
|
Return to the apartments and pick up a weeper corpse. Place this corpse in the safe zone with the other survivors. |
- After the objective is completed, do not turn on the nearby floodlights. Even though the survivors are no longer in the apartments, the objective will fail automatically when the tallboys begin to attack the apartments.[24]
Other information
API
| Technical specs | Supported | Notes |
|---|---|---|
| Direct3D | 9 | |
| Shader Model support | 3 |
| Executable | 32-bit | 64-bit | Notes |
|---|---|---|---|
| Windows |
Middleware
| Middleware | Notes | |
|---|---|---|
| Physics | PhysX, APEX | 2.8.4.6 1.0.0.0 |
| Audio | Wwise | |
| Interface | Scaleform | |
| Cutscenes | Bink Video | 1.9p |
Low end configuration
| Use custom settings[25][26] |
|---|
[SystemSettings] SkeletalLODDistanceFactorMultiplier=1 StaticLODDistanceFactorMultiplier=1 TextureForcedLODBias=0 iType_AntiAlias=0 bUseMaxQualityMode=False StaticDecals=False DynamicDecals=True UnbatchedDecals=False DecalCullDistanceScale=1.0 DynamicLights=False DynamicShadows=False LightEnvironmentShadows=False CompositeDynamicLights=False SHSecondaryLighting=False DirectionalLightmaps=True MotionBlur=False MotionBlurPause=False DepthOfField=False AmbientOcclusion=False Bloom=False UseHighQualityBloom=False bAllowLightShafts=False bAllowRatsShadow=False Distortion=False FilteredDistortion=False DropParticleDistortion=False bAllowDownsampledTranslucency=False SpeedTreeLeaves=False SpeedTreeFronds=False OnlyStreamInTextures=False LensFlares=False FogVolumes=False FloatingPointRenderTargets=True OneFrameThreadLag=True UseVsync=False UpscaleScreenPercentage=True Fullscreen=True AllowD3D10=False AllowRadialBlur=False SkeletalMeshLODBias=0 ParticleLODBias=0 DetailMode=1 ShadowFilterQualityBias=0 MaxAnisotropy=2 MaxMultisamples=1 MinShadowResolution=64 MinPreShadowResolution=8 MaxShadowResolution=800 MaxWholeSceneDominantShadowResolution=1344 ShadowFadeResolution=128 PreShadowFadeResolution=16 ShadowFadeExponent=.25 ResX=640 ResY=480 ScreenPercentage=100.000000 SceneCaptureStreamingMultiplier=1.000000 FoliageDrawRadiusMultiplier=1.000000 ShadowTexelsPerPixel=1.27324 PreShadowResolutionFactor=.5 bEnableVSMShadows=False bEnableBranchingPCFShadows=False bAllowHardwareShadowFiltering=False bAllowBetterModulatedShadows=False bEnableForegroundShadowsOnWorld=False bEnableForegroundSelfShadowing=False bAllowWholeSceneDominantShadows=False ShadowFilterRadius=2 ShadowDepthBias=.012 CSMSplitPenumbraScale=.5 CSMSplitSoftTransitionDistanceScale=4 CSMSplitDepthBiasScale=.7 UnbuiltWholeSceneDynamicShadowRadius=20000 UnbuiltNumWholeSceneDynamicShadowCascades=3 WholeSceneShadowUnbuiltInteractionThreshold=50 bAllowFracturedDamage=True NumFracturedPartsScale=1.0 FractureDirectSpawnChanceScale=1.0 FractureRadialSpawnChanceScale=1.0 FractureCullDistanceScale=1.0 bForceCPUAccessToGPUSkinVerts=false bDisableSkeletalInstanceWeights=false SpeakerConfiguration=0 TEXTUREGROUP_World=(MinLODSize=10,MaxLODSize=10,LODBias=0) TEXTUREGROUP_WorldNormalMap=(MinLODSize=10,MaxLODSize=10,LODBias=0) TEXTUREGROUP_WorldSpecular=(MinLODSize=10,MaxLODSize=10,LODBias=0) TEXTUREGROUP_Character=(MinLODSize=10,MaxLODSize=10,LODBias=0) TEXTUREGROUP_CharacterNormalMap=(MinLODSize=10,MaxLODSize=10,LODBias=0) TEXTUREGROUP_CharacterSpecular=(MinLODSize=10,MaxLODSize=10,LODBias=0) TEXTUREGROUP_Weapon=(MinLODSize=10,MaxLODSize=10,LODBias=0) TEXTUREGROUP_WeaponNormalMap=(MinLODSize=10,MaxLODSize=10,LODBias=0) TEXTUREGROUP_WeaponSpecular=(MinLODSize=10,MaxLODSize=10,LODBias=0) TEXTUREGROUP_Vehicle=(MinLODSize=10,MaxLODSize=10,LODBias=0) TEXTUREGROUP_VehicleNormalMap=(MinLODSize=10,MaxLODSize=10,LODBias=0) TEXTUREGROUP_VehicleSpecular=(MinLODSize=10,MaxLODSize=10,LODBias=0) TEXTUREGROUP_Cinematic=(MinLODSize=10,MaxLODSize=10,LODBias=0) TEXTUREGROUP_Effects=(MinLODSize=10,MaxLODSize=10,LODBias=0) TEXTUREGROUP_EffectsNotFiltered=(MinLODSize=10,MaxLODSize=10,LODBias=0,MinMagFilter=aniso,MipFilter=linear) TEXTUREGROUP_Skybox=(MinLODSize=10,MaxLODSize=10,LODBias=0) TEXTUREGROUP_UI=(MinLODSize=10,MaxLODSize=10,LODBias=0) TEXTUREGROUP_Lightmap=(MinLODSize=10,MaxLODSize=10,LODBias=0) TEXTUREGROUP_Shadowmap=(MinLODSize=10,MaxLODSize=10,LODBias=0,NumStreamedMips=3) TEXTUREGROUP_RenderTarget=(MinLODSize=10,MaxLODSize=10,LODBias=0) TEXTUREGROUP_MobileFlattened=(MinLODSize=10,MaxLODSize=10,LODBias=0) TEXTUREGROUP_ProcBuilding_Face=(MinLODSize=10,MaxLODSize=10,LODBias=0,MinMagFilter=aniso,MipFilter=linear) TEXTUREGROUP_ProcBuilding_LightMap=(MinLODSize=10,MaxLODSize=10,LODBias=0,MinMagFilter=aniso,MipFilter=linear) TEXTUREGROUP_Terrain_Heightmap=(MinLODSize=10,MaxLODSize=10,LODBias=0,MinMagFilter=aniso,MipFilter=linear) TEXTUREGROUP_Terrain_Weightmap=(MinLODSize=10,MaxLODSize=10,LODBias=0,MinMagFilter=aniso,MipFilter=linear) |
Increase Texture Quality and Turn Off Texture Streaming
| Edit Configuration File[citation needed] |
|---|
MipFadeInSpeed0=0
MipFadeOutSpeed0=0
MipFadeInSpeed1=0
MipFadeOutSpeed1=0
StopIncreasingLimit=20
MinTimeToGuaranteeMinMipCount=0
MaxTimeToGuaranteeMinMipCount=0
OnlyStreamInTextures=True
PoolSize=0
LoadMapTimeLimit=999
LightmapStreamingFactor=0
ShadowmapStreamingFactor=0
bAllowSwitchingStreamingSystem=False
UseDynamicStreaming=False
SkeletalLODDistanceFactorMultiplier=0
StaticLODDistanceFactorMultiplier=0
TextureForcedLODBias=0
DetailMode=4
|
Increase Shadows Quality
| Edit Configuration File[citation needed] |
|---|
ShadowFilterQualityBias=0 MinShadowResolution=2048 MaxShadowResolution=4096 bAllowWholeSceneDominantShadows=True MaxWholeSceneDominantShadowResolution=4096 ShadowTexelsPerPixel=0 |
Stop bodies from disappearing
| Increase Default Number of Bodies In Areas[citation needed] |
|---|
|
Display/Hide HUD
| Instructions[citation needed] |
|---|
|
Mute Note/Book Reading Ambient Sound Effect
| Mute Note/Book Reading SE[citation needed] |
|---|
|
Mute all Powers Sound Effects
| Mute Powers SFX[citation needed] |
|---|
|
Change sprint/run from hold to toggle
| Change default sprint/run behavior from a hold to a toggle, activated while moving, no need to hold down button[citation needed] |
|---|
|
| Adds "Statistics" button in pause menu, so it is possible to check statistics mid-mission. |
|---|
Notes
|
Custom Health/Mana regen
| Changes Health/Mana regeneration limits to allow full regeneration. |
|---|
Notes
|
Add Nonlethal Drop Takedown
| Allows you to knock enemies out nonlethally by dropping on their heads from a sufficient height. |
|---|
|
Download the mod here, then extract |
System requirements
| Windows | ||
|---|---|---|
| Minimum | Recommended | |
| Operating system (OS) | Vista, 7 | |
| Processor (CPU) | 3.0 GHz Dual Core | 2.4 GHz Quad Core |
| System memory (RAM) | 3 GB | 4 GB |
| Hard disk drive (HDD) | 9 GB | |
| Video card (GPU) | Nvidia GeForce GTX 460 ATI Radeon HD 5850 512 MB of VRAM DirectX 9.0c compatible | 768 MB of VRAM |
| Sound (audio device) | Windows compatible | |
- Although official system requirements show Windows Vista as a minimum, the game does run on Windows XP.[27]
Notes
- ↑ 1.0 1.1 Notes regarding Steam Play (Linux) data:
- File/folder structure within this directory reflects the path(s) listed for Windows and/or Steam game data.
- Games with Steam Cloud support may also store data in
~/.steam/steam/userdata/<user-id>/205100/. - Use Wine's registry editor to access any Windows registry paths.
- The app ID (205100) may differ in some cases.
- Treat backslashes as forward slashes.
- See the glossary page for details on Windows data paths.
References
- ↑ 1.0 1.1 Dishonored Graphics (TWEAKS) - Page 32 - Steam Users' Forums (retrieved)
- ↑ WTF Is... - Dishonored ? - YouTube
- ↑ A look at Dishonored’s many UI options | Bethesda Blog
- ↑ Dishonored | Skip Game Intros Wiki | Fandom powered by Wikia
- ↑ Steam Community :: Group :: /r/ultrawidemasterrace Group
- ↑ https://youtube.com/watch?v=AxUq2p0udlk
- ↑ Dishonored stops responding and shows a very long error, and crashes to desktop. - PC - Bethesda Softworks Forums
- ↑ ToCA EDIT: Dishonored FOV Hack Released
- ↑ 9.0 9.1 How to change FOV in Dishonored - Reddit
- ↑ NVidia Profile Inspector - AA Flags - Google Drive
- ↑ https://www.forum-3dcenter.org/vbulletin/showpost.php?p=9522150&postcount=3433
- ↑ HBAO+ Compatibility Flags
- ↑ Original HBAO+ Post at Guru3D.com Forums
- ↑ Custom Xinput DLL with Impulse Trigger support on Xbox One Controllers
- ↑ PC Gaming Surround Sound Round-up
- ↑ HowTo: Play Dishonored with separate Voice/Text language :: Steam community discussions and extended by Mirh
- ↑ Blurry texture not loading in? - Steam community discussions
- ↑ Missing image files in new DLC - Steam community discussions
- ↑ First time setup every launch. - Steam Users' Forums (retrieved)
- ↑ 20.0 20.1 Overseer Campbell quest bug? :: Dishonored General Discussions
- ↑ 21.0 21.1 Dishonored Overseer Campbell Quest Gate Bug - YouTube
- ↑ Glitched out secondary mission "Creating a Safe Haven" - Dishonored Steam Discussions
- ↑ How to complete 'Creating a Safe Haven' (if bugged) - Youtube
- ↑ https://steamcommunity.com/app/205100/discussions/0/864948300007547523/?ctp=2 - Dishonored Steam Discussions
- ↑ Tweak-Fix | Dishonored | Framerate Boost For Very Low End PC's - YouTube
- ↑ Dishonored on super low graphics for low end computer - YouTube
- ↑ Dishonored on XP & XP x64 - Steam Users' Forums (retrieved)