Difference between revisions of "Batman: Arkham Asylum"
From PCGamingWiki, the wiki about fixing PC games
m (→Video) |
(Cleanup: removing sketchy, outdated, issues due to user error (just nuking settings files is not a fix...), issues with no recent occurences or unsourced issues + move things to right places on page) |
||
| Line 88: | Line 88: | ||
* High-framerate tweaks | * High-framerate tweaks | ||
* Advanced tweaks to improve performance & visual quality beyond what the original launcher allows. For more information about those specific tweaks, see this [https://steamcommunity.com/sharedfiles/filedetails/?id=1159691355 Steam guide] | * Advanced tweaks to improve performance & visual quality beyond what the original launcher allows. For more information about those specific tweaks, see this [https://steamcommunity.com/sharedfiles/filedetails/?id=1159691355 Steam guide] | ||
| − | |||
| − | |||
| − | |||
| − | |||
==Game data== | ==Game data== | ||
| Line 112: | Line 108: | ||
{{ii}} For converting saves from one version to another, see [[#Save game data migration|Save game data migration]]. | {{ii}} For converting saves from one version to another, see [[#Save game data migration|Save game data migration]]. | ||
{{--}} Steam save files are non-compatible with the Epic Games store version of the game. | {{--}} Steam save files are non-compatible with the Epic Games store version of the game. | ||
| + | {{++}} Steam saves are compatible with the GOG version, simply copy the save files from the Steam location to the GOG save data location.<ref>{{Refcheck|user=Hman360|date=2020-12-12}}</ref> | ||
===[[Glossary:Save game cloud syncing|Save game cloud syncing]]=== | ===[[Glossary:Save game cloud syncing|Save game cloud syncing]]=== | ||
| Line 129: | Line 126: | ||
|xbox cloud = | |xbox cloud = | ||
|xbox cloud notes = | |xbox cloud notes = | ||
| + | }} | ||
| + | |||
| + | ====Convert Games for Windows - LIVE to Steam==== | ||
| + | {{Image|Batman Arkham Asylum GFWL before.jpg|Save before editing}} | ||
| + | {{Image|Batman Arkham Asylum GFWL after.jpg|Modified save}} | ||
| + | {{Fixbox|description=Prepare to replace saves|ref={{cn|date=July 2016}}|fix= | ||
| + | # Start the game | ||
| + | # According to the name of your GFWL saves, make sure the corresponding slot is also occupied in-game | ||
| + | # Close game and Steam | ||
| + | # Delete <code>{{p|steam}}\userdata\{{p|uid}}\35140\remotecache.vdf</code> | ||
| + | }} | ||
| + | {{Fixbox|description=Use [https://steamcommunity.com/app/35140/discussions/0/792924412084641813/ GFWL-stripper]|ref={{cn|date=September 2016}}}} | ||
| + | {{Fixbox|description=Remove old GFWL file header|ref=<ref>[https://steamcommunity.com/app/200260/discussions/0/810938810549705289/ [How to!] Use old GFWL savegame in Steamwork version :: Batman: Arkham City GOTY General Discussions]</ref>|fix= | ||
| + | # Go to GFWL [[#Game data|save game data location]]. | ||
| + | # Open your desired <code>save''#''.sgd</code> with a hex editor such as [https://mh-nexus.de/en/downloads.php?product=HxD HxD]. | ||
| + | # Search for the first hex <code>00 00 01</code> instance not located in the initial part of the file where all values start with '''0''' | ||
| + | # Delete everything '''before''' this. | ||
| + | # Save files over the corresponding ones in <code>{{p|steam}}\userdata\{{p|uid}}\35140\remote\</code> | ||
| + | }} | ||
| + | |||
| + | ====Convert Xbox 360 to Epic Games Store==== | ||
| + | {{ii}} "0x" refers to hexadecimal values e.g. 0x10 means "the hexadecimal value 10 (decimal 16) NOT decimal 10". | ||
| + | |||
| + | {{Fixbox|description=Manual conversion with hex editor|ref=|fix= | ||
| + | # Make a note of the save(s) you want to use on the PC version as above i.e. save 0, 1, 2, and/or 3 | ||
| + | # Insert a USB flashdrive into your Xbox360 | ||
| + | # Use your Xbox360 Settings menu to copy your Arkham Asylum savegames to the drive | ||
| + | # Complete transfer of files to your PC - there will be a "Content" folder on your USB drive, and your saves will be in it, search for the files <code>save0.sgd</code>, <code>save1.sgd</code> etc depending on which you want to convert | ||
| + | # Open the save file you want to transfer in your hex editor | ||
| + | # Go to offset <code>0xD000</code>, or search for the first occurence of <code>0x9E2A83</code> - I have only seen this near position <code>0xD000</code> in my saves, but it may vary. | ||
| + | # Delete everything '''before''' position <code>0xD000</code> | ||
| + | # You should end up with a file starting with <code>0x00 0x00 0x01</code> | ||
| + | # Now scroll down the file until you hit a big block of 0x00s. How far you have to scroll depends on how much is in your savegame. It will be a big block, you can tell it's the right block because before it you'll see lots of game related words like Harpoon Gun, Objective, but afterwards just gibberish | ||
| + | # Look at the top of the of block of 00s and find the last <code>0x11</code> byte, this is the "end" of the real data. You may have 9 or so bytes of <code>0x00</code> before it | ||
| + | # Delete everything '''AFTER''' the <code>0x11</code> so that the <code>0x11</code> is now the last byte in the file | ||
| + | # Now make a note of the offset of the <code>0x11</code> - this is <code>Value A</code>. | ||
| + | # Go back to the start of the file. | ||
| + | # Insert 4 bytes of <code>00 00 00 00</code> at the start. | ||
| + | # Your file will now begin <code>00 00 00 00 00 00 01</code>... | ||
| + | # You now will change the 3rd byte. If <code>value A</code> is less than 0x10000 - it will be <code>01</code> i.e. your file will start <code>00 00 01 00</code>. If <code>value A</code> is more than 0x10000 - it will be <code>02</code> i.e. your file starts <code>00 00 02 00</code>. And presumably onwards to bigger depending on save length e.g. if A > 0x20000 use 03 and so on... In actual fact, I've tested this up to 09 - it's just important that it's more than 1 (or rather, more than the number of 0x10000 blocks length that your savegame is) - it seems to be just an initialisation size for some sort of uncompression buffer so needs to be at least big enough. | ||
| + | # Save your changes. | ||
| + | # Copy your edited save into the correct folder as documented above, or in MrJAG's video on [https://www.youtube.com/watch?v=7AxZW_LivvM Youtube - TUTORIAL Batman Arkham How To Install SaveGames] | ||
| + | }} | ||
| + | |||
| + | ====Convert Steam to Epic Games Store==== | ||
| + | {{Fixbox|description=Manual conversion with hex editor|ref=|fix= | ||
| + | # Open your save file in your hex editor. | ||
| + | # It will start with <code>00 00 01</code>. | ||
| + | # Insert the 4 bytes <code>00 00 01 00</code> at the start of the file, so it now starts <code>00 00 01 00 00 00 01</code> | ||
| + | # Save the file and transfer to the save folder as documented above. | ||
| + | |||
| + | '''Notes''' | ||
| + | {{ii}} If your save file is longer than 65kB, you may want to try 0x02 etc as documented in the Xbox360 section above. | ||
| + | {{ii}} Converting Epic to Steam is simply done by deleting the bytes added in step 3 and saving. | ||
}} | }} | ||
| Line 174: | Line 225: | ||
===Post-processing=== | ===Post-processing=== | ||
| − | {{ | + | {{Fixbox|description=Use [[#Batman Arkham Asylum Advanced Launcher|Batman Arkham Asylum Advanced Launcher]]|ref={{cn|date=2022-11-28|reason=}}|fix= |
| − | {{Fixbox|description=Disable depth of field|ref=|fix= | + | }} |
| + | {{Fixbox|description=Disable depth of field manually|ref={{cn|date=2022-11-28|reason=}}|fix= | ||
{{ii}} This disables the DOF effect as well as color grading in all areas of the game, leading to a clearer and more colorful image. | {{ii}} This disables the DOF effect as well as color grading in all areas of the game, leading to a clearer and more colorful image. | ||
# Go in Documents\Square Enix\Batman Arkham Asylum GOTY\BmGame\Config, open the bmengine.ini file with Notepad, and change DepthOfField=True to DepthOfField=False under the [SystemSettings] section. | # Go in Documents\Square Enix\Batman Arkham Asylum GOTY\BmGame\Config, open the bmengine.ini file with Notepad, and change DepthOfField=True to DepthOfField=False under the [SystemSettings] section. | ||
}} | }} | ||
| − | === | + | ====[https://steamcommunity.com/sharedfiles/filedetails/?id=1159691355 HD Texture Pack]==== |
| − | + | {{++}} Updates many low resolution textures | |
| − | + | * Textures installed to core game files | |
| − | |||
| − | |||
| − | |||
| − | |||
| − | |||
| − | |||
| − | |||
| − | |||
| − | |||
| − | |||
| − | |||
| − | |||
| − | |||
| − | |||
| − | |||
| − | |||
==Input== | ==Input== | ||
| Line 455: | Line 491: | ||
==Issues unresolved== | ==Issues unresolved== | ||
| − | |||
| − | |||
| − | |||
| − | |||
| − | |||
| − | |||
| − | |||
| − | |||
| − | |||
| − | |||
| − | |||
| − | |||
| − | |||
| − | |||
| − | |||
| − | |||
| − | |||
| − | |||
| − | |||
| − | |||
| − | |||
| − | |||
| − | |||
| − | |||
| − | |||
| − | |||
| − | |||
| − | |||
| − | |||
| − | |||
| − | |||
| − | |||
| − | |||
| − | |||
| − | |||
| − | |||
| − | |||
| − | |||
| − | |||
| − | |||
| − | |||
| − | |||
| − | |||
| − | |||
| − | |||
| − | |||
| − | |||
| − | |||
| − | |||
| − | |||
| − | |||
| − | |||
| − | |||
===Second cutscene before Joker boss battle (Jack Ryder Show clip) is skipped=== | ===Second cutscene before Joker boss battle (Jack Ryder Show clip) is skipped=== | ||
{{ii}} Right before the Joker boss battle at the end of the game, there are 2 cutscenes. The first one (Joker talking to Batman) will play, but the second one (a clip of the Jack Ryder Show) may be skipped. | {{ii}} Right before the Joker boss battle at the end of the game, there are 2 cutscenes. The first one (Joker talking to Batman) will play, but the second one (a clip of the Jack Ryder Show) may be skipped. | ||
| Line 523: | Line 506: | ||
'''Notes''' | '''Notes''' | ||
{{ii}} If you have previously edited {{file|BMEngine.ini}} for high frame rate, you will need to edit it manually. Set <code>PhysXLevel=2</code> to 1 (normal) or 0 (off). | {{ii}} If you have previously edited {{file|BMEngine.ini}} for high frame rate, you will need to edit it manually. Set <code>PhysXLevel=2</code> to 1 (normal) or 0 (off). | ||
| − | |||
| − | |||
| − | |||
| − | |||
| − | |||
| − | |||
| − | |||
| − | |||
| − | |||
| − | |||
| − | |||
| − | |||
| − | |||
| − | |||
| − | |||
| − | |||
| − | |||
| − | |||
| − | |||
| − | |||
| − | |||
| − | |||
| − | |||
}} | }} | ||
| Line 551: | Line 511: | ||
{{ii}} Effects such as cloth physics (other than Batman's cape), smoke, and small objects such as papers and leaves are not active despite PhysX being enabled. | {{ii}} Effects such as cloth physics (other than Batman's cape), smoke, and small objects such as papers and leaves are not active despite PhysX being enabled. | ||
| − | {{Fixbox|description=Install latest [http://www.nvidia.com/object/physx_system_software.html PhysX System Software]|ref={{cn|date=September 2016}}}} | + | {{Fixbox|description=Install latest [http://www.nvidia.com/object/physx_system_software.html PhysX System Software]|ref={{cn|date=September 2016}}fix= |
| + | }} | ||
==Other information== | ==Other information== | ||
| Line 628: | Line 589: | ||
}} | }} | ||
| − | === | + | ===Center Main Camera View=== |
| − | + | By default the game's main third-person camera view is off-center (i.e. the character stands at the left side of the screen). For those who prefer the character to be central to the screen, the camera position can be changed via an in-game console command. | |
| − | + | {{Fixbox|description=Center Camera View|ref=<ref>[https://web.archive.org/web/20210526235720/https://old.reddit.com/r/BatmanArkham/comments/9rf9aj/any_way_to_change_the_camera_to_centred_view_in/ Reddit /r/BatmanArkham Any way to change the camera to centred view in Arkham City?]</ref>|fix= | |
| − | + | <ol> | |
| − | + | <li>Go to <code>{{p|game}}\Binaries</code>. | |
| − | + | <li>Create a new text file in that folder named <code>center.txt</code> with the following content: | |
| − | + | <pre> | |
| − | + | set R3rdPersonCamera WalkCamConfig (StateFreeCameraSitOffsetMin=(X=0.000000,Y=0.000000,Z=0.000000),StateFreeCameraSitOffsetMax=(X=0.000000,Y=0.000000,Z=0.000000),StateFreeCameraPullOffset=(X=0.000000,Y=0.000000,Z=0.000000),CameraPivotOffset=(X=0.000000,Y=0.000000,Z=65.000000),ZoomedOffset=(X=0.000000,Y=0.000000,Z=80.000000),maxPitch=14500.000000,MinPitch=-100000.000000,MinFreeCameraDistance=300.000000,MaxFreeCameraDistance=300.000000,ShortCamSpringConst=250.000000,LongCamSpringConst=250.000000,DefaultCameraPitch=-910.000000,CameraSitOffsetPower=1.500000,bUseSeparate43Settings=True,StateFreeCamera43SitOffsetMax=(X=0.000000,Y=25.000000,Z=60.000000),StateFreeCamera43SitOffsetMin=(X=-100.000000,Y=67.000000,Z=-20.000000),bDontModifySitOffsetWhenLookingUp=False) | |
| − | + | </pre> | |
| − | + | <li>Go to the [[#Game data|configuration file(s) location]]. | |
| − | {{Fixbox|description= | + | <li>Open {{file|BMInput.ini}}. |
| − | + | <li>Under the <code>[Engine.PlayerInput]</code> section, add a new key binding line like the following: | |
| − | + | <pre>Bindings=(Name="F8",Command="exec center.txt", Shift=false, Control=false, Alt=false, bIgnoreShift=false, bIgnoreCtrl=false, bIgnoreAlt=false)</pre> | |
| − | + | <li>Launch the game and while playing press the key to center the camera. | |
| − | + | </ol> | |
| − | |||
| − | |||
| − | |||
| − | |||
| − | ==== | ||
| − | |||
| − | |||
| − | |||
| − | |||
| − | |||
| − | |||
| − | |||
| − | |||
| − | |||
| − | |||
| − | |||
| − | |||
| − | |||
| − | |||
| − | |||
| − | |||
| − | |||
| − | |||
| − | |||
| − | |||
| − | |||
| − | |||
| − | |||
| − | ==== | ||
| − | |||
| − | |||
| − | |||
| − | |||
| − | |||
| − | |||
'''Notes''' | '''Notes''' | ||
| − | {{ii}} | + | {{ii}} You will need to press the key once each time you launch the game. |
| − | {{ii}} | + | {{ii}} To add the command to an existing keybind, precede it with a pipe (<code><nowiki>|</nowiki></code>) character. For example, to make the {{key|F8}} key change the FOV and center the camera:<pre>Bindings=(Name="F8",Command="fov 110{{!}}exec center.txt", Shift=false, Control=false, Alt=false, bIgnoreShift=false, bIgnoreCtrl=false, bIgnoreAlt=false)</pre> |
}} | }} | ||
| − | |||
| − | |||
| − | |||
==System requirements== | ==System requirements== | ||
Revision as of 21:39, 28 November 2022
 |
|
| Developers | |
|---|---|
| Rocksteady Studios | |
| macOS (OS X) | Feral Interactive |
| Publishers | |
| Warner Bros. Interactive Entertainment | |
| Prior to 2010 | Eidos Interactive |
| OS X | Feral Interactive |
| Engines | |
| Unreal Engine 3 | |
| Release dates | |
| Windows | September 15, 2009 |
| macOS (OS X) | November 19, 2011 |
| Reception | |
| Metacritic | 91 |
| IGDB | 89 |
| Taxonomy | |
| Monetization | One-time game purchase |
| Microtransactions | None |
| Modes | Singleplayer |
| Pacing | Real-time |
| Perspectives | Third-person |
| Controls | Direct control |
| Genres | Action, Adventure, Metroidvania, Stealth |
| Art styles | Realistic |
| Themes | Contemporary, North America |
| Series | Batman: Arkham |
| Batman: Arkham | |
|---|---|
| Subseries of Batman | |
| Batman: Arkham Asylum | 2009 |
| Batman: Arkham City | 2011 |
| Batman: Arkham Origins | 2013 |
| Batman: Arkham Origins Blackgate Deluxe Edition | 2014 |
| Batman: Arkham Knight | 2015 |
| Batman: Arkham VR | 2017 |
| Suicide Squad: Kill the Justice League | 2024 |
Warnings
- For Games for Windows - LIVE on Windows 8 or later, install the latest Games for Windows - LIVE software.
Key points
- Play as the Joker and Prey in the Darkness DLCs have been ported to the OS X GOTY version.[1] The Windows version still requires manually downloading the files and patching the game's executable.
- An improved, fan-made launcher exists to replace the original one and allows to edit settings that the original launcher does not and features many extras. See BAA Advanced Launcher.
General information
- macOS developer minisite
- GOG.com Community Discussions for game series
- GOG.com Support Page
- Steam Community Discussions
Availability
| Source | DRM | Notes | Keys | OS |
|---|---|---|---|---|
| Retail | SecuROM 7 and Games for Windows - LIVE DRM.[Note 1] Custom DRM code may sabotage the game by disabling the glider cape, rendering several areas inaccessible. |
|||
| Epic Games Store | Game of the Year Edition. DRM-free when launched directly from executable.[2] |
|||
| Game of the Year Edition. | ||||
| GOG.com | Game of the Year Edition. | |||
| Green Man Gaming | Game of the Year Edition. | |||
| Humble Store | Game of the Year Edition. | |||
| Steam | Game of the Year Edition. Make a shortcut to ShippingPC-BmGame.exe, then add -nosteam to the end of the Target field. Save data will now save to Documents\Square Enix; Challenge maps may crash the game. | |||
| GamersGate (unavailable) | Game of the Year Edition. | |||
| Games for Windows Marketplace (unavailable) | SecuROM PA DRM.[3] | |||
| Origin (unavailable) | Game of the Year Edition. |
- SecuROM PA and Games for Windows - LIVE DRM were removed from the Steam version in 2013.
- A demo is available here as well as on Steam.
- The Mac OS X version is no longer sold digitally.
- The non-GOTY version upgrades to GOTY when activated on Steam. If this is not possible, contact WB Games' support.
Essential improvements
Skip intro videos
- Not necessary if using the Batman Arkham Asylum Advanced Launcher as it provides a toggle that allows to disable startup movies easily.
| Delete or rename video files[4] |
|---|
|
Batman Arkham Asylum Advanced Launcher
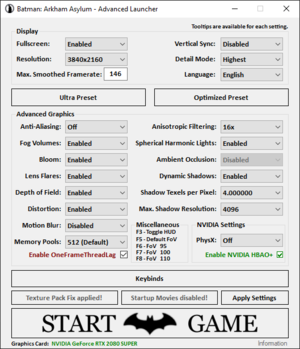
- This custom launcher replaces the original one and includes all the features from the vanilla launcher along with common tweaks with a user-friendly GUI.
- Supports Steam GOTY, Epic Games Store GOTY and GOG GOTY releases
- Provides a toggle for skipping intro videos
- Streamlines enabling HBAO+ on Nvidia cards without going through Nvidia Profile Inspector (AO flag used: 0x00000030)
- Common tweaks like key binds for different FOV values & HUD toggle
- High-framerate tweaks
- Advanced tweaks to improve performance & visual quality beyond what the original launcher allows. For more information about those specific tweaks, see this Steam guide
Game data
Configuration file(s) location
| System | Location |
|---|---|
| Windows | %USERPROFILE%\Documents\Square Enix\Batman Arkham Asylum GOTY\BmGame\Config\ |
| macOS (OS X) | |
| Steam Play (Linux) | <SteamLibrary-folder>/steamapps/compatdata/35140/pfx/[Note 2] |
Save game data location
| System | Location |
|---|---|
| Windows | %USERPROFILE%\Documents\Square Enix\Batman Arkham Asylum GOTY\SaveData\ |
| macOS (OS X) | ~/Library/Application Support/Feral Interactive/Batman Arkham City GOTY/Save Data/ |
| Steam | <Steam-folder>/userdata/<user-id>/35140/remote/ |
| Steam Play (Linux) | <SteamLibrary-folder>/steamapps/compatdata/35140/pfx/[Note 2] |
- The save subfolder is named with a long string of letters and numbers.
- For non-GOTY version, path for both configuration files and save data start with
%USERPROFILE%\Documents\Eidos\Batman Arkham Asylum\instead. - For converting saves from one version to another, see Save game data migration.
- Steam save files are non-compatible with the Epic Games store version of the game.
- Steam saves are compatible with the GOG version, simply copy the save files from the Steam location to the GOG save data location.[5]
Save game cloud syncing
| System | Native | Notes |
|---|---|---|
| Epic Games Launcher | ||
| GOG Galaxy | ||
| Origin | 1 GB available. | |
| OneDrive | Requires enabling backup of the Documents folder in OneDrive on all computers. | |
| Steam Cloud | Approx. 954 MB available. |
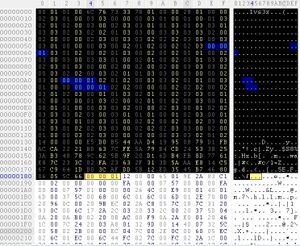
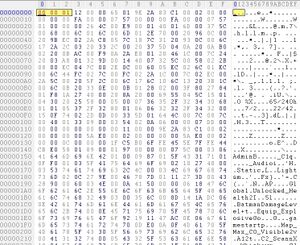
Convert Games for Windows - LIVE to Steam
| Prepare to replace saves[citation needed] |
|---|
|
| Use GFWL-stripper[citation needed] |
|---|
| Remove old GFWL file header[6] |
|---|
|
Convert Xbox 360 to Epic Games Store
- "0x" refers to hexadecimal values e.g. 0x10 means "the hexadecimal value 10 (decimal 16) NOT decimal 10".
| Manual conversion with hex editor |
|---|
|
Convert Steam to Epic Games Store
| Manual conversion with hex editor |
|---|
Notes
|
Video
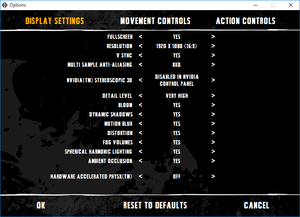
- Video settings can only be changed in the launcher
| Graphics feature | State | WSGF | Notes |
|---|---|---|---|
| Widescreen resolution | |||
| Multi-monitor | Check here if you have broken cutscene | ||
| Ultra-widescreen | Some cutscenes are pillar-boxed. | ||
| 4K Ultra HD | Subtitles are extremely small in resolutions higher than 1080p and nearly unreadable. The rest of the UI scales well. | ||
| Field of view (FOV) | Use BAA Advanced Launcher. | ||
| Windowed | In launcher, click settings. Doesn't properly capture mouse, may click background windows by accident.[citation needed] | ||
| Borderless fullscreen windowed | |||
| Anisotropic filtering (AF) | Use BAA Advanced Launcher. | ||
| Anti-aliasing (AA) | Up to 16xQ MSAA. Nvidia users only. AMD users must use BAA Advanced Launcher for antialiasing. up to 4x MSAA, 8xQ crashes the game. Nvidia users can force SGSSAA in Nvidia Profile Inspector with the 0x080000C1 antialiasing compatibility flag.[7] |
||
| Vertical sync (Vsync) | Set via launcher. | ||
| 60 FPS | |||
| 120+ FPS | Capped at 62 FPS. Use BAA Advanced Launcher to change the cap. | ||
| High dynamic range display (HDR) | See the glossary page for potential alternatives. | ||
Post-processing
| Use Batman Arkham Asylum Advanced Launcher[citation needed] |
|---|
| Disable depth of field manually[citation needed] |
|---|
|
HD Texture Pack
- Updates many low resolution textures
- Textures installed to core game files
Input
| Keyboard and mouse | State | Notes |
|---|---|---|
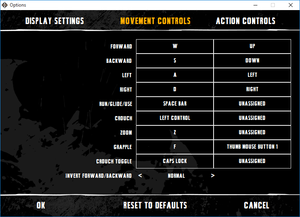
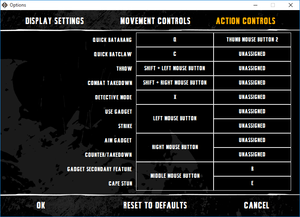
| Remapping | Remappable in the launcher | |
| Mouse acceleration | ||
| Mouse sensitivity | See Mouse sensitivity. | |
| Mouse input in menus | ||
| Mouse Y-axis inversion | ||
| Controller | ||
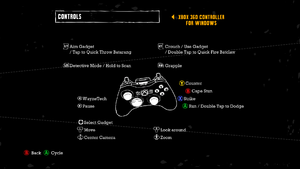
| Controller support | XInput supported, DirectInput has some mapping issues. | |
| Full controller support | ||
| Controller remapping | See the glossary page for potential workarounds. | |
| Controller sensitivity | ||
| Controller Y-axis inversion |
| Controller types |
|---|
| XInput-compatible controllers | ||
|---|---|---|
| Xbox button prompts | ||
| Impulse Trigger vibration |
| PlayStation controllers | ||
|---|---|---|
| PlayStation button prompts | Use this mod. | |
| Light bar support | ||
| Adaptive trigger support | ||
| DualSense haptic feedback support | ||
| Connection modes | ||
| Tracked motion controllers | Supports the Razer Hydra.[citation needed] | |
|---|---|---|
| Button/gesture prompts |
| Generic/other controllers | DirectInput has some mapping issues. | |
|---|---|---|
| Button prompts |
| Additional information | ||
|---|---|---|
| Controller hotplugging | ||
| Haptic feedback | ||
| Digital movement supported | ||
| Simultaneous controller+KB/M | [8] |
| Steam Input | ||
|---|---|---|
| Steam Input API support | ||
| Hook input (legacy mode) | ||
| Official controller preset(s) | ||
| Steam Controller button prompts | ||
| Cursor detection |
Mouse sensitivity
| Change Mouse sensitivity[citation needed] |
|---|
Notes
|
Disable Mouse Smoothing
| Disable Mouse Smoothing[citation needed] |
|---|
|
Audio
| Audio feature | State | Notes |
|---|---|---|
| Separate volume controls | ||
| Surround sound | Dolby Digital 5.1[citation needed]; Analog 7.1 | |
| Subtitles | ||
| Closed captions | ||
| Mute on focus lost | ||
| Royalty free audio |
Localizations
| Language | UI | Audio | Sub | Notes |
|---|---|---|---|---|
| English | ||||
| Czech | Fan translation, download. | |||
| French | ||||
| German | ||||
| Hungarian | Fan translation, download. | |||
| Italian | ||||
| Japanese | Retail version, download. | |||
| Brazilian Portuguese | Fan translation, download. | |||
| Russian | Retail version, download. | |||
| Polish | Retail version, download. If the installer doesn't work download here. | |||
| Spanish | ||||
| Turkish | Fan translation, download. | |||
| Traditional Chinese |
VR support
| 3D modes | State | GG3D | Notes | |
|---|---|---|---|---|
| Native 3D | ||||
| Nvidia 3D Vision | Issues with glass effects; to fix use Helix Mod: Batman Arkham Asylum. | |||
| TriDef 3D | ||||
| iZ3D | ||||
| vorpX | G3D Officially supported game, see official vorpx game list. |
|||
Issues unresolved
Second cutscene before Joker boss battle (Jack Ryder Show clip) is skipped
- Right before the Joker boss battle at the end of the game, there are 2 cutscenes. The first one (Joker talking to Batman) will play, but the second one (a clip of the Jack Ryder Show) may be skipped.
| Restart from Checkpoint[citation needed] |
|---|
|
Extreme lag in second Scarecrow level
- Even on an otherwise capable machine this section can run at sub-20 fps.
| Turn PhysX to normal or off (the issue occurs on high)[citation needed] |
|---|
|
Notes
|
PhysX effects are not present in game despite setting being on "normal" or "high"
- Effects such as cloth physics (other than Batman's cape), smoke, and small objects such as papers and leaves are not active despite PhysX being enabled.
| Install latest PhysX System Software[citation needed]fix= |
|---|
Other information
API
| Technical specs | Supported | Notes |
|---|---|---|
| Direct3D | 9.0c | |
| OpenGL | 2.0 | OS X only. |
| Shader Model support | 3 |
| Executable | 32-bit | 64-bit | Notes |
|---|---|---|---|
| Windows | |||
| macOS (OS X) | [citation needed] |
Middleware
| Middleware | Notes | |
|---|---|---|
| Physics | PhysX | 2.8.1 |
| Audio | FMOD | |
| Interface | Scaleform | |
| Cutscenes | Bink Video | 1.9i |
Mods
Ex-exclusive PS3 DLCs
- This only works with Steam GOTY version & Epic Games GOTY version.
- You need to acquire the DLC files from the OS X version of the game.[9] The files are also available for download directly from PCGamingWiki.
| Use xdelta patch[citation needed] |
|---|
Notes
|
| Manually hex edit executable[10] |
|---|
|
Center Main Camera View
By default the game's main third-person camera view is off-center (i.e. the character stands at the left side of the screen). For those who prefer the character to be central to the screen, the camera position can be changed via an in-game console command.
| Center Camera View[11] |
|---|
Notes
|
System requirements
| Windows | ||
|---|---|---|
| Minimum | Recommended | |
| Operating system (OS) | XP, Vista, 7 | |
| Processor (CPU) | AMD Athlon 64 3500+ 2.2 GHz Intel Pentium 4 3.0 GHz |
AMD Athlon 64 X2 4600+ 2.4 GHz Intel Core 2 Duo E6600 2.4 GHz |
| System memory (RAM) | 1 GB (XP) 2 GB (Vista/7) |
2 GB |
| Hard disk drive (HDD) | 8 GB | |
| Video card (GPU) | ATI Radeon X1300 Nvidia GeForce 6600 256 MB of VRAM DirectX 9 compatible | ATI Radeon HD 3870 Nvidia GeForce 9800 GTX 512 MB of VRAM |
| macOS (OS X) | ||
|---|---|---|
| Minimum | Recommended | |
| Operating system (OS) | 10.9.5 | 10.10.3 |
| Processor (CPU) | 2.0 GHz | 2.4 GHz |
| System memory (RAM) | 4 GB | 8 GB |
| Hard disk drive (HDD) | 10 GB | 10 GB |
| Video card (GPU) | 256 MB of VRAM | 1 GB of VRAM |
Notes
- ↑ Games for Windows - LIVE DRM features: Legacy activation, supports local profiles.
- ↑ 2.0 2.1 Notes regarding Steam Play (Linux) data:
- File/folder structure within this directory reflects the path(s) listed for Windows and/or Steam game data.
- Games with Steam Cloud support may also store data in
~/.steam/steam/userdata/<user-id>/35140/. - Use Wine's registry editor to access any Windows registry paths.
- The app ID (35140) may differ in some cases.
- Treat backslashes as forward slashes.
- See the glossary page for details on Windows data paths.
References
- ↑ Batman Arkham City GOTY mac edition? :: Steam Community Discussions
- ↑ Verified by User:Baronsmoki on 2019-09-19
- ↑ Microsoft Games for Windows Marketplace - last accessed on 21 August 2022
- ↑ Skip Intro Movies - last accessed on 2020-11-16
- ↑ Verified by User:Hman360 on 2020-12-12
- ↑ [How to!] Use old GFWL savegame in Steamwork version :: Batman: Arkham City GOTY General Discussions
- ↑ List of anti-aliasing compatibility flags for Nvidia
- ↑ Verified by User:SojerManLan on 2021-04-20
- ↑ You CAN play as the Joker on PC! - Steam Users' Forums (retrieved)
- ↑ Batman Arkham Asylum • CS.RIN.RU - Steam Underground Community
- ↑ Reddit /r/BatmanArkham Any way to change the camera to centred view in Arkham City?

